Overview
My team of 4 software engineering students and I were tasked with enhancing a basic command line interface desktop addressbook application for our Software Engineering project. We chose to morph it into an all-in-one administration desktop application called AddMin+.
AddMin+ is specially designed to ease the workload of the admin staffs in event management companies by allowing them to effectively handle administrative tasks.
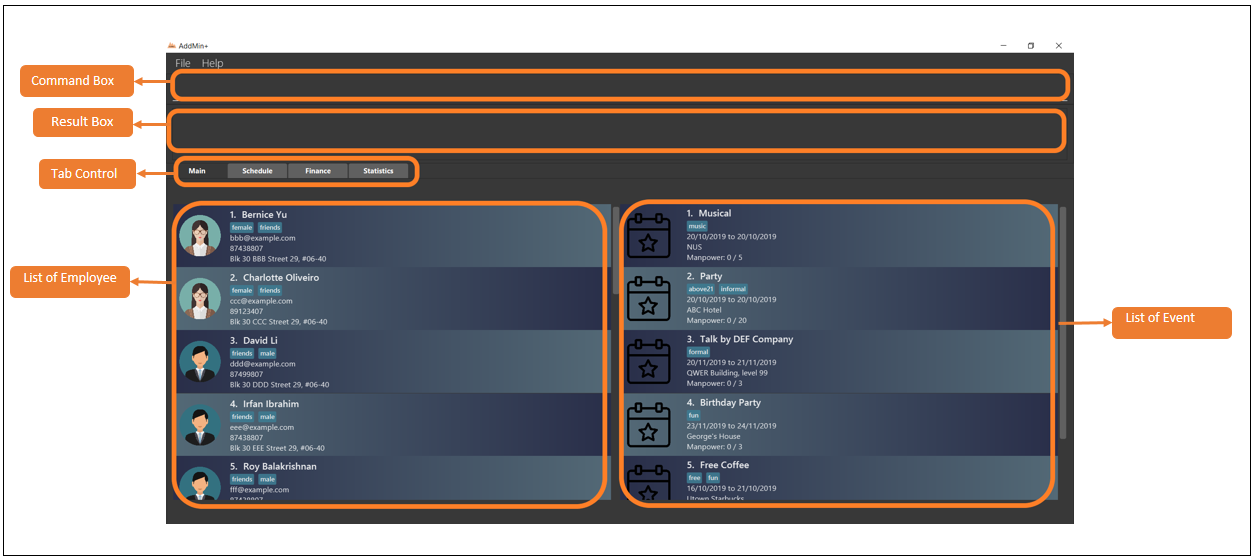
This is what our project looks like:
My role was to design and write the code for the association of employees with event, which includes everything from front-end display where users can see such an association to the back-end storage. One interesting point of this feature was the development of an algorithm which internally checks the schedule of individual employees and prevents schedule clashes.
The following sections illustrate these features in more detail, as well as the relevant documentation I have added to the user and developer guides in relation to these features.
Summary of contributions
-
Major feature: enabled the association of employees with events which includes automated/manual allocation of employees to event commands and a de-allocate command, as well as the viewing of the association via the fetch event command. All related commands have GUI features implemented.
-
What it does: This feature allows the user to allocate employees to events either manually or using a smart algorithm developed in AddMin+. The algorithm also ensures that employees cannot be allocated to events with conflicting time periods. The portable
Fetch Event Windowalso allows users to allocate events manpower in the differentTabsof AddMin+. -
Justification: This feature improves the product significantly because a user can now allocate employees to events, which is a key component for event management companies that our app is targeting. The algorithm used to check for conflicting schedule is also highly beneficial as users no longer have to waste precious time checking the availability of every individual employee. The GUI features further provide convenience for users who prefer using the mouse.
-
Highlights: This enhancement affects existing commands and commands to be added in the future. It required an in-depth analysis of design alternatives. The implementation too was challenging as it required the knowledge and understanding of both
EventandEmployeeclasses. The flexibility of the current design allows users to perform allocation commands in various environments in AddMin+.
-
-
Minor feature: added command history to allow user to view and navigate previous commands using up/down arrow keys.
-
Code contributed: [Functional code] [Test code] {links to collated code files}
-
Other contributions:
-
Project management:
-
Enhancements to existing features:
-
Updated GUI to show both employee and event list (Pull request #78)
-
-
Documentation:
-
Community:
-
Contributions to the User Guide
Event-Specific Management
Fetch Full Details of an Event: fetch_ev
Fetches an event by displaying a pop-up window with full details of the event.
The Fetch Event Window serves as a portable platform for event manpower allocation.
It can be accessed from the Main and Schedule Tab.
|
Format: fetch_ev EVENT_INDEX
Examples:
-
fetch_ev 2
Returns the 2rd event from the event list.
Alternatively, the fetch_ev command can be executed from the GUI in just 2 simple steps.
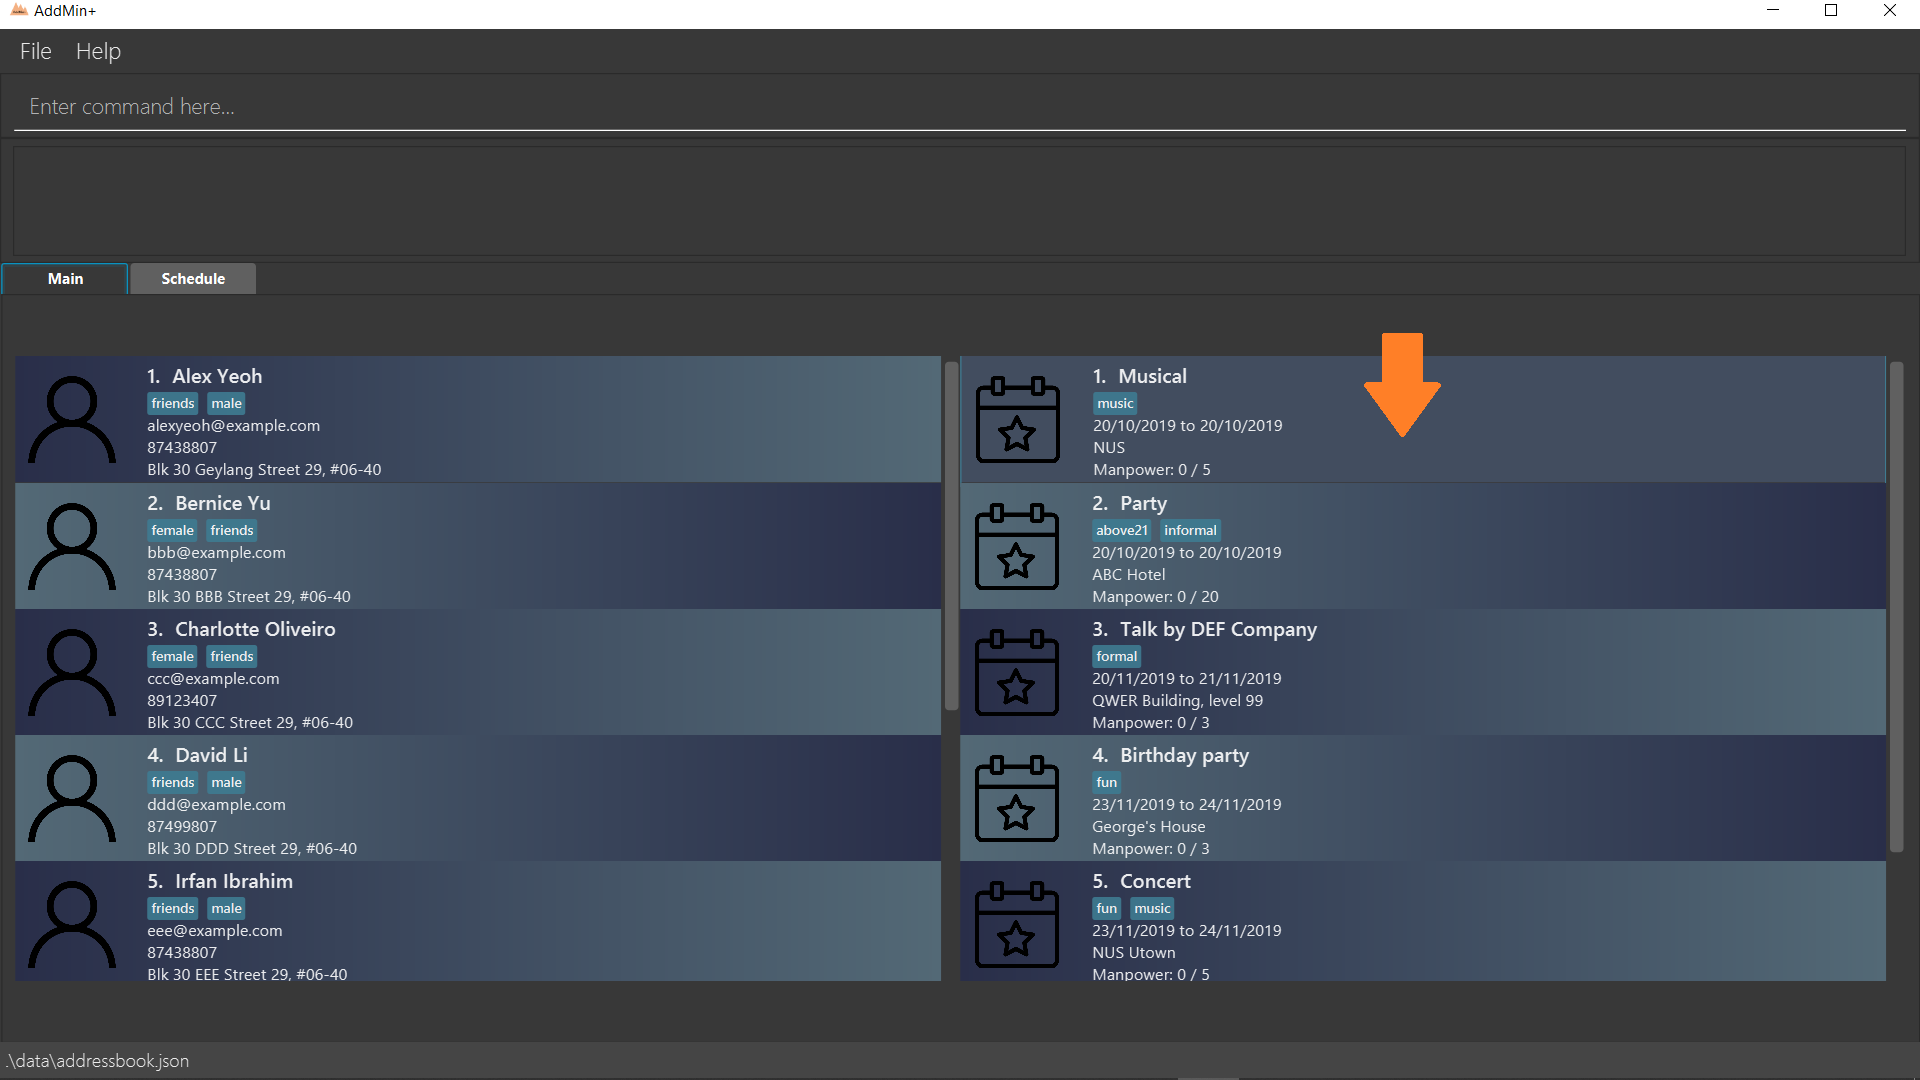
Step 1. Double-click the event card in the list as shown in the figure below:
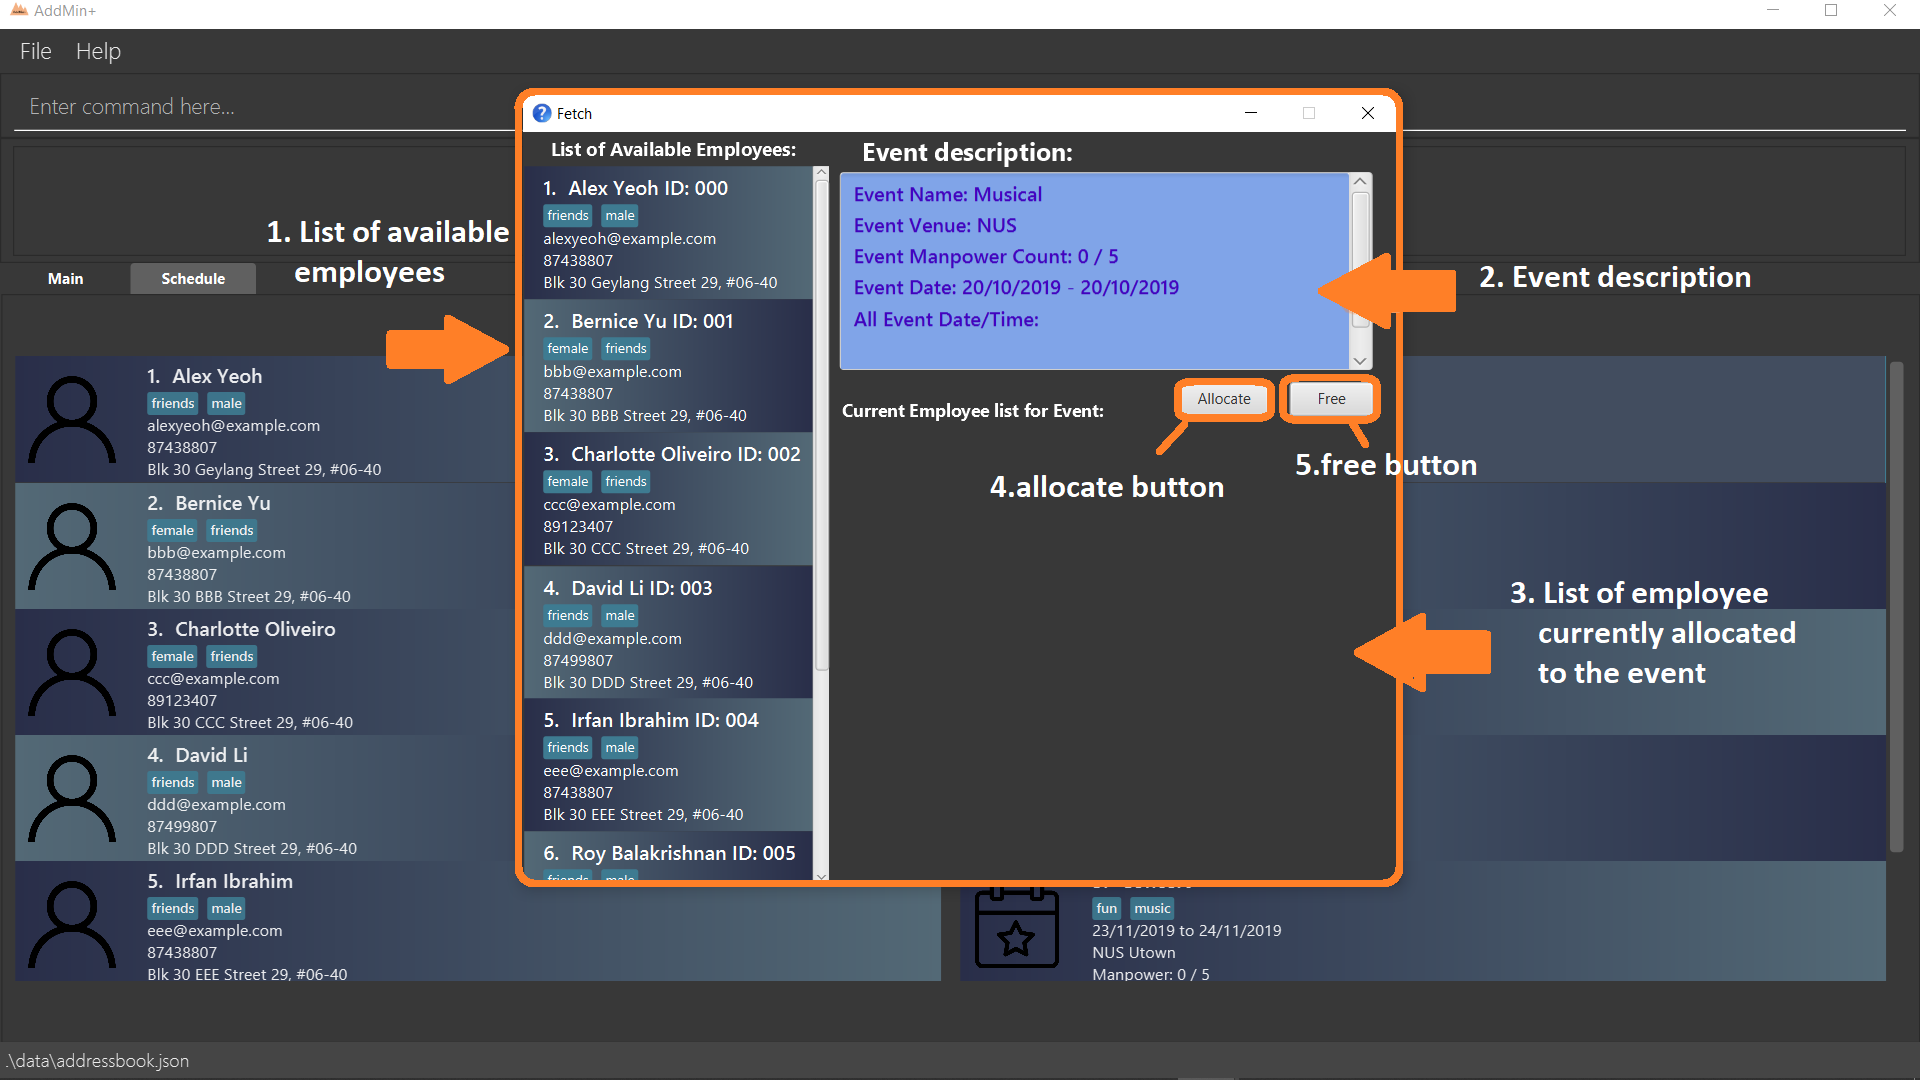
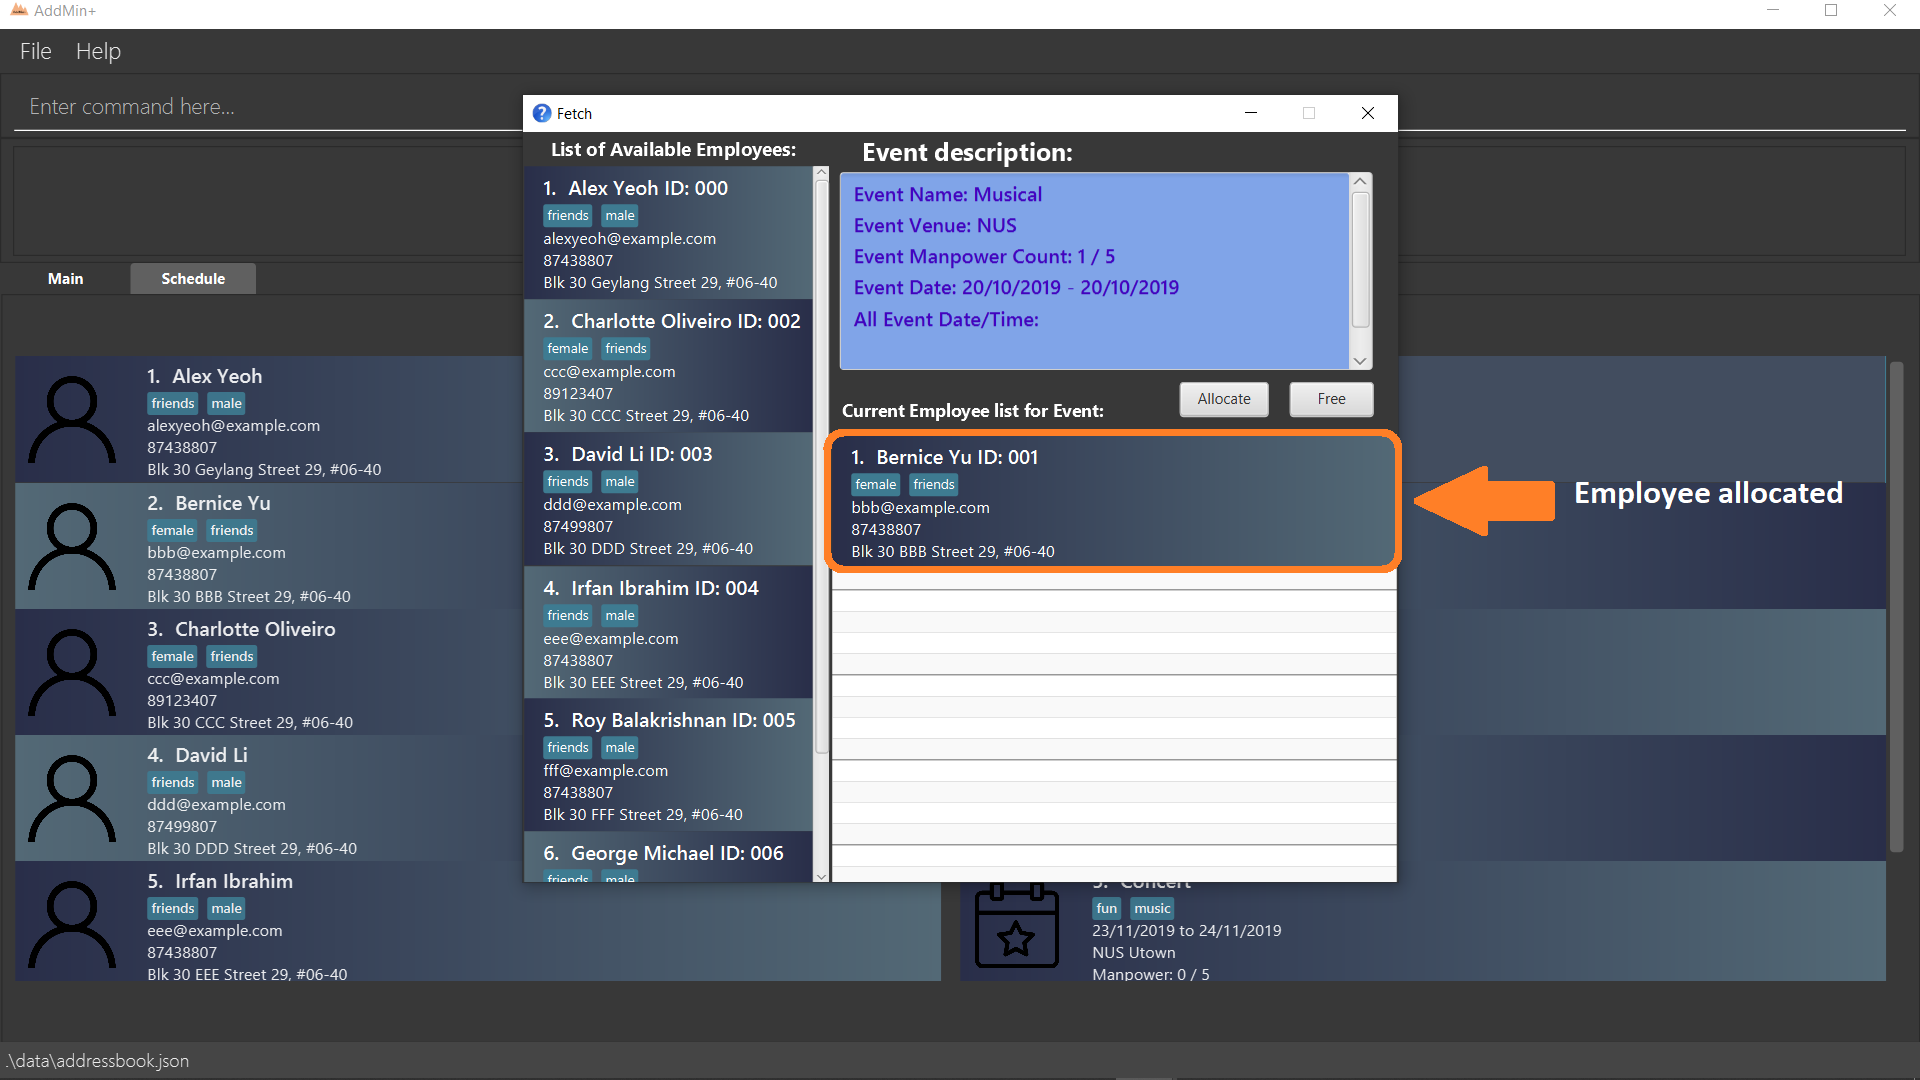
Step 2: After successfully fetching the event, the following Fetch Event Window should show:
Automated allocation of Employees to Events: allocate
Automatically allocates a specified number of employees from the complete employee list to an event based on the filter tags specified by the user. There is no manual selection of employees. Once an employee is allocated to an event, it is assumed that he will be unavailable from the start date to the end date of the event.
Format: allocate EVENT_INDEX [n/NUMBER_OF_EMPLOYEES] [t/TAG_FOR_FILTER]…
| Random selection of employees to allocate if supply exceeds demand of event. |
Examples:
-
allocate 1
Allocate available employees to the 1st event shown in the event list. -
allocate 2 n/3 t/female
Allocate 3 employees who are tagged as 'female' to the 2nd event shown in the event list.
Alternatively, the allocate command can be executed from the GUI in just 1 simple step!
Step 1: To perform a allocate command without number/filter specification, click the allocate button as shown in the Fetch Event Window in Fetch Full Details of an Event: fetch_ev.
Manual allocation of Employees to Events: allocatem
Manually chooses and allocates a single employee to an event.
Format: allocatem EVENT_INDEX n/EMPLOYEE_INDEX/ allocatem EVENT_INDEX id/EMPLOYEE_ID
Examples:
-
allocatem 1 n/2
Allocate the 2nd employee on the employee list to the 1st event on the event list. -
allocatem 1 id/002
Allocate the employee with id:"002" to the 1st event on the event list.
Alternatively, the allocatem command can be executed from the GUI in just 2 simple step!
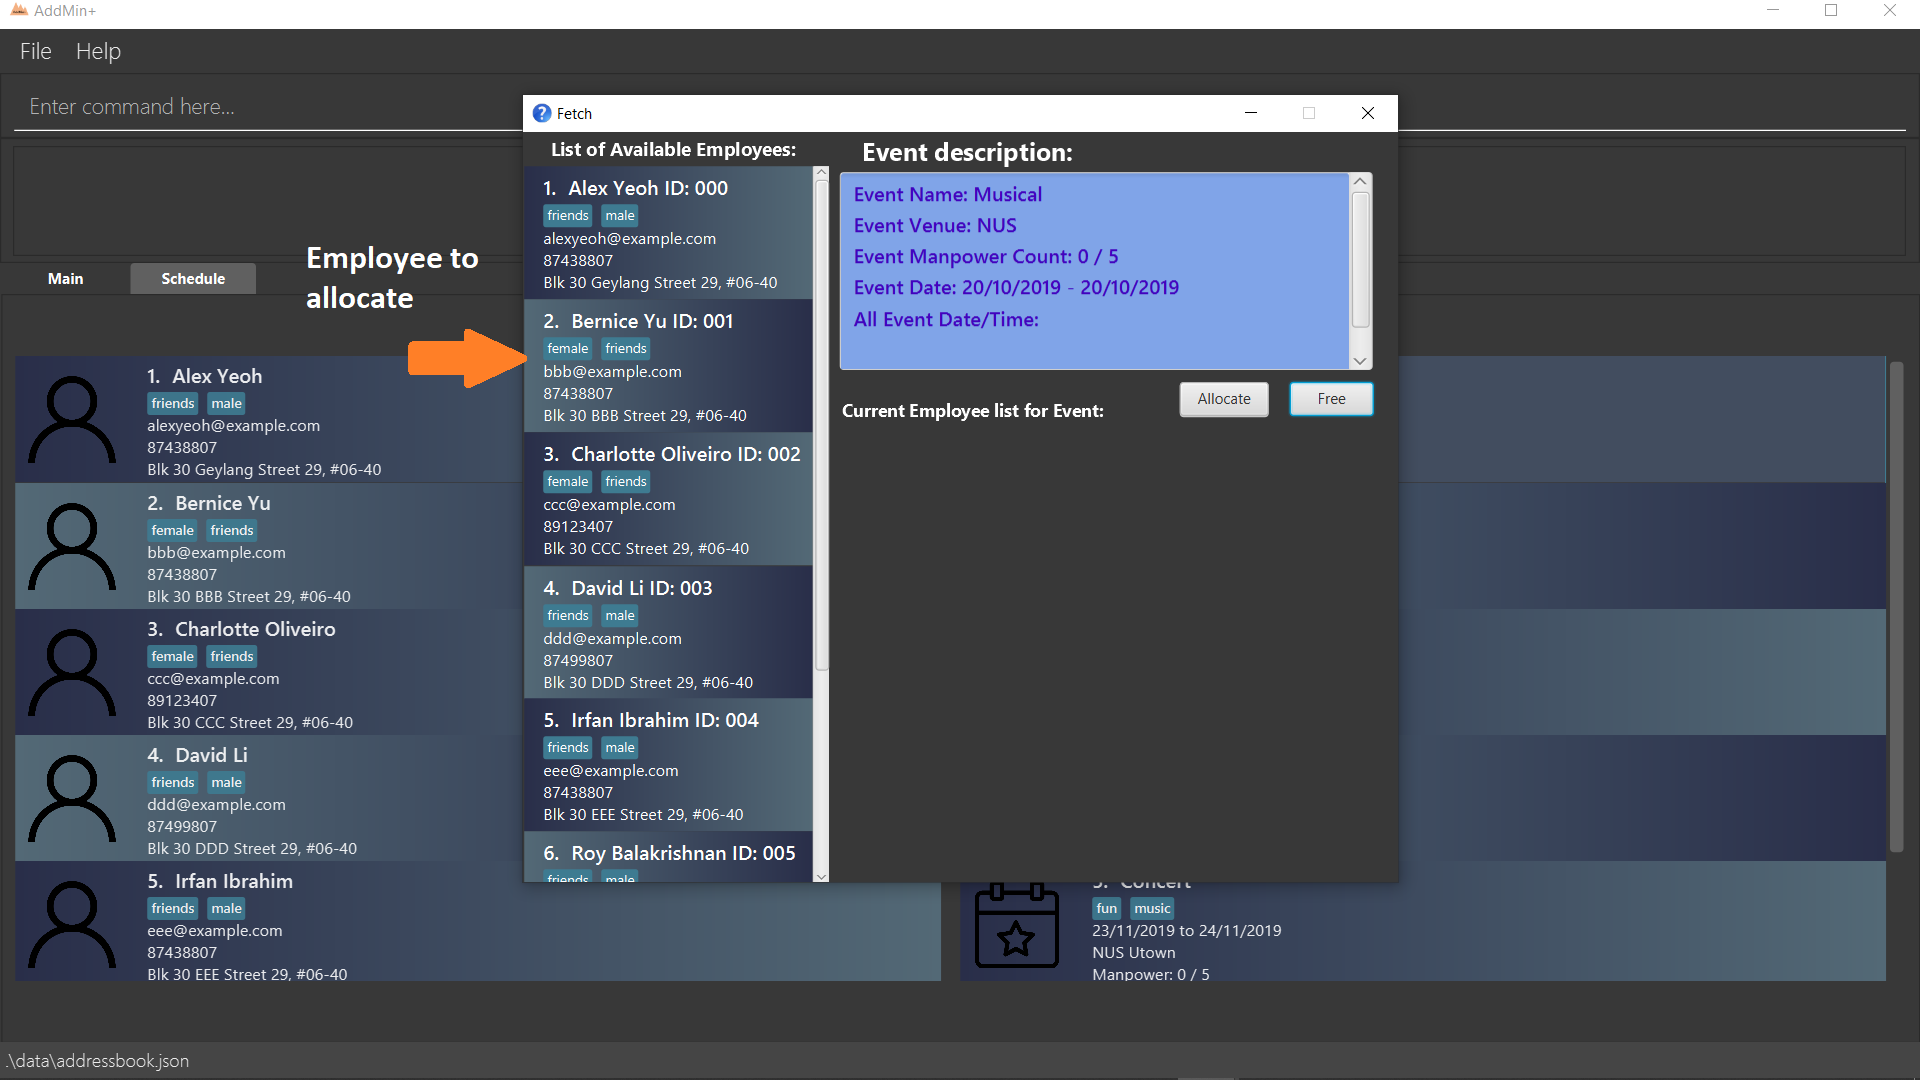
Step 1: Double-click the employee card on the left list. Notice the employee to allocate as shown in the following figure.
allocatem commandStep 2: Result after the allocatem command is shown below:
allocatem commandDe-allocation of Employees from Event: free
Free employees allocated to the event.
Format: free EVENT_INDEX [id/EMPLOYEE_ID]
Examples:
-
free 1
Free all employees allocated to the 1st event on the event list. -
free 1 id/001
Free an employee with id: "001" allocated to the 1st event on the event list.
Alternatively, the free command can be executed from the GUI in just 1 simple step!
Step 1: To perform a free command without ID specification, click the free button as shown in the Fetch Event Window in Fetch Full Details of an Event: fetch_ev.
To free a particular employee to an event, double-click the employee card on the right list as shown in the 2nd figure in Manual allocation of Employees to Events: allocatem
|
Contributions to the Developer Guide
Storage component
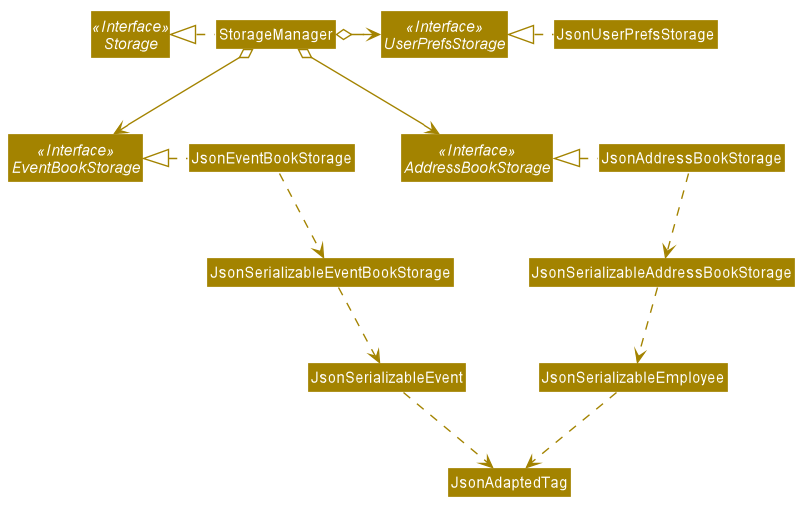
API : Storage.java
The Storage component,
-
can save
UserPrefobjects in json format and read it back. -
can save the App data in json format and read it back.
Automated allocation of Employees to Events feature
Implementation
The AutoAllocateCommand has an auto-allocation mechanism which is facilitated by methods in Event.
The AutoAllocateCommand takes in three arguments:
-
eventIndex- index of event in the displayed event list -
ManpowerCountToAdd- number of employees to allocate [optional] -
tagList- a set of tags to filter the employees [optional]
Additionally, the AutoAllocateCommand uses the following operations:
-
Event#isAvailableForEvent()— Checks if an employee is available for the event. -
AutoAllocateCommand#createAvailableEmployeeListForEvent()— Creates a list of employees available for the event, filtered by the tags specified by user. -
AutoAllocateCommand#getManpowerNeededByEvent()— Calculates the number of employees currently required by the event. -
AutoAllocateCommand#createEventAfterManpowerAllocation()— Creates a new event with an updated manpower list.
Given below is an example usage scenario and how the auto allocation mechanism behaves at each step.
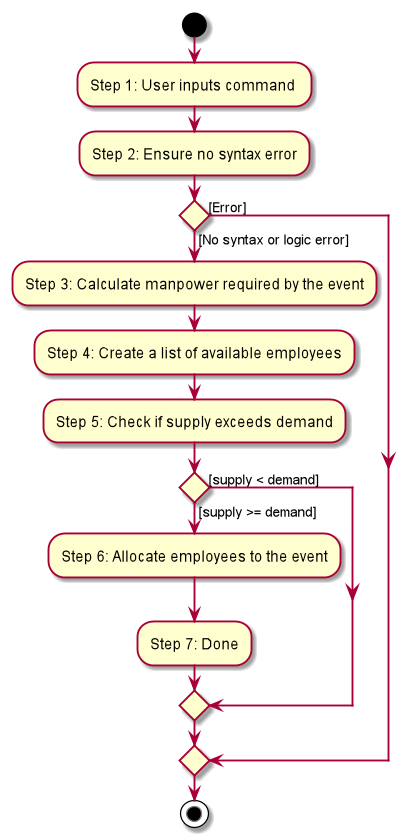
Step 1.
The user executes allocate 1 n/2 t/female with the intention to allocate 2 employees with tag [female]
to the 1st event displayed in the event list.
Step 2.
The command checks if eventIndex is valid and if ManpowerCountToAdd is specified.
The command also checks if the event still requires manpower, and if manpower count stated by user exceeds that needed by the event.
If ManpowerCountToAdd is not specified, it is assumed to be the maximum number possible for the event.
|
Step 3.
The command calls its own method AutoAllocateCommand#getManpowerNeededByEvent() to get the number of employees required by the specified event.
Step 4.
The command calls its own method AutoAllocateCommand#createAvailableEmployeeListForEvent() to create a filtered list of employees based on the tagList and if employee satisfies Event#isAvailableForEvent().
Step 5. The command checks if supply (generated in step 4) exceeds demand (generated in step 3) of the event.
| If demand exceeds supply, an exception will be thrown to the user. If the supply exceeds demand, employees will be randomly selected instead. |
Step 6.
The command calls Event#createEventAfterManpowerAllocation() to create a new event with an updated manpower list.
For storage purposes, only the Employee#EmployeeId is saved in the event’s manpower list.
|
Step 7. Done.
The following sequence diagram shows how the auto allocation works:
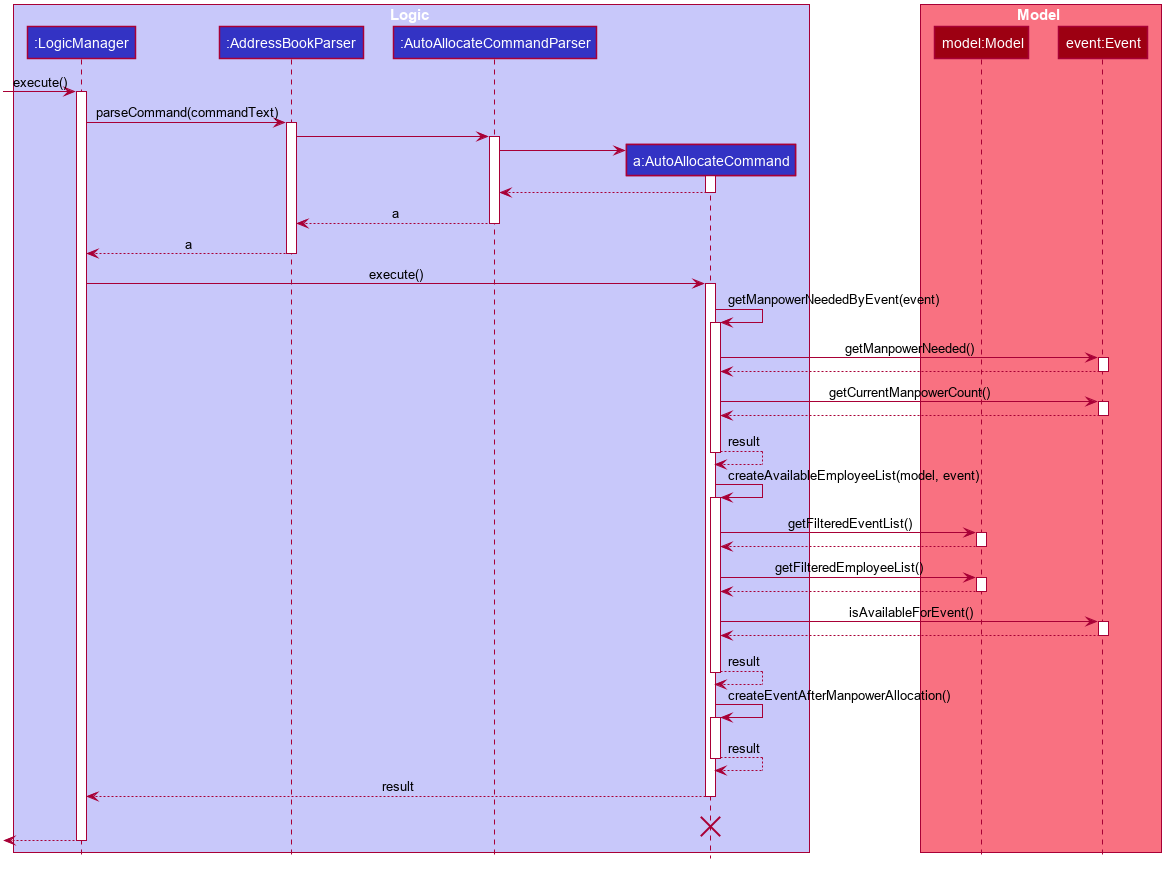
The lifeline for AutoAllocateCommand should end at the destroy marker (X) but due to a limitation of PlantUML, the lifeline reaches the end of diagram.
|
Design Considerations
Aspect: Storage of employees associated with event after successful command
| Feature | Alternative 1 | Alternative 2 |
|---|---|---|
Storage of employees associated with event after successful command |
Saves only the Pros: Easy to implement. Will use less memory. Cons: Future accesses require more time. I decided to proceed with this option because it has less dependencies on other classes which is is a good programming practice. |
Saves all fields of Pros: Easy retrieval in the future. Cons: Changes in |
Update of changes made to the manpower list of an event after the allocation of employees. |
Directly modifies the Pros: Easy to implement. Cons: May cause unwanted behaviours if testing is not done properly. |
Create a new event with a newly created and updated manpower list. Pros: Good programming practice. Cons: Harder to implement. I decided to proceed with this option because it complies with the Law of Demeter which states that objects should not navigate internal structures of other objects. |
Conclusion
Given the time constraints of only 6 weeks for this project, I feel that sufficient progress has been made to build a great app. However, the team has plans to turn AddMin+ into a truly revolutionary app that changes the entire administrative process.