By: CS2103T-T11-3 Since: AUG 2019 Licence: MIT
- 1. Introduction
- 2. Setting up
- 3. Design
- 4. Implementation
- 5. Logging
- 6. Documentation
- 7. Testing
- 8. Dev Ops
- Appendix A: Product Scope
- Appendix B: User Stories
- Appendix C: Use Cases
- Appendix D: Non Functional Requirements
- Appendix E: Glossary
- Appendix F: Instructions for Manual Testing
- F.1. Launch and Shutdown
- F.2. Deleting an employee
- F.3. Generating Schedule
- F.4. Display Schedule for Specific Date
- F.5. Display Schedule for Specific Month Year
- F.6. Display Schedule for between 2 specific date
- F.7. Event
- F.8. Generating Statistics
- F.9. Generating Detailed Statistics
- F.10. Saving data
- F.11. Undo payment made to an employee
1. Introduction
1.1. Purpose
This Developer Guide specifies the software architecture, design, and major implementation features of our Desktop Application, AddMin+.
1.2. Intended Audience
The intended audience of this Developer Guide is for fellow developers looking to contribute to this open-source project and the graders of the CS2103T module.
1.3. Software Description
AddMin+ is an all in one administration desktop application, specifically for use by small companies with limited administrative staff and would benefit from automating their menial administrative tasks.
The application primarily uses a Command Line Interface (CLI) and displays the results through a Graphical User Interface (GUI).
1.4. Using this Developer Guide
| LightBulbs indicate a Tip, something that is helpful to the reader |
| 'i' Icon indicate a Note that supplements useful information |
Text in a blue font and grey background indicates a hyperlink
Text with a grey background indicates Code Logic such as class objects, OOP definitions or user-input.
2. Setting up
Refer to the guide here.
3. Design
3.1. Architecture
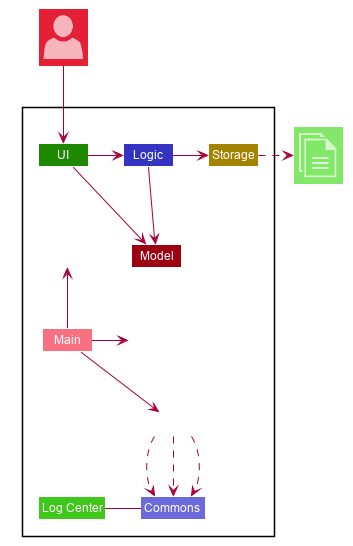
The Architecture Diagram given above explains the high-level design of the App. Given below is a quick overview of each component.
The .puml files used to create diagrams in this document can be found in the diagrams folder.
Refer to the Using PlantUML guide to learn how to create and edit diagrams.
|
-
At app launch: Initializes the components in the correct sequence, and connects them up with each other.
-
At shut down: Shuts down the components and invokes cleanup method where necessary.
Commons represents a collection of classes used by multiple other components.
The following class plays an important role at the architecture level:
-
LogsCenter: Used by many classes to write log messages to the App’s log file.
The rest of the App consists of four components.
Each of the four components
-
Defines its API in an
interfacewith the same name as the Component. -
Exposes its functionality using a
{Component Name}Managerclass.
For example, the Logic component (see the class diagram given below) defines it’s API in the Logic.java interface and exposes its functionality using the LogicManager.java class.
How the architecture components interact with each other
The Sequence Diagram below shows how the components interact with each other for the scenario where the user issues the command delete 1.
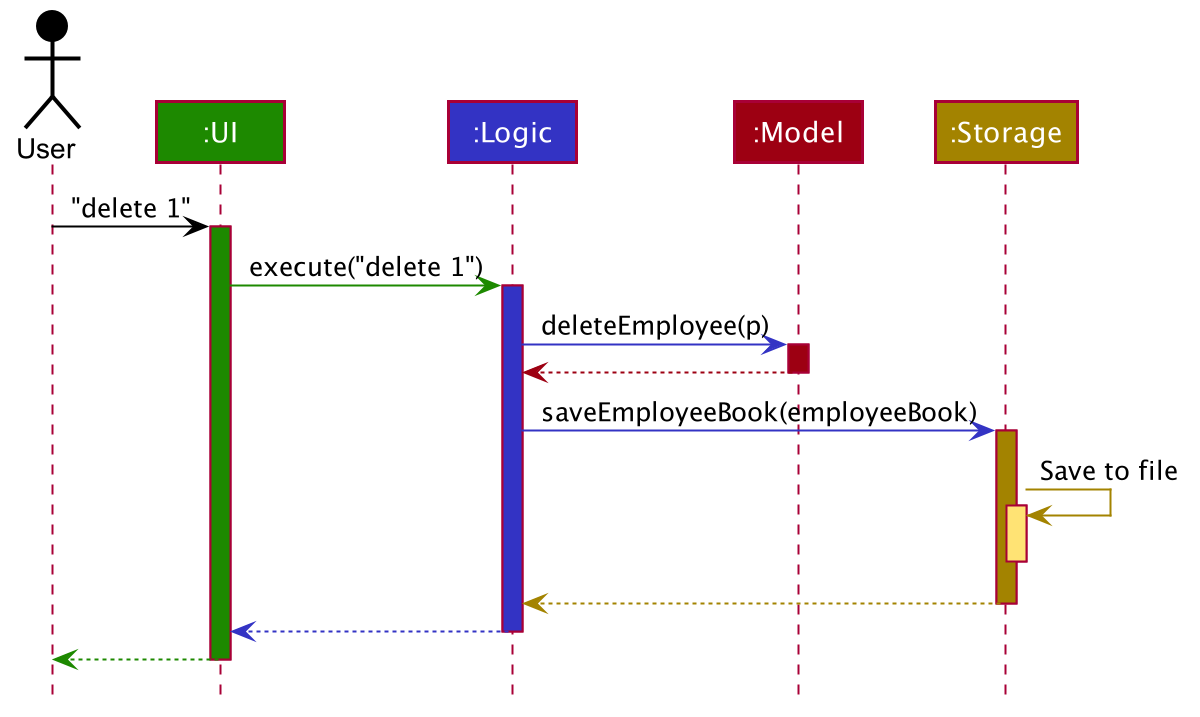
delete 1 commandThe sections below give more details of each component.
3.2. UI component
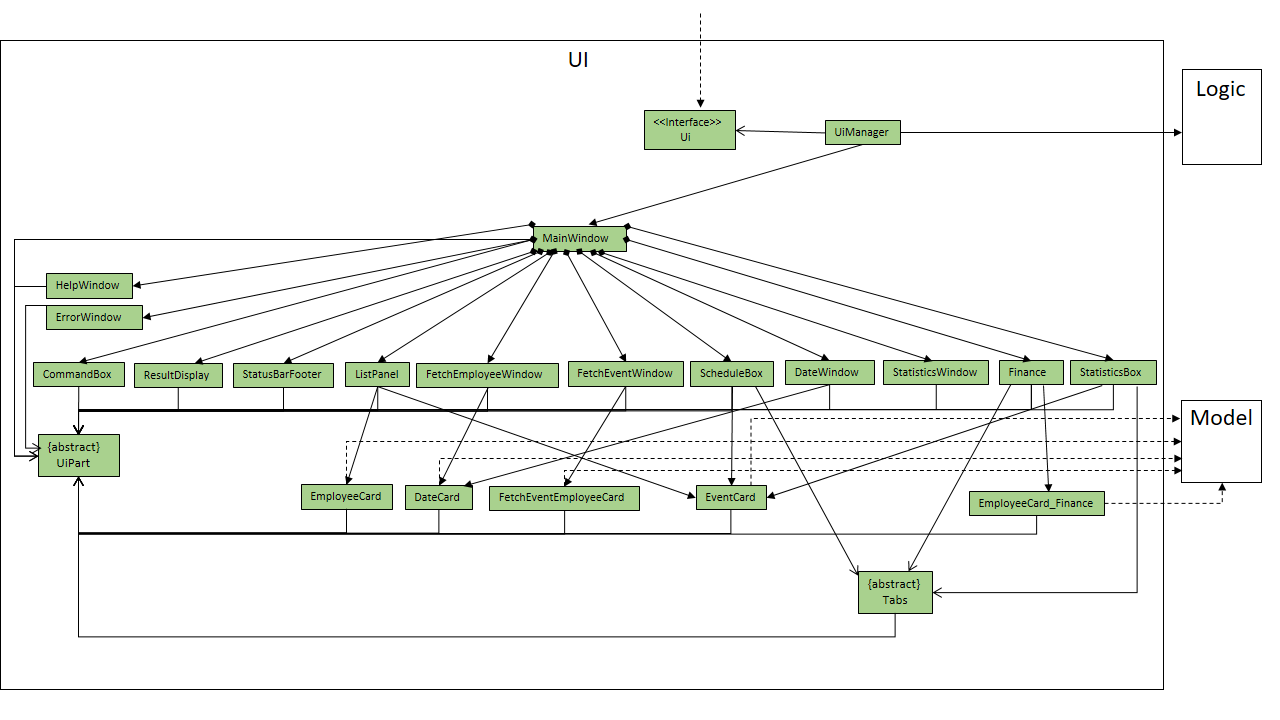
API : Ui.java
The UI consists of a MainWindow that is made up of parts e.g.CommandBox, ResultDisplay, ListPanel, StatusBarFooter etc.
All these, including the MainWindow, inherit from the abstract UiPart class.
There are also ScheduleBox, Finance, StatisticBox which are of the tabs in the TabPane of MainWindow, of which all of them inherits from the abstract class Tabs.
The abstract class Tabs also inherits from the abstract class UiPart.
The UI component uses JavaFx UI framework.
The layout of these UI parts are defined in matching .fxml files that are in the src/main/resources/view folder.
For example, the layout of the MainWindow is specified in MainWindow.fxml
The UI component,
-
Executes user commands using the
Logiccomponent. -
Listens for changes to
Modeldata so that the UI can be updated with the modified data.
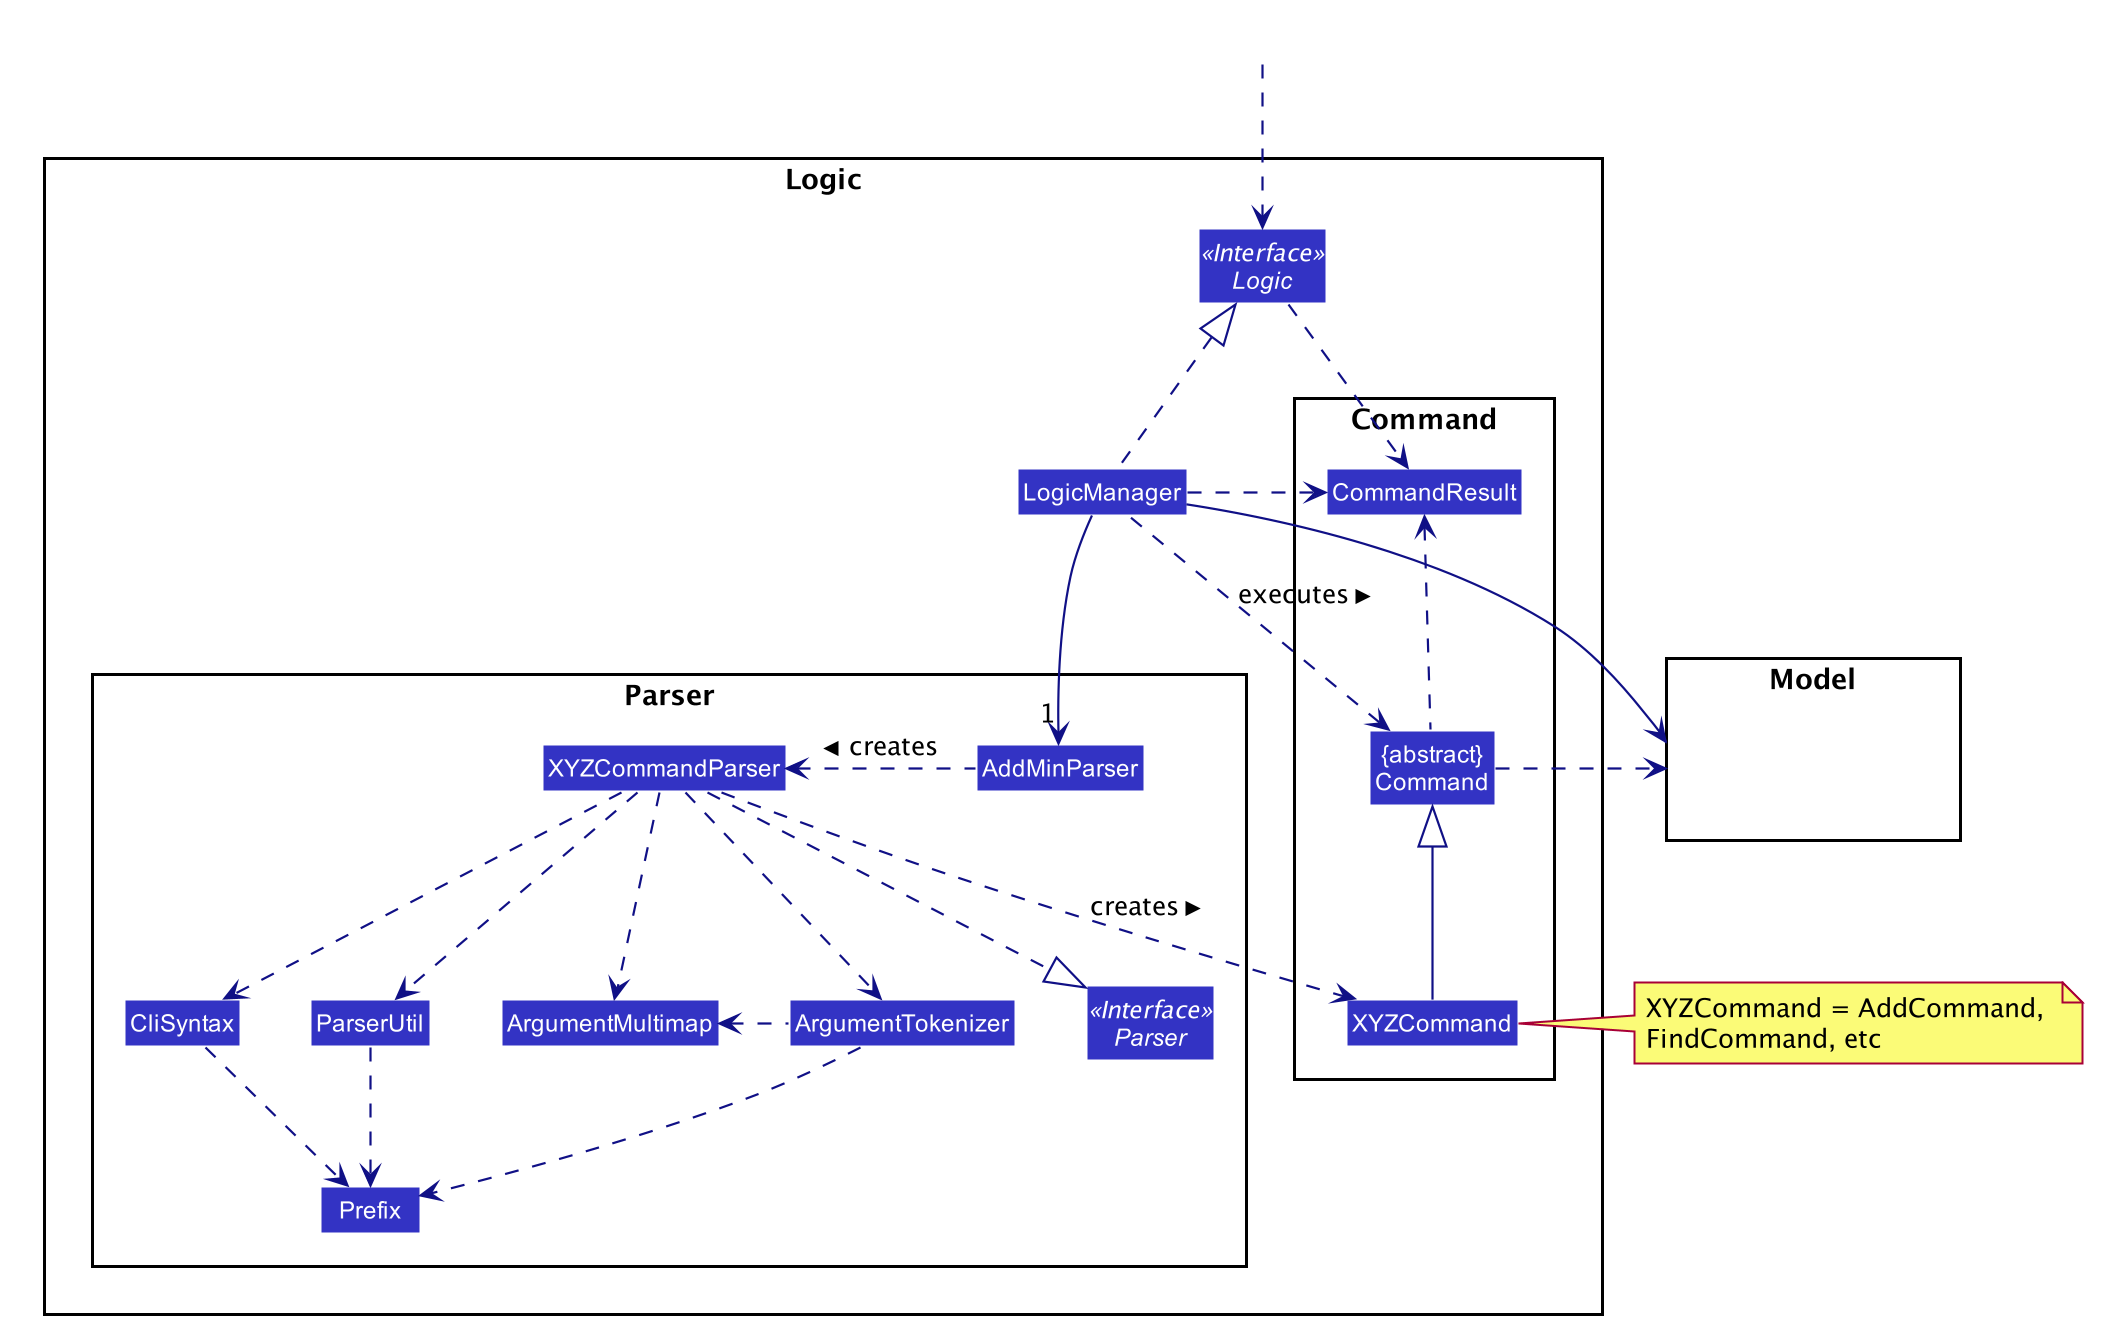
3.3. Logic component
API :
Logic.java
-
Logicuses theAddMinParserclass to parse the user command. -
This results in a
Commandobject which is executed by theLogicManager. -
The command execution can affect the
Model(e.g. adding an employee or event). -
The result of the command execution is encapsulated as a
CommandResultobject which is passed back to theUi. -
In addition, the
CommandResultobject can also instruct theUito perform certain actions, such as adding events and allocating manpower.
Given below is the Sequence Diagram for interactions within the Logic component for the execute("delete 1") API call.

delete 1 Command
The lifeline for DeleteCommandParser should end at the destroy marker (X) but due to a limitation of PlantUML, the lifeline reaches the end of diagram.
|
3.4. Model component
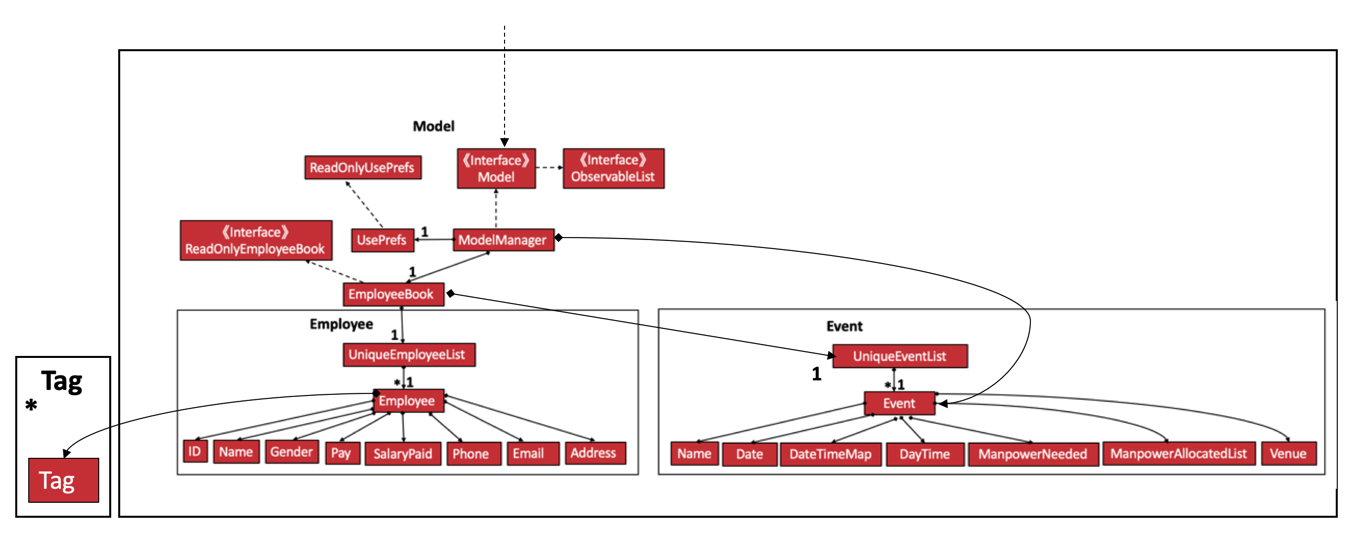
API : Model.java
The Model,
-
stores a
UserPrefobject that represents the user’s preferences. -
stores the Employee Book and Event Book data.
-
exposes an unmodifiable
ObservableList<Employee>and an unmodifiableObservableList<Event>that can be 'observed' e.g. the UI can be bound to this list so that the UI automatically updates when the data in the list change. -
does not depend on any of the other three components.
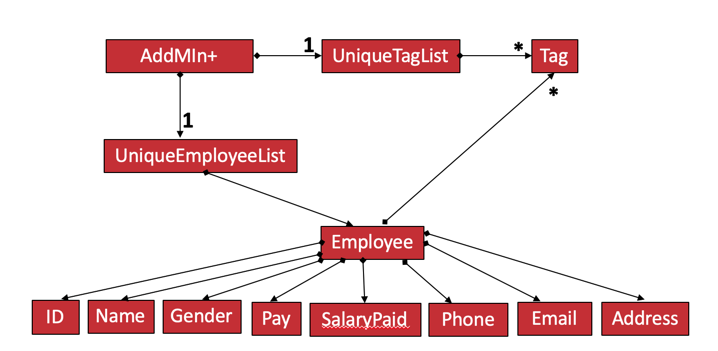
As a more OOP model, we can store a Tag list in both Employee and Event, which AddMin+ can reference. This would allow our application to only require one Tag object per unique Tag, instead of each Employee or Event needing their own Tag object. An example of how such a model may look like is given below.
|
+

3.5. Storage component
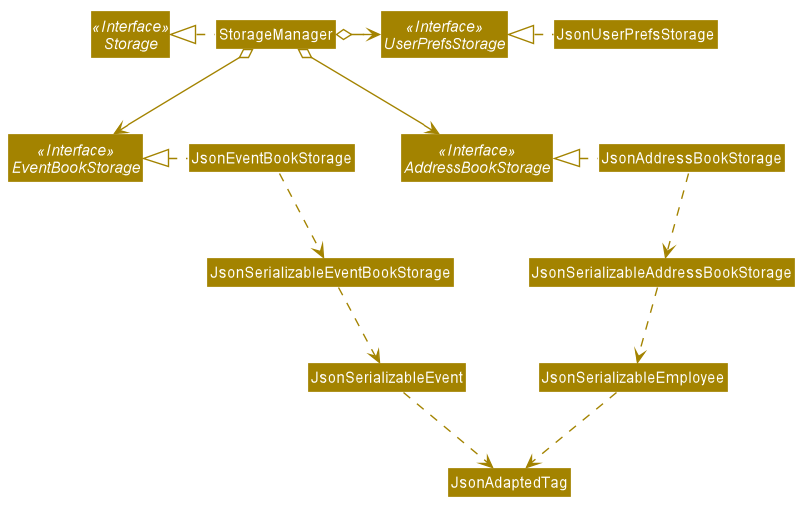
API : Storage.java
The Storage component,
-
can save
UserPrefobjects in json format and read it back. -
can save the App data in json format and read it back.
3.6. Common classes
Classes used by multiple components are in the seedu.addmin.commons package.
4. Implementation
This section describes some noteworthy details on how certain features are implemented.
4.1. Statistics feature
4.1.1. Implementation
Given below is an example usage scenario and how the statistics mechanism behaves at each step.
Step 1. The user launches the application for the first time and navigates to the statistics tab by either clicking the Statistics tab on the UI or statistics command.
Step 2. Statistics are generated on-demand and displayed to the user based on the current data by either clicking the Generate Statistics button on the UI or generate_stats command.
Step 3. Detailed Statistics are generated on-demand and displayed to the user based on the current data by either clicking the Generate Detailed Statistics button on the UI or generate_stats_detail command.
Step 4. These commands execute in a flow starting from parsing the command via the AddressBookParser.
4.1.2. Design Considerations
Aspect: How statistics executes
Alternative 1 |
Alternative 2 |
|
Consideration 1: |
Processes the data and generates statistics upon Pros: Cons: |
Generate statistics each time there is change in the data and store them. Pros: Cons: |
Why We chose Alternative 1: |
||
4.2. Automated allocation of Employees to Events feature
4.2.1. Implementation
The AutoAllocateCommand has an auto-allocation mechanism which is facilitated by methods in Event.
The AutoAllocateCommand takes in three arguments:
-
eventIndex- index of event in the displayed event list -
ManpowerCountToAdd- number of employees to allocate [optional] -
tagList- a set of tags to filter the employees [optional]
Additionally, the AutoAllocateCommand uses the following operations:
-
Event#isAvailableForEvent()— Checks if an employee is available for the event. -
AutoAllocateCommand#createAvailableEmployeeListForEvent()— Creates a list of employees available for the event, filtered by the tags specified by user. -
AutoAllocateCommand#getManpowerNeededByEvent()— Calculates the number of employees currently required by the event. -
AutoAllocateCommand#createEventAfterManpowerAllocation()— Creates a new event with an updated manpower list.
Given below is an example usage scenario and how the auto allocation mechanism behaves at each step.
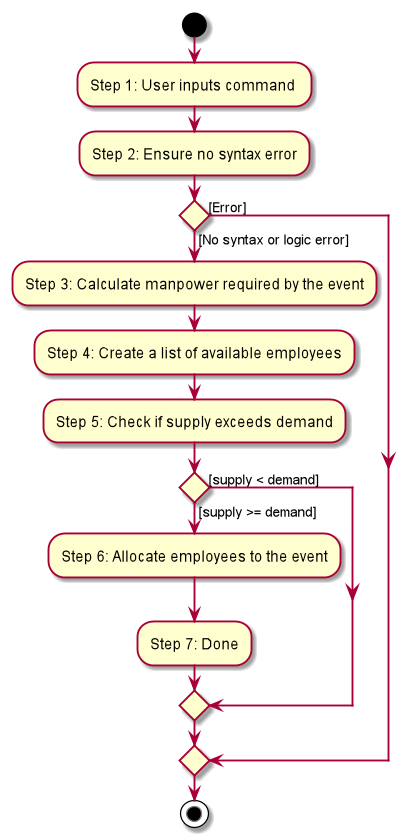
Step 1.
The user executes allocate 1 n/2 t/female with the intention to allocate 2 employees with tag [female]
to the 1st event displayed in the event list.
Step 2.
The command checks if eventIndex is valid and if ManpowerCountToAdd is specified.
The command also checks if the event still requires manpower, and if manpower count stated by user exceeds that needed by the event.
If ManpowerCountToAdd is not specified, it is assumed to be the maximum number possible for the event.
|
Step 3.
The command calls its own method AutoAllocateCommand#getManpowerNeededByEvent() to get the number of employees required by the specified event.
Step 4.
The command calls its own method AutoAllocateCommand#createAvailableEmployeeListForEvent() to create a filtered list of employees based on the tagList and if employee satisfies Event#isAvailableForEvent().
Step 5. The command checks if supply (generated in step 4) exceeds demand (generated in step 3) of the event.
| If demand exceeds supply, an exception will be thrown to the user. If the supply exceeds demand, employees will be randomly selected instead. |
Step 6.
The command calls Event#createEventAfterManpowerAllocation() to create a new event with an updated manpower list.
For storage purposes, only the Employee#EmployeeId is saved in the event’s manpower list.
|
Step 7. Done.
The following sequence diagram shows how the auto allocation works:
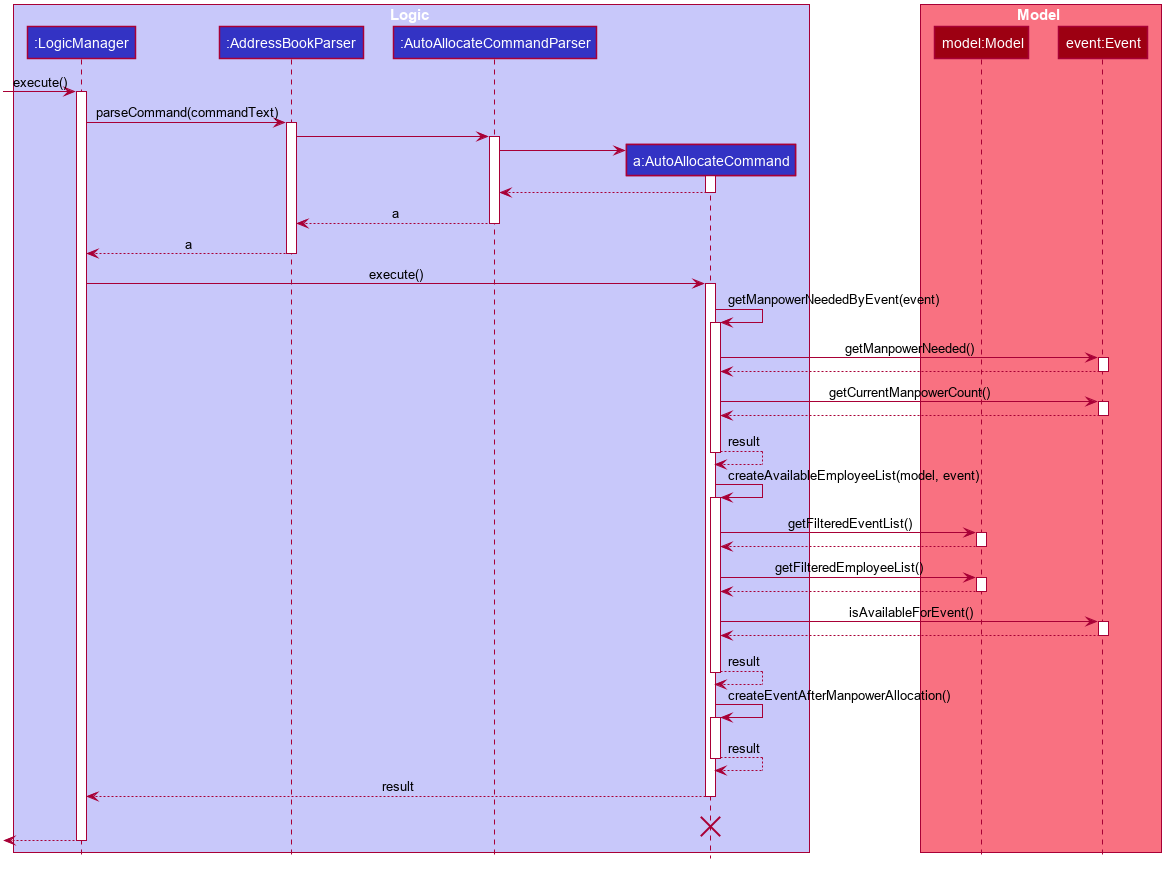
The lifeline for AutoAllocateCommand should end at the destroy marker (X) but due to a limitation of PlantUML, the lifeline reaches the end of diagram.
|
4.2.2. Design Considerations
Aspect: Storage of employees associated with event after successful command
| Feature | Alternative 1 | Alternative 2 |
|---|---|---|
Storage of employees associated with event after successful command |
Saves only the Pros: Easy to implement. Will use less memory. Cons: Future accesses require more time. I decided to proceed with this option because it has less dependencies on other classes which is is a good programming practice. |
Saves all fields of Pros: Easy retrieval in the future. Cons: Changes in |
Update of changes made to the manpower list of an event after the allocation of employees. |
Directly modifies the Pros: Easy to implement. Cons: May cause unwanted behaviours if testing is not done properly. |
Create a new event with a newly created and updated manpower list. Pros: Good programming practice. Cons: Harder to implement. I decided to proceed with this option because it complies with the Law of Demeter which states that objects should not navigate internal structures of other objects. |
4.3. Setting Date & Time to Events
4.3.1. Implementation
The Event object is constructed with a start date and an end date as class attributes, both of which are EventDate objects, which represents a single day by itself.
Our implementation of Event does not assume that the event will be occurring consecutively from the start to the end date, and requires the user to manually assign each specific date with the time period that the Event is in process.
| In our implementation, when the Event is instantiated, the time period of 0800-1800 is automatically created and mapped to the Start & End Dates of the Event. |
To achieve this functionality, there exists an EventDayTime object that encapsulates the period of the day.
It has two class attributes - both of which are LocalTime objects to represent the start and end time.
Each Event contains an EventDateTimeMap object that maps an EventDate object to an EventDayTime object using a HashMap implementation.
This mapping is added through the EventAssignDate command.
It requires the use of the following objects/methods from the event package.
-
EventContainsKeyDatePredicate- Check whether the stated date exists within the range of the Event’s Start and End Date. -
Event#assignDateTime- Calls theEventDateTimeMapobject to insert a Date-Time mapping. -
EventDate#datesUntil- Returns a Stream ofEventDatesfrom the Start to End Date. Used to auto-set a DateTime mapping for all dates.
| To improve user productivity and effectiveness, omitting the target date from the command text will automatically create the mapping for every date from the Event’s start to end date, inclusive. Alternatively, by specifying both a start and end date range in the command text, a mapping for the range will be created. |
Given below is an example usage scenario of the program functionality when a user attempts to assign a Date & Time to an already existent Event.
Step 1.
The User executes the command set_ev_dt 2 on/18/10/2019 time/0900-2000, with the intention to assign the date of 18th October 2019, time period 9am-8pm to the second event currently displayed in the event list.
If the date is omitted, i.e. set_ev_dt 2 time/0900-2000, the time period 0900-2000 will be automatically assigned for all dates from the start to end date of the Event.
Alternatively, if the end date is stated, i.e. set_ev_dt 2 on/18/10/2019 time/22/10/2019 time/0900-2000, the time period of 0900-2000 will be assigned for all dates from 18th to 22nd of October.
Step 2.
The parser checks if input format is correct, and attempts to create Index, EventDate and EventDayTime objects from it
Step 3. The command checks if the index of the event stated exists on the displayed list, and if the stated dates is within the start and end date of the Event. (Input Validation)
Step 4.
The command calls Event#assignDateTime() on the referenced Event object to add the EventDate-EventDayTime mapping into EventDateTimeMap.
Step 5.
If only a single target date is stated, continue to Step 6. Else, the system will repeat Step 4 through the entire date range - which is either the start and end date of the Event or the range specified by the user.
Step 6. DateTimeMapping is converted a String to save and update in Storage.
Step 7. Done.
If the command execution fails, a ParseException (from Step 2) or a CommandException (from Step 3) will be thrown, specifiying the reason of the error.
|
The following sequence diagram shows how the AssignDateCommand works:
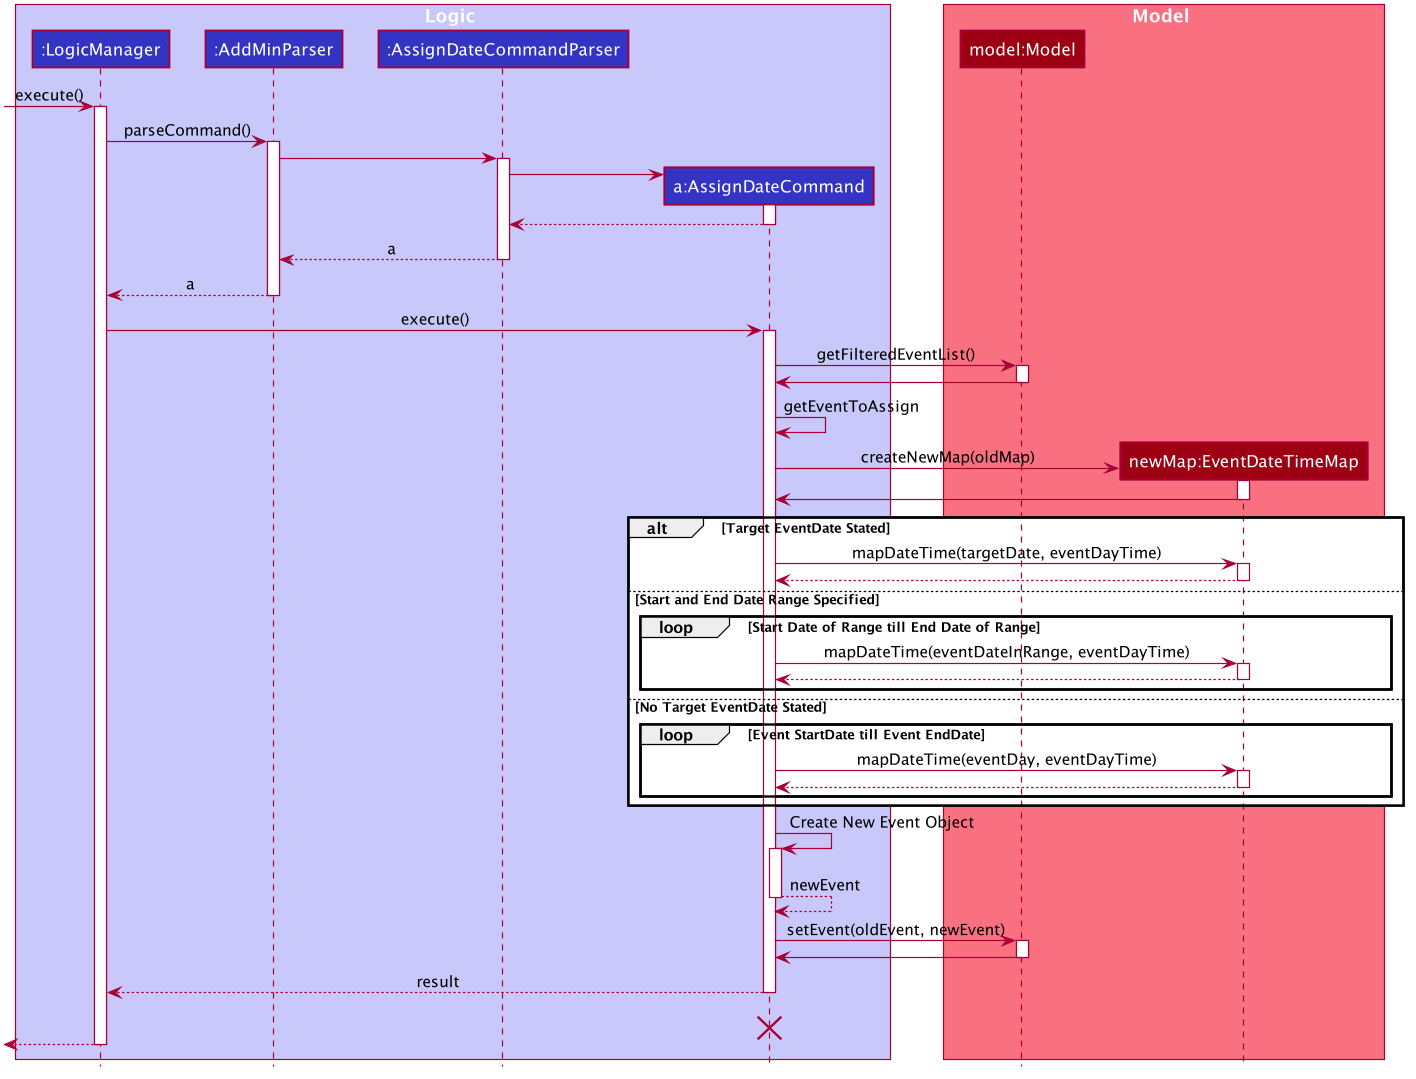
The lifeline for AssignDateCommand ends at the destroy marker (X).
|
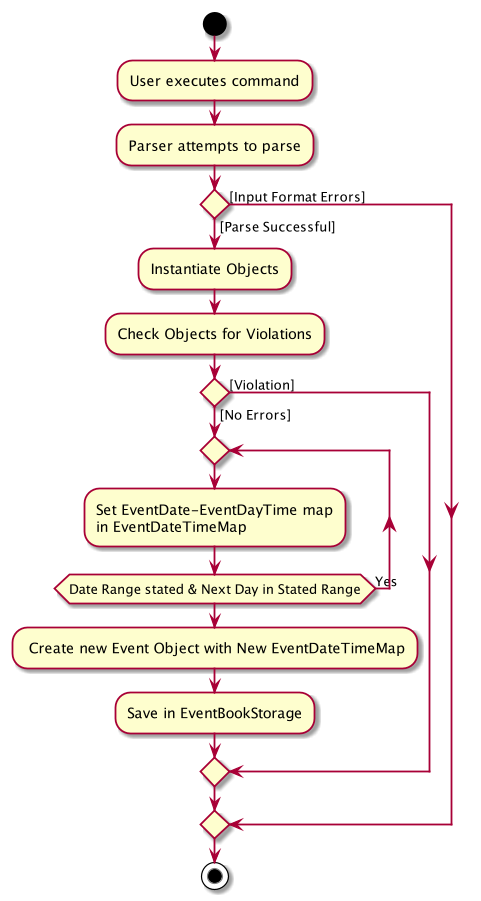
The following activity diagram shows how the Setting of Date&Time to Event work:
4.3.2. Design Considerations
Below, we discuss two key aspects - how we store EventDateTimeMap and how commands to edit Event affect the EventDateTimeMap.
| Aspect | Alternative 1 | Alternative 2 |
|---|---|---|
Storage of DateTimeMap |
Stores the DateTimeMap in an string format that is saved in a field of an Pros: Simplicity in implementation and easier reference as it is loaded and saved to the same JSON file. Cons: Performance issues as it needs to update the entire event object although only one attribute is updated |
Store the DateTimeMap in a separate file e.g. Pros: Faster performance in saving and loading as it is kept separate from Cons: Requires a new storage unit, along with all its supporting functions which will require alot of repeated code.
Instantiation of the |
Decision: Alternative 1 |
||
Impact of Edit Event on The |
Prevent the editing of Event Dates if the Pros:
Greatly reduce the potential for buggy behavior, as Cons: Negative User Experience - Will need to take extra steps to manually delete DateTime mappings. |
Allow editing of Event Dates if the Pros: Better User Experience - Narrowing the Start/End Date would naturally mean that the user no longer require mappings on those dates and hence they can be safely deleted. Cons:
Increased risk of inadvertent deletion of existing Date-Time mappings from |
Decision: Alternative 2 |
||
4.4. Generate Schedule Feature
4.4.1. Proposed Implementation
The Generate Schedule Feature is implemented to allow users to have an overview of the event schedule.
It will display all dates that have an event and the specific events that are happening on those dates listed.
Do note that the generate_schedule command will only display dates and events that have a set date and time allocated to it.
The feature is facilitated by a DistinctDatesProcessor and requires the use of a new Object - DistinctDate, as well as an internal ObservableList - distinctDatesList found in the ModelManager.
The DistinctDateProcessor processes the entire list of Events in the EventList when the command is called.
The DistinctDateProcessor will then process through these events to create specific DistinctDate Objects which stores a list of events that occurs on the date they are representing.
These DistinctDate Objects are then used, to create DateCard which will be displayed on the GUI. This feature can be seen in the generate schedule window as well as the employee fetch window.
The DistinctDateProcessor utilises the following operations in the generate_schedule command:
-
generateAllDistinctDateList(Model model)— Returns a list ofDistinctDateObjects. This operation utilises the generateDistinctDateList() operations. -
generateDistinctDateList(List<Event> eventList)— Returns a list ofDistinctDateObjects. This operation utilises the generateDateList() and generateListOfEventForDate() operations. -
generateDateList(List<Event> eventList)— Takes in the entire list of events, identify all the dates that have been mapped to which that has at least one event and returns it as a list. -
generateListOfEventForDate(EventDate date, Model model)— Takes in anEventDateobject, and processes through the entire list of events, to find all events on that specific date, and return them as a list.
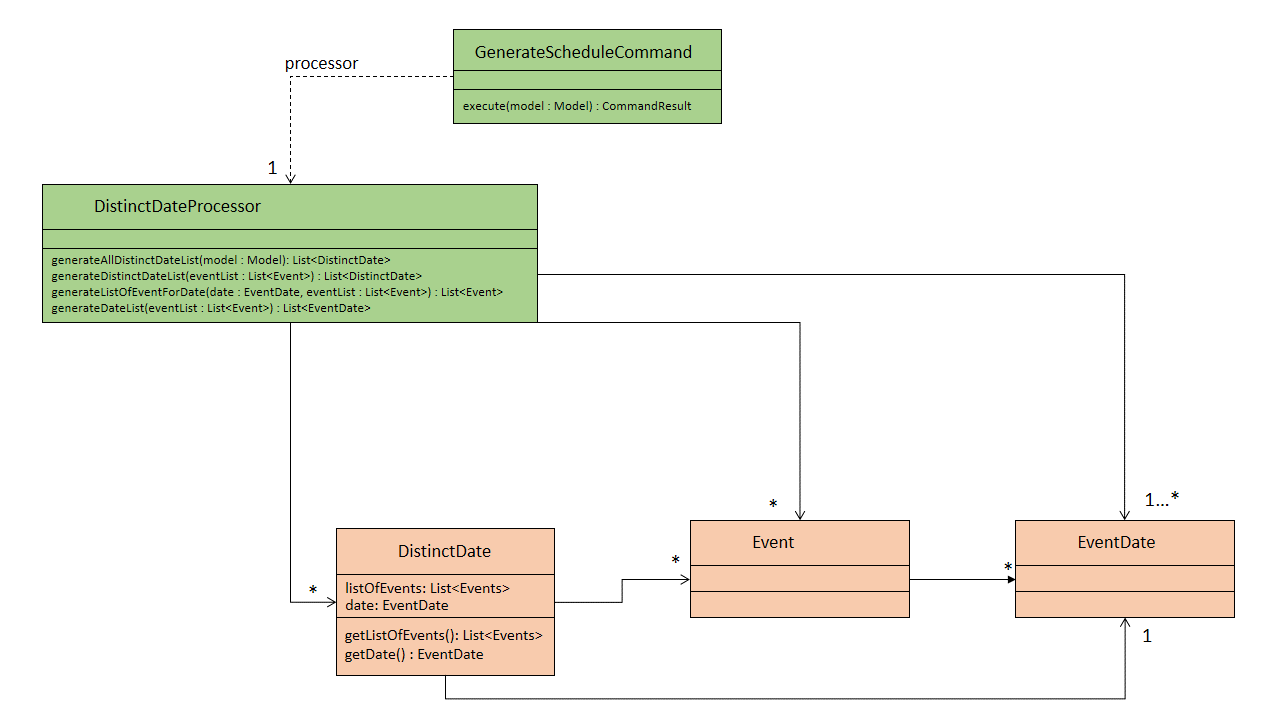
The following class diagram shows the relationships between the different classes used by the generate_schedule command:
Below is an example usage scenario and how the generate_schedule command behaves at each step.
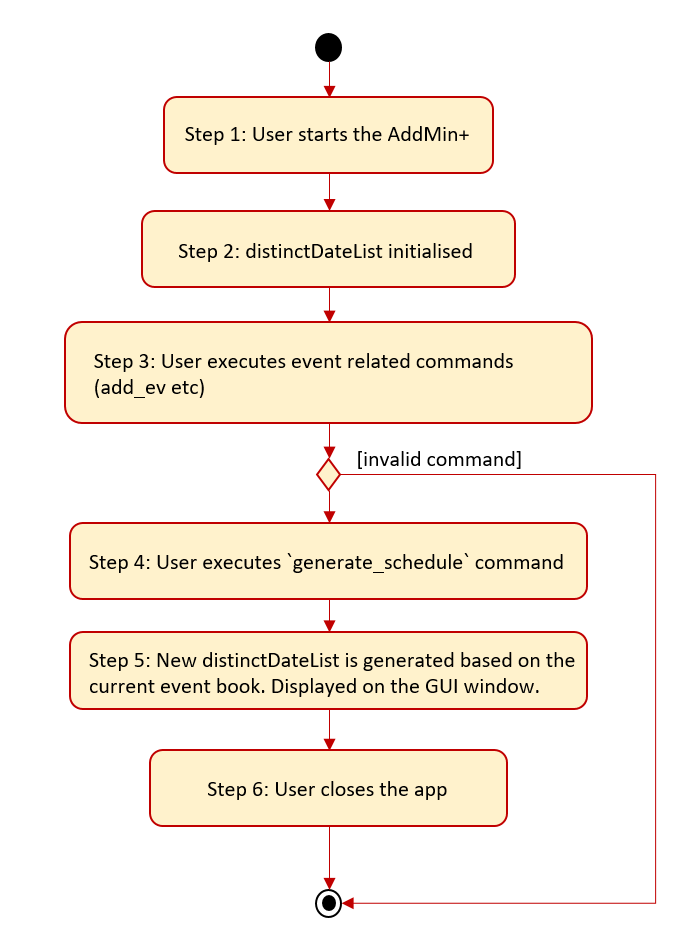
Step 1. The user launches the application for the first time.
Step 2.
The distinctDatesList will be initialised based on the initial event book state.
Step 3.
The user executes add_ev n/Free Coffee … to add a new event into the Eventlist.
The distinctDatesList will not be updated, and will not contain the new event that is added.
Any command that alters the eventBook will not change the distinctDatesList. Only when the generate_schedule command is called,
a new distinctDateList will be generated again using the latest EventList.
|
Step 4.
The user executes generate_schedule to see all the dates that have a set time mapping and the respective events on those dates.
Step 5. The distinctDateList will be generated again based on the current list of events in the EventList and will be displayed on a separate window.
Step 6. The user now decides to close the app, the current state of the EventBook and EmployeeBook will be stored, however, the DistinctDateList would not.
| Note that the Generate Schedule Feature does not load and store the DistinctDate Objects. It processes and generates the list when it is called upon or when the application starts. |
Step 7. Done.
The following sequence diagram shows how the generate_schedule operation works:
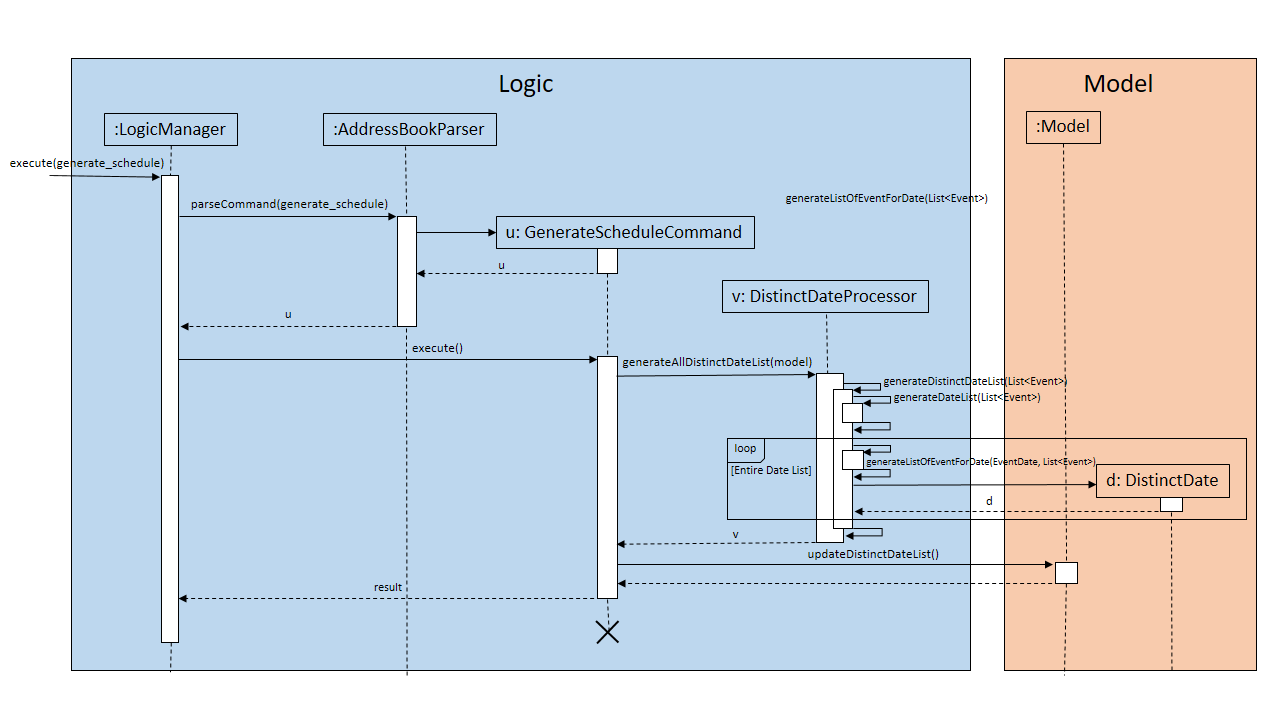
The lifeline for GenerateScheduleCommand ends at the destroy marker (X).
|
4.4.2. Design Considerations
Alternative 1 |
Alternative 2 |
|
Consideration 1: |
Generates and Processes the DistinctDate Object upon Pros: Cons: |
Creates and Stores the DistinctDate object whenever a new event is added. Pros: Cons: |
Why We chose Alternative 1: |
||
Alternative 1 |
Alternative 2 |
|
Consideration 2: |
Display Directly on the Schedule Tab, update the list when Pros: Cons: |
Display on a separate window generates and display the list on the new window when Pros: Cons: |
Why we chose Alternative 2: |
||
4.5. Finance
4.5.1. Implementation
The Finance Feature is implemented to allow users to get the salary details of all employees in an easy manner.
The tab shows three salary related details which are 'Total Salary' 'Pending To Pay' 'Salary Paid'. Two commands were
implemented, which are 'pay' and 'undo_pay', allowing the user to make the payment or undo the payment for the employee.
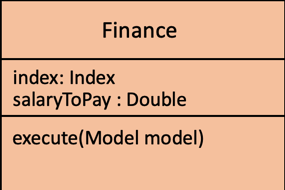
The `Finance' take in three arguments:
-
employeeIndex- index of event in the displayed employee list -
employeePay- the hourly salary for the specific employee -
employeeSalaryPaid- the total amount of salary has paid to the specific employee
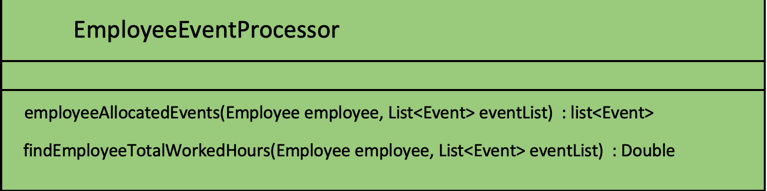
Additionally, the Finance uses the following operations:
-
EmployeeEventProcessor#findEmployeeTotalWorkedHours()— Find the total working hours for the specific employee. -
Employee#addSalaryPaid— Update the 'employeeSalaryPaid' for the specific employee. -
finance#updateCards()— Update the finance detail for all employees.
The following class diagrams shows how the Finance` class and utility EmployeeEventProcessor class is implemented:
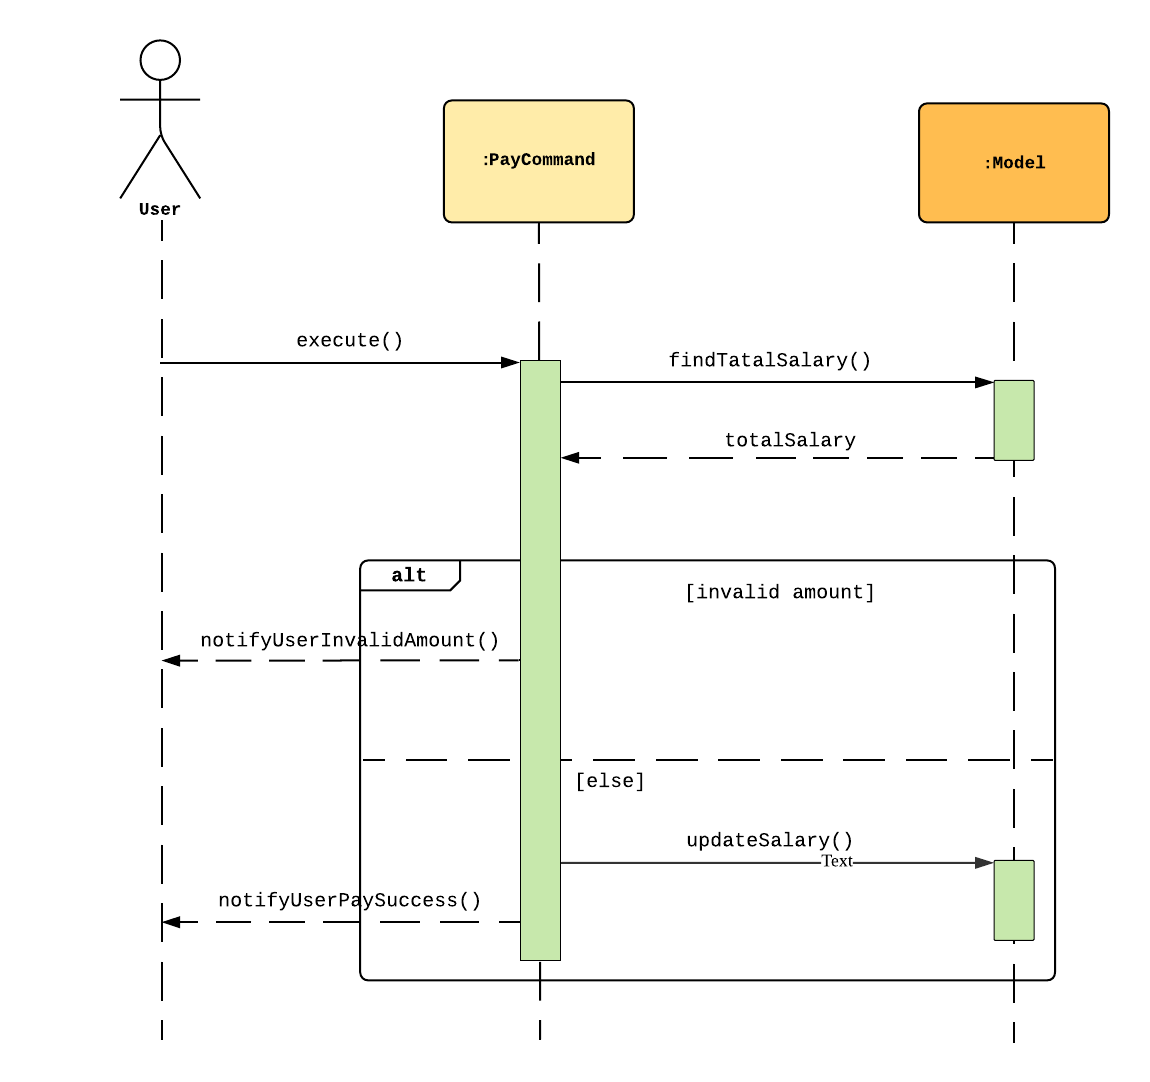
Given below is an example usage scenario and how the finance feature behaves at each step.

Step 1. The user executes pay 1 s/100 (undo_pay 1 s/100) with the intention to pay 100 dollar to
the first employee in the employee list
Step 2. The command checks if eventIndex is valid.
Step 3. The command calls method of 'Employee#findEmployeeTotalWorkedHours` to get the
total working hours for the specific employee and times employeePay to get the total salary.
Step 4. The command calls method of 'Employee#getEmployeeSalaryPaid()` to get the
employeeSalaryPaid for this specific employee from the storage .
Step 5. The command checks if the value of payment/undo-payment is valid.
| The value of the payment/undo-payment should be positive integer. The value of the payment should be less than the value of 'Pending To Pay'. The value of the undo-payment should be less than the value of 'Salary Paid'. |
Step 6. The command calls Employee#addSalaryPaid to update the employeeSalaryPaid for this specific employee.
For storage purposes, only the Employee#employeeSalaryPaid is saved.
|
Step 7. The command calls Finance#updatecard() to update the PendingToPay of
the employee card. The UI will update accordingly.
Step 8. Done.
The following sequence diagram shows how the auto allocation works:
Aspect: Storage of employees associated with event after successful command
| Feature | Alternative 1 | Alternative 2 |
|---|---|---|
Storage of employees fields after pay/undo-pay command |
Saves only the Pros: Easy to implement. Will use less memory. Cons: Future accesses the 'Pending To Pay' and 'Total Salary' require more time. Decision: Alternative 1 : I decided to proceed with this option* because it creates fewer fields in employees, the 'Pending To Pay' and 'Total Salary' is modified real time. User do not need to input so many fields when they add the employees. |
Saves the Pros: Easy to access the 'Pending To Pay' and 'Total Salary'. Cons: when the user want to add employees, the user have type in all these fields. |
The display of Finance section |
Use CLI display Pros: Easy to implement. Size of jar file will be smaller. Cons: The UI is not user-friendly. |
GUI display Pros: User easy to visualise. Cons: Jar file is larger. Decision: Alternative 2 : I decided to use GUI to display the finance section. It is easier for user to visualise the salary details of the specific employee. |
5. Logging
We are using java.util.logging package for logging.
The LogsCenter class is used to manage the logging levels and logging destinations.
-
The logging level can be controlled using the
logLevelsetting in the configuration file (See Section 5.1, “Configuration”) -
The
Loggerfor a class can be obtained usingLogsCenter.getLogger(Class)which will log messages according to the specified logging level -
Currently log messages are output through:
Consoleand to a.logfile.
Logging Levels
-
SEVERE: Critical problem detected which may possibly cause the termination of the application -
WARNING: Can continue, but with caution -
INFO: Information showing the noteworthy actions by the App -
FINE: Details that is not usually noteworthy but may be useful in debugging e.g. print the actual list instead of just its size
5.1. Configuration
Certain properties of the application can be controlled (e.g user prefs file location, logging level) through the configuration file (default: config.json).
6. Documentation
Refer to the guide here.
7. Testing
Refer to the guide here.
8. Dev Ops
Refer to the guide here.
Appendix A: Product Scope
Target user profile:
-
Has a need to help Administrative staff to manage events and employees.
-
Prefer desktop apps over other types.
-
Can type fast.
-
Prefers typing over mouse input.
-
Is reasonably comfortable using CLI apps.
-
Someone who prefers a clean interface and dislike clutter.
Value proposition: Manage events and employees easier than enterprise apps commonly used such as Microsoft Excel and Microsoft Word. Provides a clean and modern desktop application designed specifically to cater to their specific needs while improving user experience and efficiency.
Appendix B: User Stories
Priorities: High (must have) - * * *, Medium (nice to have) - * *, Low (unlikely to have) - *
| Priority | As a … | I want to … | So that I can… |
|---|---|---|---|
|
HR Admin |
automate my manpower allocation process |
improve work productivity |
|
HR Admin |
view upcoming events and schedule of these events |
remind the company staff to attend |
|
HR Director |
view the number of events |
decide whether to have more or less of events |
|
HR Personnel |
keep track of all the worker’s details |
access the worker’s personal details whenever I need it |
|
Finance Staff |
keep track of all the worker’s details |
ensure proper financial accounting for the company |
|
Accountant |
see the payslip of all employees |
easily track expenses related to employee wages |
|
Accountant |
access the employee’s personal details |
keep track of all the worker’s details |
|
Employee of a Company |
able to see payslip |
for documenting purposes |
|
Admin Staff |
be able to track the employee’s pay status |
to ensure the workers are paid correctly |
|
Admin Staff |
view my company’s available manpower |
decide on the manpower allocation |
|
Employee |
view upcoming events |
record them on my calendar |
|
Admin Staff |
see all events on a specific date |
plan on the logistics needed ahead of time |
|
Manager |
tag my employees with comments/remarks |
have better manpower allocation for events |
Appendix C: Use Cases
(For all use cases below, the System is the AddMin+ and the Actor is the user, unless specified otherwise)
Use case: Delete employee
MSS
-
User requests to list employees
-
AddMin+ shows a list of employees
-
User requests to delete a specific employee by stating the index of the current displayed list.
-
AddMin+ deletes the employee
Use case ends.
Extensions
-
3a. The given input index is invalid.
-
3a1. AddMin+ shows an error message.
Use case resumes at step 2.
-
Use case: Edit Event in Event List
MSS
-
User requests to view the company’s current list of events.
-
AddMin+ shows a list of events, with each event tagged to an index of the current displayed list.
-
User specifies the index of the event, and list the details of the event to edit
-
AddMin+ edits and saves the updated event details.
Use case ends.
Extensions
-
3a. Input Index given is invalid.
-
3a1.AddMin+ shows an error message and refuses the edit.
Use case resumes at step 2.
-
-
3b. No details to edit were specified, or is of the wrong input format
-
3b1. AddMin+ displays an error message warning the user that no details were edited.
Use case resumes at step 2.
-
Use case: Allocate an Employee to an Event
MSS
-
User requests to view the company’s current list of employees and events.
-
AddMin+ shows the list of employees and events.
-
User specifies the index of the event, and the index of the employee.
-
AddMin+ allocates the Employee to the Event.
Use case ends.
Extensions
-
3a.Input Index given is invalid.
-
3a1.AddMin+ shows the error message.
Use case resumes at step 3.
-
-
3b.The event has full manpower.
-
3b1.AddMin+ shows the error message.
Use case resumes at step 3.
-
-
3c.The employee was previously allocated to the event.
-
3c1.AddMin+ shows the error message.
Use case resumes at step 3.
-
-
3d.The employee has a conflicting schedule, and is unavailable for the event.
-
3d1.AddMin+ shows the error message.
Use case resumes at step 3.
-
Use case: Displaying the Schedule on a specific date
MSS
-
User requests to list events
-
EventBook shows a list of events
-
User requests to display schedule on a specific date
-
AddMin+ display a list of events that is on that date
Use case ends.
Extensions
-
3.The date format given is invalid.
-
3a.AddMin+ shows an error message.
Use case resumes at step 2.
-
{More to be added}
Appendix D: Non Functional Requirements
-
Should work on any mainstream OS as long as it has Java
11or above installed. -
Should be able to hold up to 1000 employees and events without a noticeable sluggishness in performance for typical usage.
-
A user with above average typing speed for regular English text (i.e. not code, not system admin commands) should be able to accomplish most of the tasks faster using commands than using the mouse.
-
Program should run smoothly and without bugs
-
Should be able to work independent of a remote server, database, and internet connection
Appendix E: Glossary
- Mainstream OS
-
Windows, Linux, Unix, OS-X
Appendix F: Instructions for Manual Testing
Given below are instructions to test the app manually.
| These instructions only provide a starting point for testers to work on; testers are expected to do more exploratory testing. |
F.1. Launch and Shutdown
-
Initial launch
-
Download the jar file and copy into an empty folder
-
Double-click the jar file
Expected: Shows the GUI with a set of sample contacts. The window size may not be optimum.
-
-
Saving window preferences
-
Resize the window to an optimum size. Move the window to a different location. Close the window.
-
Re-launch the app by double-clicking the jar file.
Expected: The most recent window size and location is retained.
-
F.2. Deleting an employee
-
Deleting an employee while all employees are listed
-
Prerequisites: List all employees using the
list_emcommand. Multiple employees in the list. -
Test case:
delete_em 1
Expected: Employee of ID '1' is deleted from the list. Details of the deleted contact shown in the status message. Timestamp in the status bar is updated. -
Test case:
delete_em 0
Expected: No employee is deleted. Error details shown in the status message. Status bar remains the same. -
Other incorrect delete commands to try:
delete,delete x(where x is larger than the list size) {give more}
Expected: Similar to previous.
-
F.3. Generating Schedule
-
Generating Schedule of all the events according to the current event list.
-
Prerequisites: Multiple events in the event list. User must either be in the Main Tab or Schedule Tab.
-
Test case:
generate_schedule
Expected: Result box displays - "Schedule Generated". AddMin+ will jump to the Schedule Tab. New window will open displaying the entire schedule, according to the event’s start, end date and the specific date, time mappings. If an event does not have any set date, time mappings then it will only be displayed as the start and end date.
-
F.4. Display Schedule for Specific Date
-
Displaying all the events whose start, end date spans across a specified date.
-
Prerequisites: Multiple events in the event list. User must either be in the Main Tab or Schedule Tab.
-
Test case:
display_schedule_date on/10/12/2019
Expected: Result box displays the number of events listed in the Event List in the Schedule Tab. AddMin+ will jump to the Schedule Tab. The event list will display all events whose start, end date spans across 10/12/2019. -
Prerequisites: Multiple events in the event list. User must either be in the Main Tab or Schedule Tab.
-
Test case:
display_schedule_date on/31/11/2019
Expected: Result box prompt a user input error and displays the following message "Invalid date: 31/11/2019 Date should be in the following format dd/MM/yyyy, be a valid Calendar Date, and be in the last 10 years." . The event list will not be updated.
-
F.5. Display Schedule for Specific Month Year
-
Displaying all the events whose start, end date spans across a specified Month and Year.
-
Prerequisites: Multiple events in the event list. User must either be in the Main Tab or Schedule Tab.
-
Test case:
display_schedule_month on/12/2019
Expected: Result box displays the number of events listed in the Event List in the Schedule Tab. AddMin+ will jump to the Schedule Tab. The event list will display all events whose start, end date spans across 12/2019. -
Prerequisites: Multiple events in the event list. User must either be in the Main Tab or Schedule Tab.
-
Test case:
display_schedule_date on/13/2019
Expected: Result box prompt a user input error and displays the following message "Input Year Month should be MM/yyyy" . The event list will not be updated.
-
F.6. Display Schedule for between 2 specific date
-
Displays all events which meets the following requirements, according if user’s specified start and end date range includes a single date that the event’s start and end date spans across , the event will be displayed.
-
Prerequisites: Multiple events in the event list. User must either be in the Main Tab or Schedule Tab.
-
Test case:
display_schedule_between start/10/12/2019 end/12/12/2019
Expected: Result box displays the number of events listed in the Event List in the Schedule Tab. AddMin+ will jump to the Schedule Tab. The event list will display all events which spans across at least a single date between 10/12/2019 and 12/12/2019. -
Prerequisites: Multiple events in the event list. User must either be in the Main Tab or Schedule Tab.
-
Test case:
display_schedule_between start/30/12/2019 end/12/12/2019
Expected: Result box prompt a user input error and displays the following message "Your stated Start Date [30/12/2019] is after your End Date [12/12/2019]!" . The event list will not be updated. -
Prerequisites: Multiple events in the event list. User must either be in the Main Tab or Schedule Tab.
-
Test case:
display_schedule_between start/33/12/2019 end/12/12/2019
Expected: Result box prompt a user input error and displays the following message "Invalid date: 33/12/2019 Date should be in the following format dd/MM/yyyy, be a valid Calendar Date, and be in the last 10 years." . The event list will not be updated.
-
F.7. Event
-
Editing an Event Date
-
Prerequisites: At least one event listed in the event list. Either add events using
add_evif empty, orlist_evotherwise. -
Test Case:
edit_ev 1 on/20/10/2019 till/20/10/2020
Expected Error Message : "The maximum acceptable range between the Start and End Dates is 90 days." -
Test Case:
edit_ev 1 till/25/10/2019
Expected: Event End Date is edited successfuly. -
Other incorrect commands:
edit_ev 1 on/20/10/2019 till/10/10/2019(Start Date after End Date)
edit_ev 1 on/10/10/1990 till/20/10/1990(Too Long ago)
edit_ev 1 on/31/02/2019(Not a valid calendar date)
-
-
Setting Event Date-Time
-
Prerequisites: Same and continued from above.
-
Test Case:
set_ev_dt 1 time/1000-1300
Expected: Mapping from Start to End Date successfully assigned. Double click on the Event or usefetch_ev 1to see the mapping. -
Test Case:
delete_ev_dt 1 on/20/10/2020(or any date out of range)
Expected Error Message: "The Date [20/10/2020] is not found in the Date-Time Mapping of Event: [Musical]" -
Test Case:
delete_ev_dt 1 on/25/10/2019
Expected: Successfully deleted Date-Time Mapping, with message "Deleted DateTime [25/10/2019] from Event: [Musical]." Double click on the Event or usefetch_ev 1to verify that the mapping of '25/10/2019' is no longer there.
-
F.8. Generating Statistics
-
Generating Statistics based on the current data on both events and employees.
-
Prerequisites: Multiple events in the event list and multiple employees in the employee list. User must navigate to the Statistics tab.
-
Test case:
generate_stats
Expected: Statistics window will display statistics. Statistics window will be populated with different types of data including a list of upcoming events requiring manpower, a pie chart for these events based on their tags and a pie chart to represent the employee tags. If an event does not have any set tags, the user would likely allocate any employee to it.
-
F.9. Generating Detailed Statistics
-
Generating Detailed Statistics based on the current data on both events and employees.
-
Prerequisites: Multiple events in the event list and multiple employees in the employee list. User must navigate to the Statistics tab.
-
Test case:
generate_stats_detail
Expected: New window will open displaying detaile statistics of both events and employees. Statistics pop-up window will be populated with statistical data based on the most current app data. This will be displayed in a text file format for the user to quickly scroll through and get the data they require.
-
F.10. Saving data
-
Dealing with missing data files
-
Go to the home folder where AddMin+ is located.
-
Delete every file except the .jar file.
-
Open the jar file again, a sample set of Employee and Event data should be loaded.
-
-
Dealing with corrupted data files
-
Go to the home folder where AddMin+ is located. Open the data folder which should contain employeebook.json and eventbook.json files.
-
Open one of the json file and corrupt the file.
-
Open the jar file again, AddMin+ should still run with one of the list data loaded. === Pay an employee
-
-
Pay an employee in the showing list
-
Prerequisites: The employee has sufficient amount of 'Pending Pay'.
-
Test case:
pay 1 s/10
Expected: Employee of ID '1' is paid $10 from the list. Details of the payment shown in the status message. -
Test case:
pay 1 s/-10
Expected: The employee is not paid. Error details shown in the status message. Status bar remains the same. -
Other incorrect delete commands to try:
pay,pay x,pay x s/10, (where x is larger than the list size) {give more}
Expected: Similar to previous
-
F.11. Undo payment made to an employee
-
Undo payment made to an employee in the showing list
-
Prerequisites: The employee has sufficient amount of 'Salary Paid'.
-
Test case:
undo_pay 1 s/10
Expected: The 'Salary Paid' of Employee of ID '1' has been deducted $10. Details of the payment shown in the status message. -
Test case:
undo_pay 1 s/-10
Expected: The command is not executed. Error details shown in the status message. Status bar remains the same. -
Other incorrect delete commands to try:
undopay,undo_pay x,undo_pay x s/10, (where x is larger than the list size) {give more}
Expected: Similar to previous.
-