By: CS2103T-T11-3 Since: AUG 2019 Licence: MIT
- 1. Welcome to AddMin+
- 2. Getting Started
- 3. Features
- 3.1. General Commands
- 3.2. Entity Management
- 3.3. Employee-Specific Management
- 3.4. Event-Specific Management
- 3.4.1. Fetch Full Details of an Event:
fetch_ev - 3.4.2. Automated allocation of Employees to Events:
allocate - 3.4.3. Manual allocation of Employees to Events:
allocatem - 3.4.4. De-allocation of Employees from Event:
free - 3.4.5. Setting a Date&Time to an Event:
set_ev_dt - 3.4.6. Delete a DateTime Mapping from an Event:
delete_ev_dt - 3.4.7. Clear all DateTime Mappings from an Event:
clear_ev_dt
- 3.4.1. Fetch Full Details of an Event:
- 3.5. Finance Management
- 3.6. Schedule Management
- 3.7. Statistics
- 3.8. Miscellaneous
- 4. FAQ
- 5. Upcoming Features in v2.0
- 6. Command Summary
1. Welcome to AddMin+
AddMin+ is an all-in-one administration desktop application, that is specially designed for any events management start-up company with limited manpower and resources. These companies would usually only be able to afford to hire one admin staff to handle both the management of events and employees and this can be tough. The Admin+ Team understands the struggles that start-ups face daily, and we are here to help!
AddMin+ is specially designed to ease the workload of the admin and allow him/her to effectively handle the administrative tasks of the company by providing the following functions: event creation and deletion, editing of event details after creation, manual and automatic manpower allocation for events and providing an overview of all the data via statistics. The purpose of this user guide is to show the user how they can use our app to carry out their administrative tasks efficiently and also answer any questions they may have while using our app.
2. Getting Started
2.1. Installation
-
Ensure you have Java
11or above installed in your Computer. -
Download the latest
AddMin+.jarhere. -
Copy the file to a new empty folder which you want to use as the home folder for AddMin+
-
Double-click the file to start the app. The GUI should appear in a few seconds.

=== Using AddMin+
AddMin+ is an app that is mainly used through the Command Line Interface (CLI), complemented with a GUI display.
-
Click on the specific tab you to navigate across. Currently, we have the
Main,Schedule,FinanceandStatisticsTab. -
Type the command in the command box and press Enter to execute it.
-
e.g. typing
helpand pressing Enter will open the help window.
-
-
Some example commands you can try:
-
list: lists all contacts -
add_emadd_em n/John Doe g/Male p/20 no/98765432 e/johnd@example.com a/311, Clementi Ave 2, #02-25 on/12/12/2012 t/friends: adds a contact namedJohn Doeto the Employee List. -
delete_em3: deletes the 3rd Employee shown in the current list -
exit: exits the app
-
-
Refer to Section 3, “Features” for details of each command.
2.2. CLI Usage & Command Formatting
Command Format
As a CLI application, most commands are executed by typing your commands on the Command Box. We will discuss the exact commands that you may execute under the Section 3, “Features” section, but it is important to first understand the format of the command.
Commands start with a single string (which may include underscores) such as add_em or free.
Subsequently, you supply the prefix, for example, n/ and then the necessary parameter.
It is alright if there is spacing within your parameter.
The prefixes and parameters will be stated for each command.
-
Words in
UPPER_CASEare the compulsory parameters to be supplied by the user e.g. inadd_em n/NAME,NAMEis a parameter which can be used asadd_em n/John Doe. -
Items in square brackets are optional e.g
n/NAME [t/TAG]can be used asn/John Doe t/friendor asn/John Doe. -
Items with
… after them can be used multiple times including zero times e.g.[t/TAG]…can be used ast/friend,t/friend t/familyetc. -
Parameters can be in any order e.g. if the command specifies
n/NAME no/PHONE_NUMBER,no/PHONE_NUMBER n/NAMEis also acceptable. -
Previous commands can be accessed by using the up/down arrow keys.
-
Not following the specific format will trigger an Invalid Command Format error message on the result display box.
Parameter Constraints
Our application requires the strict adhering of parameters to certain constraints to prevent feature flaws and functionality bugs. Listed below are the category of parameters, the prefixes utilizing them and their constraints.
Type & Format |
Utilizing Prefixes |
Constraints |
Index |
No Prefix |
|
Date |
|
|
Time Period |
|
|
Name |
|
|
Gender |
|
|
Email |
|
|
Phone Number |
|
|
Integer |
|
|
Money |
|
|
3. Features
The features of AddMin+ can be grouped into 4 main categories, General, Entity Management, Finance, Schedule, and Statistics. The commands that AddMin+ recognize follows a specific format, however, each category will have their own set of valid commands. For new users, do refer to the subsections under Section 3 for the specific command and how to use them. For more advanced users, you could refer to Section 6, “Command Summary”.
3.1. General Commands
3.1.1. Viewing help : help
Opens a help guide, a list of all commands for the user as a reference to.
Format: help
3.1.3. Navigation between Tabs : main | schedule | statistics
Provides a way to jump between the Main, Schedule and Statistics Tab.
| A Schedule-related command executed in the Main Tab will direct you to the Schedule Tab. Meanwhile, a Statistics-related command will not execute on any other tab but the Statistics tab. While an Employee-related command executed in the Schedule Tab will not be allowed as the user does not have an employee list to refer to in the Schedule Tab. Lastly, all Event-related command is executed based on the current Event list that is being displayed, regardless if the user is in the Main Tab or Schedule Tab. |
Main Tab: main
Schedule Tab: schedule
Statistics Tab: statistics
3.2. Entity Management
AddMin+ contains two main entities - Employees and Events with similar commands, especially in Create, Read, Update and Delete (CRUD) operations.
3.2.1. List : list | list_em | list_ev
Employee: Shows the list of all employees on the company’s roster. Full details are truncated.
Event: Shows the list of all events on the company’s calendar. Full details are truncated.
Both Employee and Event: list
Employee Format: list_em
Event Format: list_ev
3.2.2. Adding: add_em | add_ev
Employee: Adds an employee to the employee list
Employee Format: add_em n/NAME g/GENDER p/PAY no/PHONE e/EMAIL a/ADDRESS on/JOIN_DATE [t/TAG]…
Event: Adds an event that the company is organizing or hosting to the company’s calendar.
Event Format: add_ev n/NAME at/VENUE m/MANPOWER_NEEDED on/START_DATE till/END_DATE[t/TAG]…
| Both employee and events can have any number of tags (including 0) |
Add Employee Examples:
-
add_em n/John Doe g/Male p/10 no/98765432 e/johnd@example.com a/311, Clementi Ave 2, #02-25 on/12/12/2012 t/friends t/owesMoney -
add_em n/Betsy Crowe g/Female p/6 no/91909111 e/betsycrowe@example.com a/Newgate Prison on/10/12/2019 t/criminal
Add Event Examples:
-
add_ev n/Free Coffee at/Utown Starbucks m/5 on/16/03/2019 till/17/03/2019 t/fun t/free -
add_ev n/NUS RUN at/NUS Sports Hall m/5 on/19/10/2019 till/20/10/2019 t/running t/sports
3.2.3. Editing details : edit_em | edit_ev
Edits a specific entity based on the fields input by the user. At least one field must be provided, and existing values will be updated to the input values.
Employee: Edit an existing employee in the employee list.
Employee Format: edit_em INDEX [n/NAME] [g/GENDER] [p/P] [no/PHONE] [e/EMAIL] [a/ADDRESS] [on/JOIN_DATE] [t/TAG]…
Event: Edits an existing event in the event list.
Event Format Format: edit_ev INDEX [n/EVENT_NAME] [at/VENUE] [m/MANPOWER_NEEDED] [on/START_DATE] [till/END_DATE] [t/TAG]…
|
When editing tags, the existing tags of the entity will be removed i.e adding of tags is not cumulative. You can remove all the entity’s tags by typing t/ without specifying any tags after it.
|
Employee Edit Examples:
-
edit_em 1 no/91234567 e/johndoe@example.com
Edits the Phone Number and Email address of the 1st employee on the displayed employee list to be91234567andjohndoe@example.comrespectively. -
edit_em 2 n/Betsy Crower t/
Edits the name of the 2nd employee to beBetsy Crowerand clears all existing tags.
Event Edit Examples:
-
edit_ev 1 on/16/09/2019
Edits the start date of the 1st event on the displayed event list to be on the 16th September, 2019. -
edit_ev 2 n/Concert t/
Edits the name of the 2nd event on the displayed event list to beConcertand clears all existing tags.
3.2.4. Find: find_em_name | find_em_tag | find_ev_name | find_ev_tag
Find entities whose names contain any of the given keywords.
Employee Format: find_em_name KEYWORD [MORE_KEYWORDS]
Event Format: find_ev_name KEYWORD [MORE_KEYWORDS]
Find entities whose tag contain any of the given keywords.
Employee Format: find_em_tag KEYWORD [MORE_KEYWORDS]
Event Format: find_ev_tag KEYWORD [MORE_KEYWORDS]
Examples:
-
find_em_name John
ReturnsjohnandJohn Doe -
find_ev_name Concert Musical Play
Returns any event having namesConcert,Musical, orPlay -
find_ev_name Party
Returns any event having namesPartyorparty -
find_em_tag male fun
Returns all employees that are tagged asmaleandfun -
find_ev_tag free music
Returns all events that are tagged asfreeandmusic
3.2.5. Deleting an entity : delete_em | delete_ev
Deletes the entity from the employee list/event calendar.
Employee Format: delete_em INDEX
Event Format: delete_ev INDEX
Examples:
-
delete_em 2
Deletes the 2nd employee in the displayed employee list. -
delete_ev 1
Deletes the 1st event in the displayed event list shown (Works on both Main and Schedule tab)
3.3. Employee-Specific Management
3.3.1. Fetch Full Details of an Employee: fetch_em
Fetches an employee by displaying a pop-up window that shows the full list of every working date of an employee, based on the dates of the events allocated.
Format: fetch_em EMPLOYEE_INDEX
Examples:
-
fetch_em 2
Returns the 2rd employee from the displayed employee list.
3.4. Event-Specific Management
3.4.1. Fetch Full Details of an Event: fetch_ev
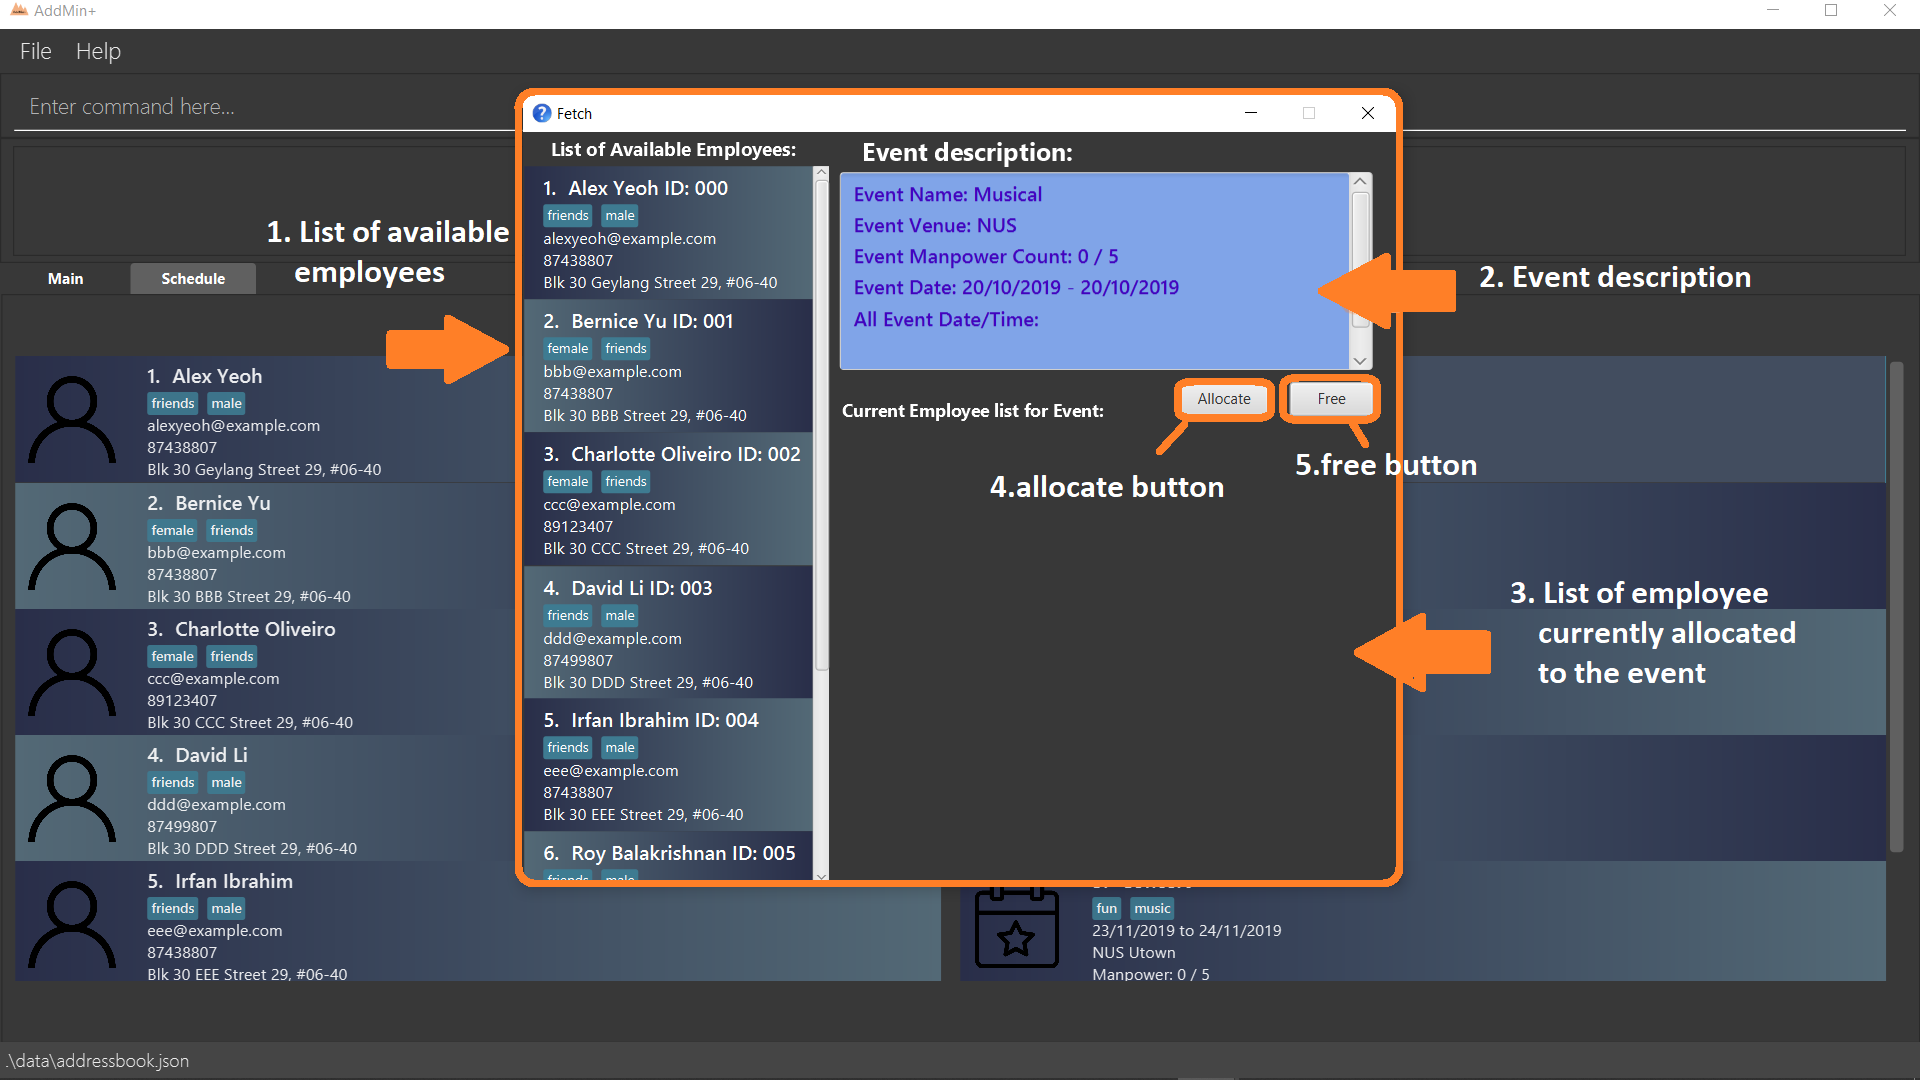
Fetches an event by displaying a pop-up window with full details of the event.
The Fetch Event Window serves as a portable platform for event manpower allocation.
It can be accessed from the Main and Schedule Tab.
|
Format: fetch_ev EVENT_INDEX
Examples:
-
fetch_ev 2
Returns the 2rd event from the event list.
Alternatively, the fetch_ev command can be executed from the GUI in just 2 simple steps.
Step 1. Double-click the event card in the list as shown in the figure below:
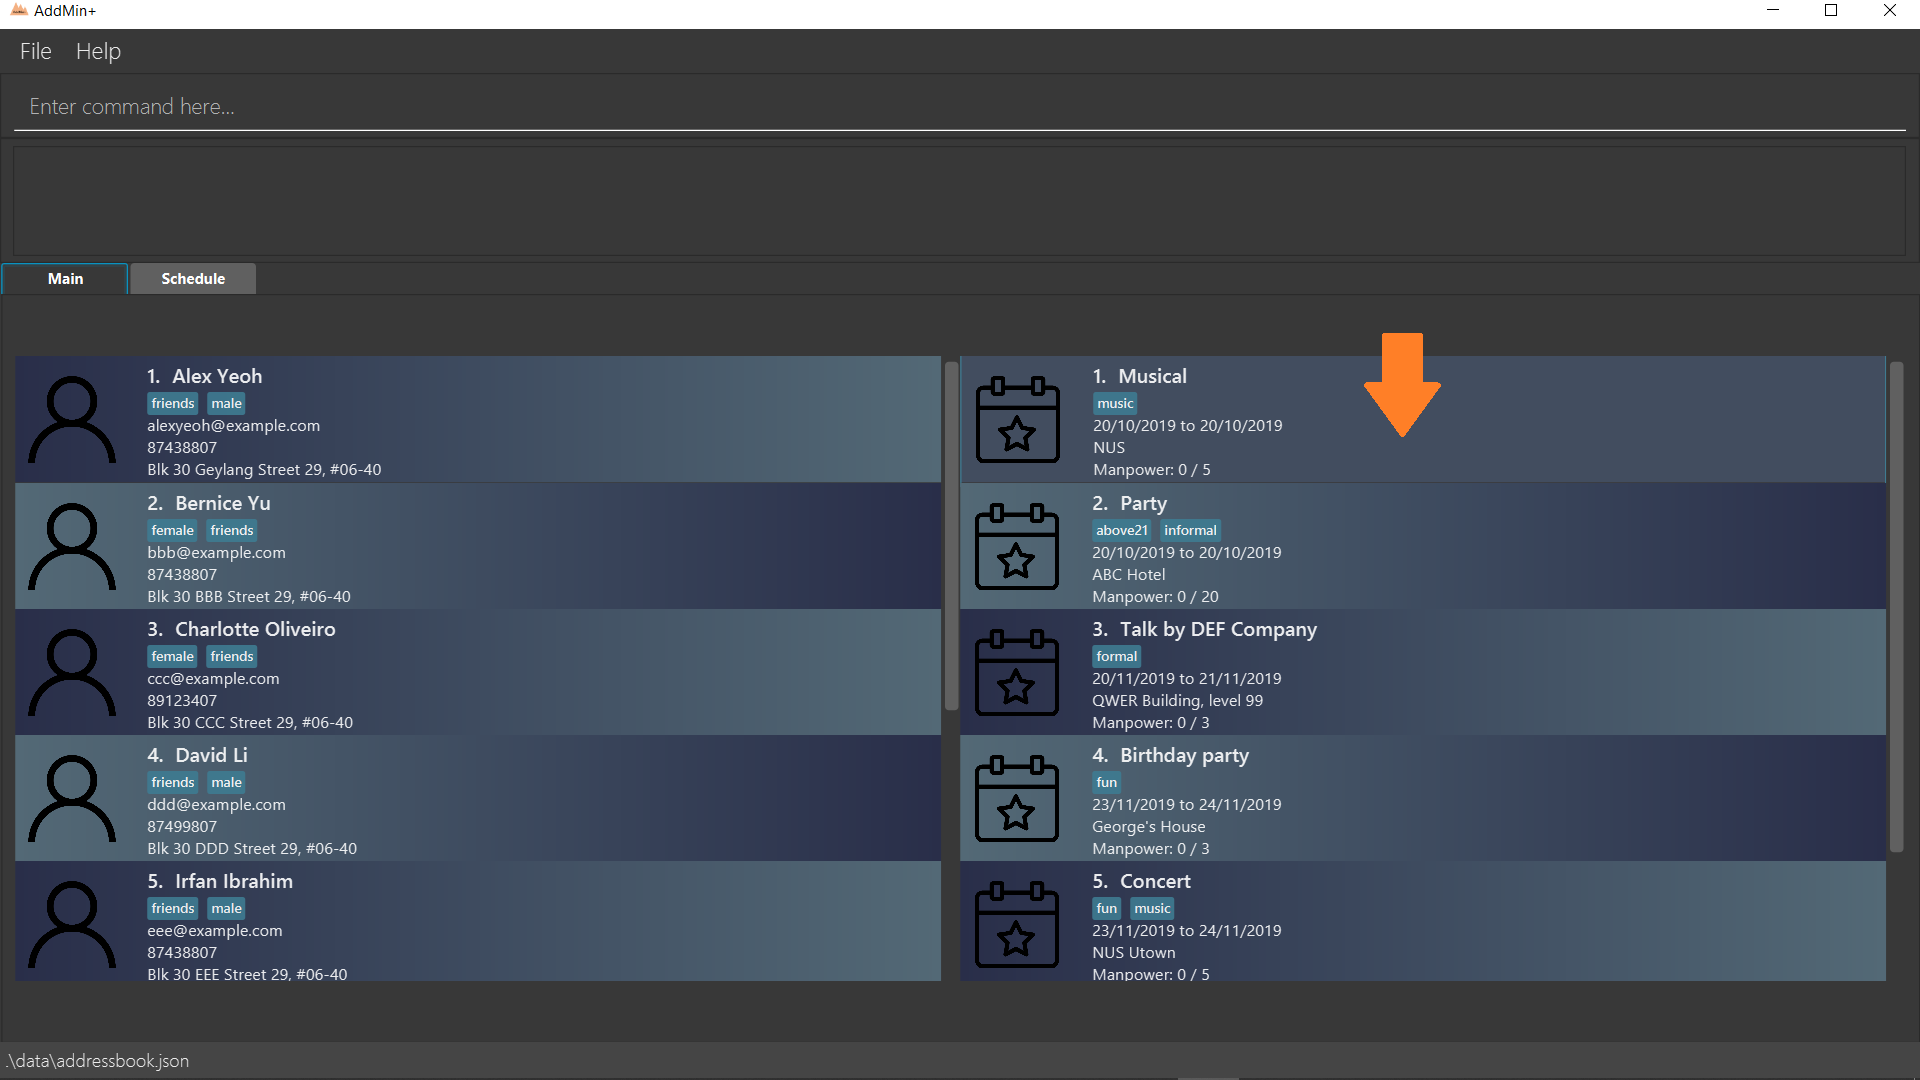
Step 2: After successfully fetching the event, the following Fetch Event Window should show:
3.4.2. Automated allocation of Employees to Events: allocate
Automatically allocates a specified number of employees from the complete employee list to an event based on the filter tags specified by the user. There is no manual selection of employees. Once an employee is allocated to an event, it is assumed that he will be unavailable from the start date to the end date of the event.
Format: allocate EVENT_INDEX [n/NUMBER_OF_EMPLOYEES] [t/TAG_FOR_FILTER]…
| Random selection of employees to allocate if supply exceeds demand of event. |
Examples:
-
allocate 1
Allocate available employees to the 1st event shown in the event list. -
allocate 2 n/3 t/female
Allocate 3 employees who are tagged as 'female' to the 2nd event shown in the event list.
Alternatively, the allocate command can be executed from the GUI in just 1 simple step!
Step 1: To perform a allocate command without number/filter specification, click the allocate button as shown in the Fetch Event Window in Section 3.4.1, “Fetch Full Details of an Event: fetch_ev”.
3.4.3. Manual allocation of Employees to Events: allocatem
Manually chooses and allocates a single employee to an event.
Format: allocatem EVENT_INDEX n/EMPLOYEE_INDEX/ allocatem EVENT_INDEX id/EMPLOYEE_ID
Examples:
-
allocatem 1 n/2
Allocate the 2nd employee on the employee list to the 1st event on the event list. -
allocatem 1 id/002
Allocate the employee with id:"002" to the 1st event on the event list.
Alternatively, the allocatem command can be executed from the GUI in just 2 simple step!
Step 1: Double-click the employee card on the left list. Notice the employee to allocate as shown in the following figure.
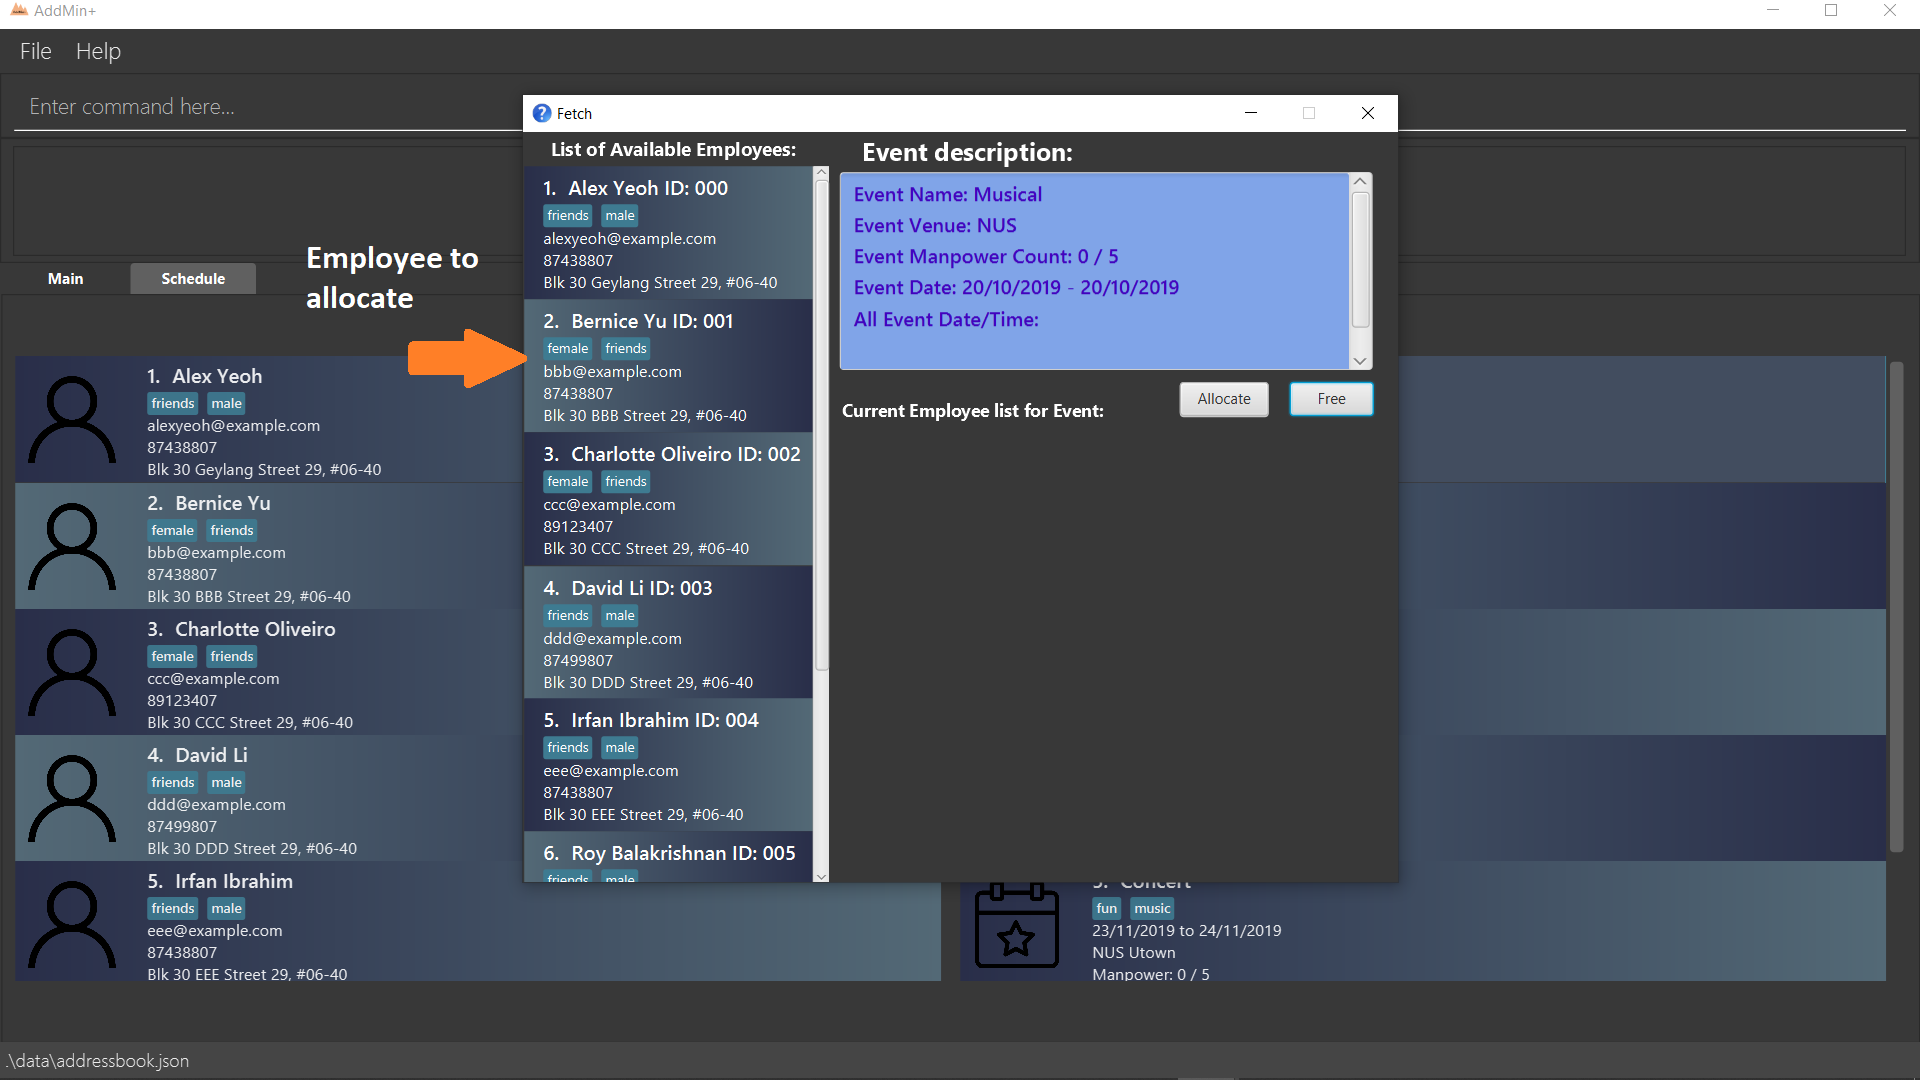
allocatem commandStep 2: Result after the allocatem command is shown below:
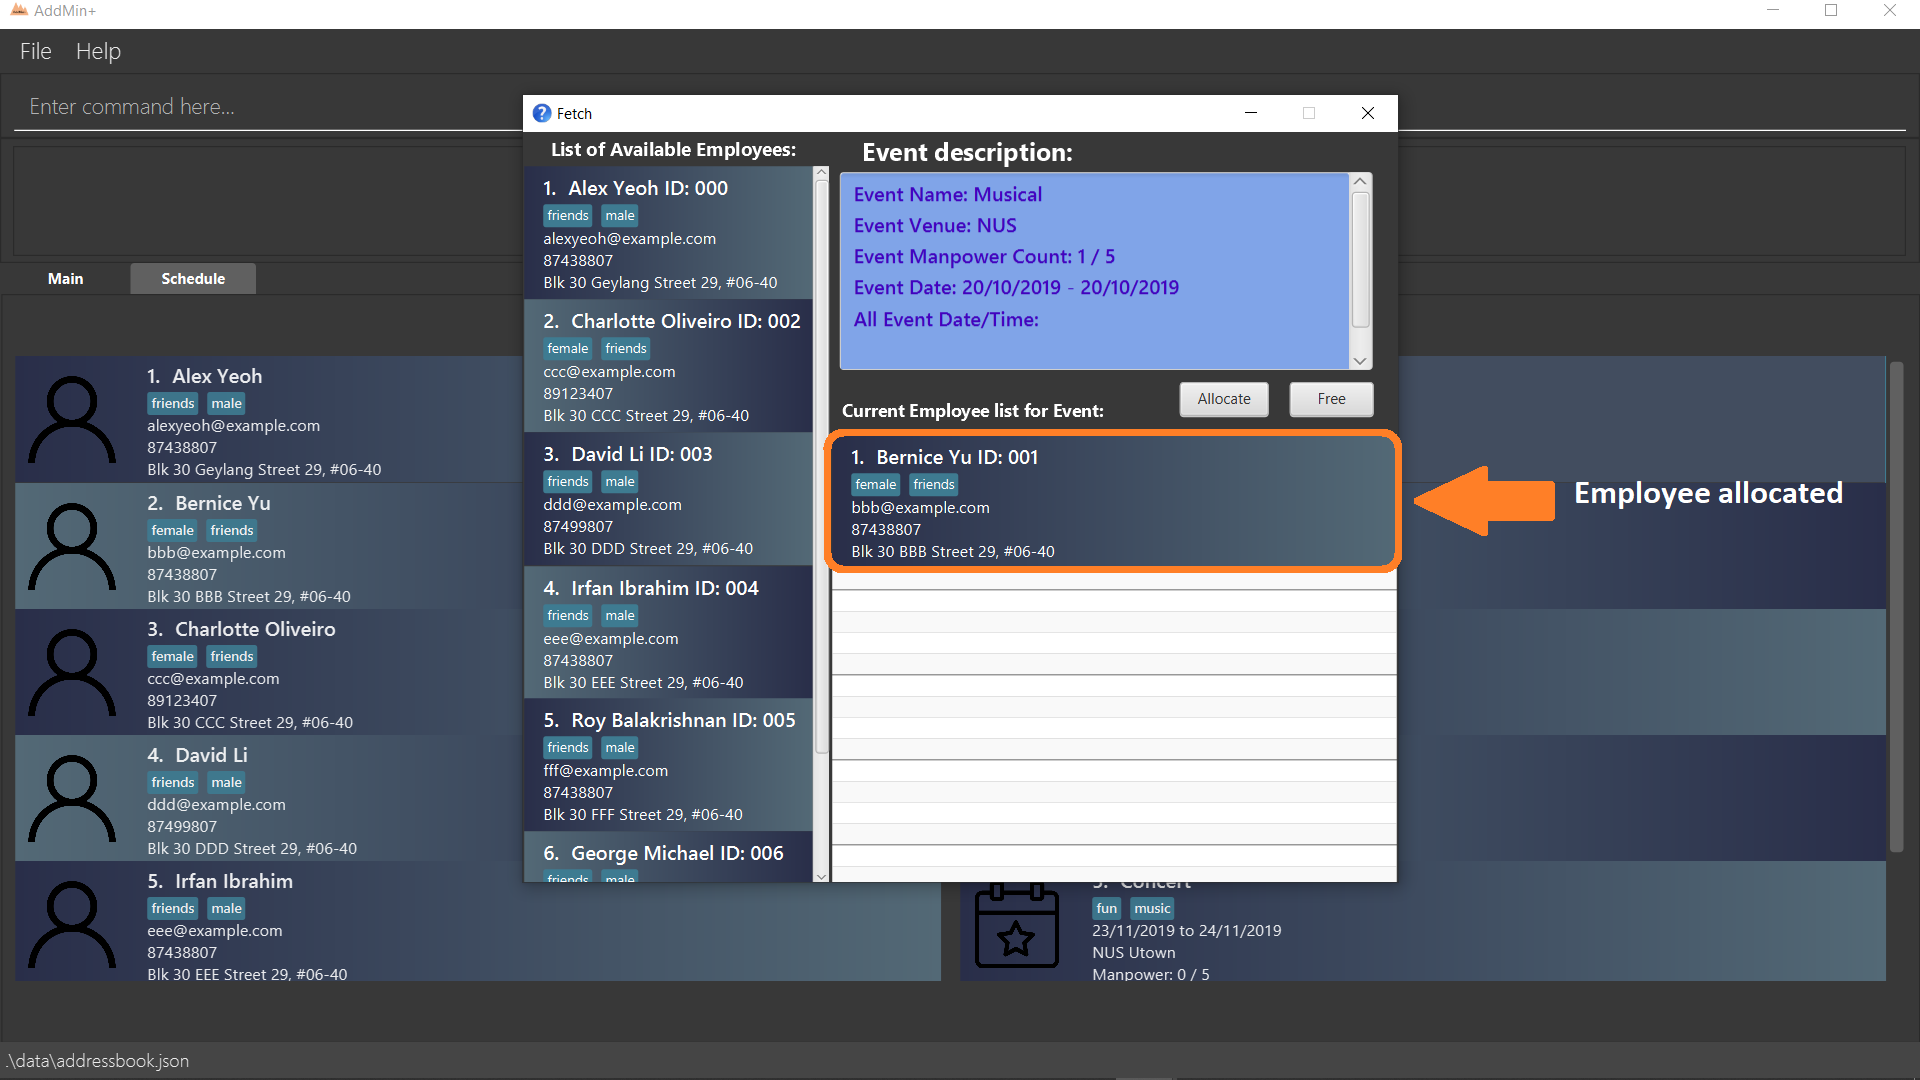
allocatem command3.4.4. De-allocation of Employees from Event: free
Free employees allocated to the event.
Format: free EVENT_INDEX [id/EMPLOYEE_ID]
Examples:
-
free 1
Free all employees allocated to the 1st event on the event list. -
free 1 id/001
Free an employee with id: "001" allocated to the 1st event on the event list.
Alternatively, the free command can be executed from the GUI in just 1 simple step!
Step 1: To perform a free command without ID specification, click the free button as shown in the Fetch Event Window in Section 3.4.1, “Fetch Full Details of an Event: fetch_ev”.
To free a particular employee to an event, double-click the employee card on the right list as shown in the 2nd figure in Section 3.4.3, “Manual allocation of Employees to Events: allocatem”
|
3.4.5. Setting a Date&Time to an Event: set_ev_dt
Sets a Date-Time Schedule Mapping for a specific Event.
| Even though the start date and end dates of each event is stated, the event is not assumed to be held for the entire range. Hence, the Date-Time setting feature enables the user to declare and set the schedule of the event. Events are initialized without any schedule, other than their stated start and end date with a default time of 0800-1800. |
Format: set_ev_dt EVENT_INDEX [on/EVENT_DATE] [till/EVENT_DATE] time/EVENT_DAYTIME
Examples:
-
set_ev_dt 2 on/02/10/2019 time/1000-2000
Sets the 2nd Event from the Event List a time period of 10am-8pm on the 2nd of October 2019. -
set_ev_dt 3 time/0500-1500
Sets the 3rd Event from the Event List a time period of 5am-3pm on all dates from the start to the end date (inclusive) of the Event. -
set_ev_dt 1 on/02/10/2019 till/10/10/2019 time/0500-1500
Sets the 1st Event from the Event List a time period of 5am-3pm on all dates from the 2nd of October to the 10th of October (inclusive).
3.4.6. Delete a DateTime Mapping from an Event: delete_ev_dt
Deletes Date-Time mappings for a specific event by stating a single date or a range of dates.
Format: delete_ev_dt EVENT_INDEX on/EVENT_DATE [till/EVENT_DATE]
Example:
-
delete_ev_dt 2 on/18/10/2019
Deletes the Date-Time mapping on 18th October from the 2nd Event on the Event list. -
delete_ev_dt 2 on/18/10/2019 till/22/10/2019
Deletes all Date-Time mappings that lie in the range of 18th - 22nd of October 2019 from the 2nd Event on the Event list.
3.4.7. Clear all DateTime Mappings from an Event: clear_ev_dt
Clears all Date-Time mappings for a specific event.
Format: clear_ev_dt EVENT_INDEX
Example:
-
clear_ev_dt 2
Clears all the date-time mapping from the 2nd Event on the Event list.
3.5. Finance Management
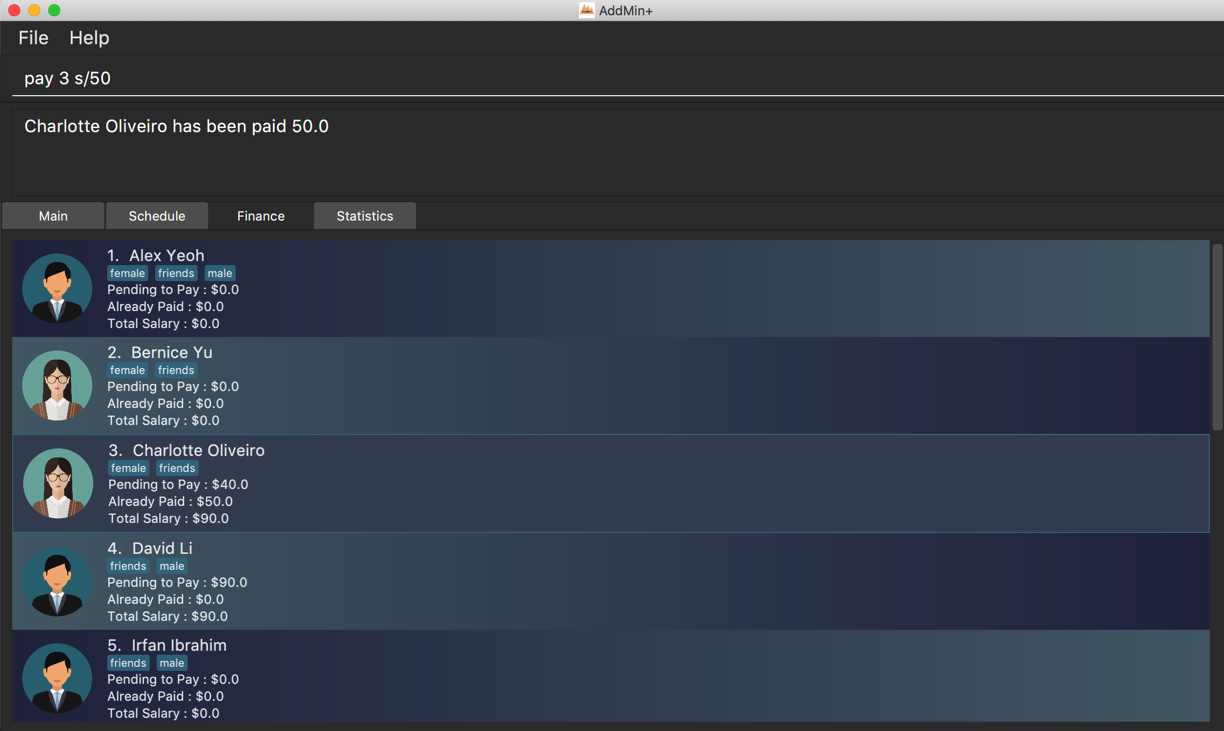
3.5.1. Generate Payment To Employee: pay
Generates the payment for an employee
Format: pay EMPLOYEE_INDEX s/VALUE
Examples:
-
list_em
pay 3 s/50
Generates the payment of employee with $50.
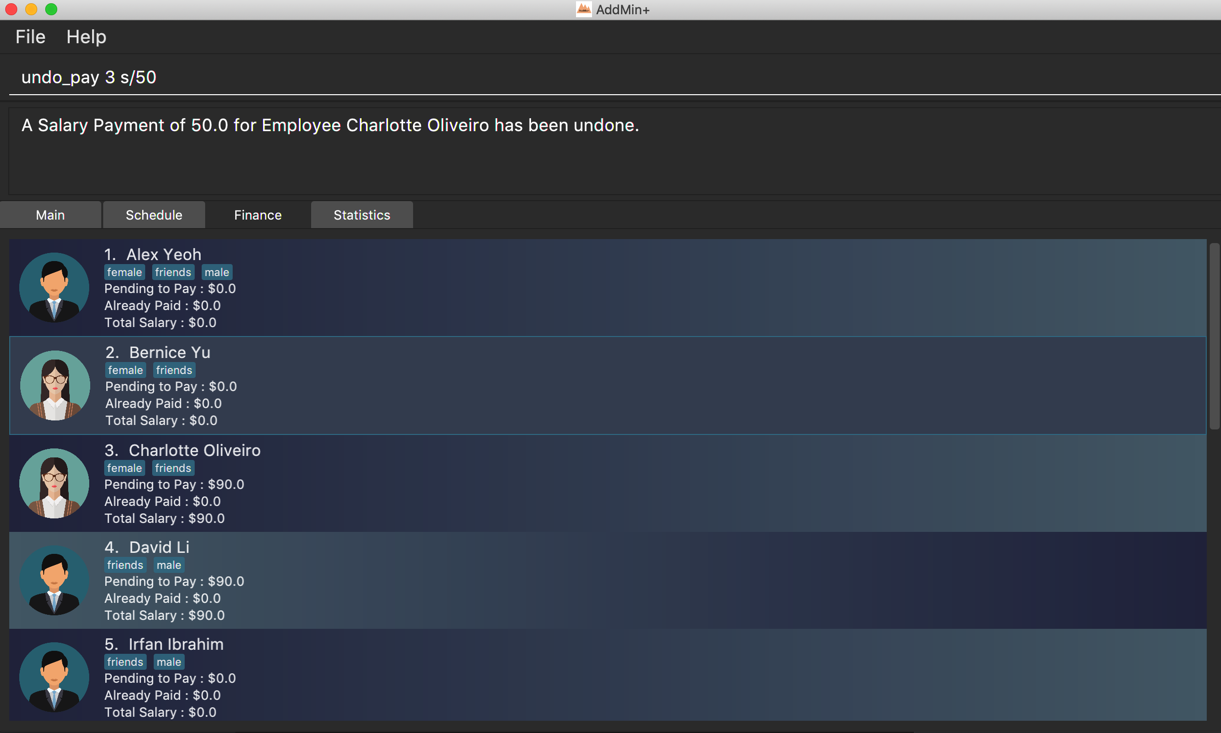
3.5.2. Undo Payment To Employee: undo_pay
Undo the payment for an employee
Format: undo_pay EMPLOYEE_INDEX s/VALUE
Examples:
-
list_em
undo_pay 3 s/50
Undo the payment of employee with $50.
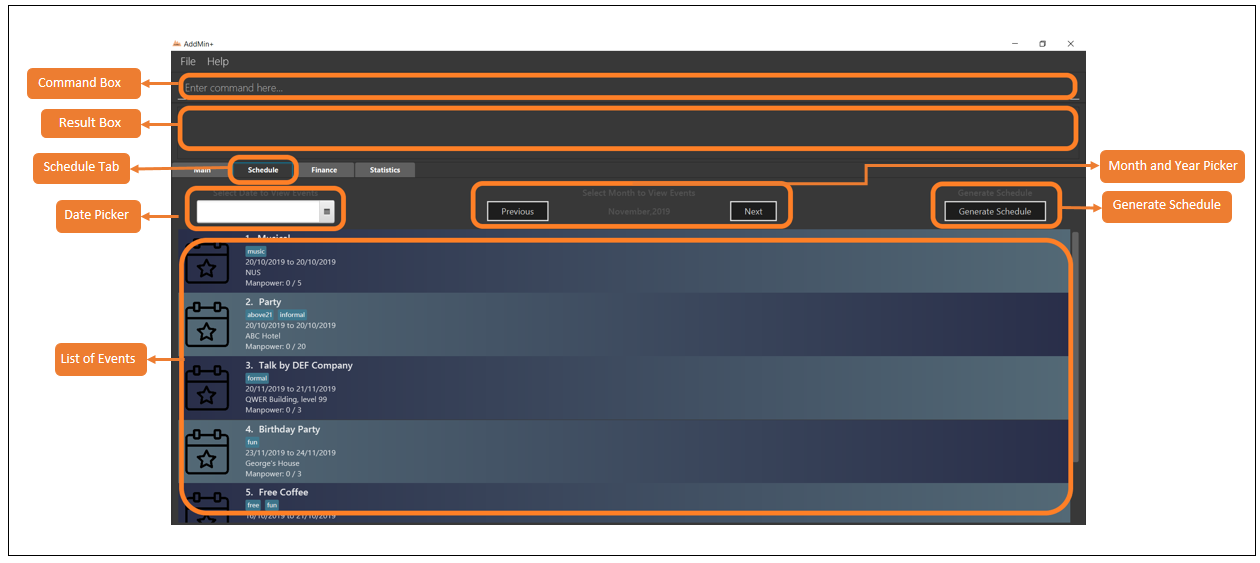
3.6. Schedule Management
Welcome to Schedule! Looking for a way to display and see what events you have on a specific Date or Month? Want to have an overview of all the dates where you have an event? Then you are at the right place!
To get things started, all Schedule-related commands occur in the Schedule Tab as seen from the figure below. You can get to the Schedule Tab easily by either clicking on the Schedule Tab on the User Interface or just simply type in any Schedule-related commands and AddMin+ will bring you there.
|
3.6.1. Display Schedule for a specific date: display_schedule_date
Want to check if you have any events on a specific date?
Instead of looking through the entire list of events you have, you could use the display_schedule_date command to do it!
Format: display_schedule_date on/dd/MM/yyyy
Examples:
display_schedule_date on/02/12/2019
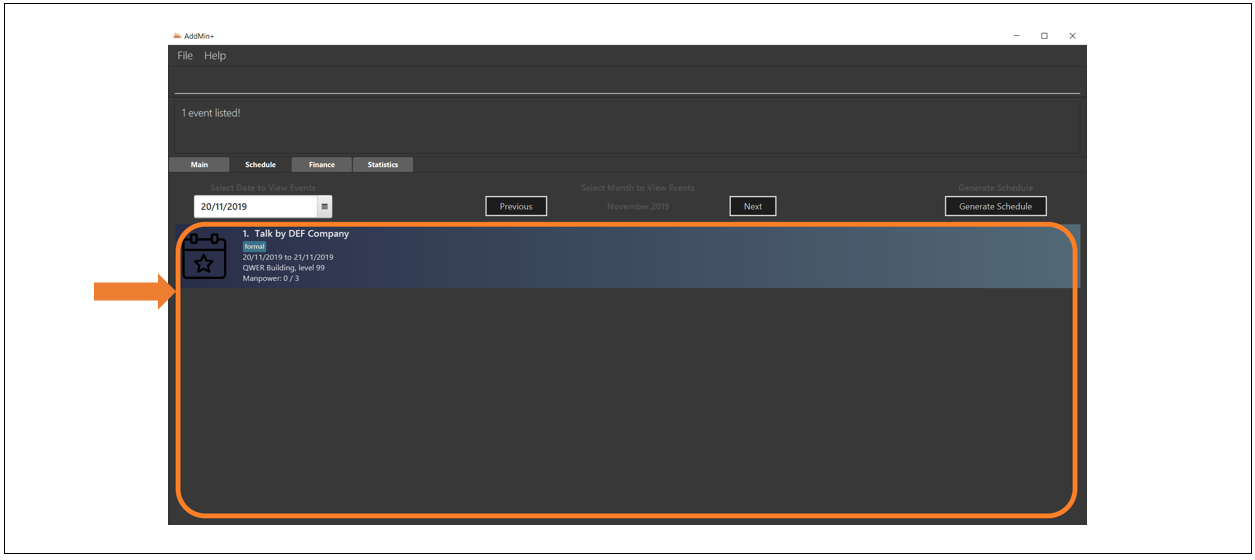
Example: To display schedule for a specific date (20/11/2019):
Step 1.
Either type display_schedule_date on/20/11/2019 into the command box or click on the specific date from the date picker as seen from the figure below.

Step 2. The result box will display a message informing you how many events are being listed. In this case, the message displayed is "1 event listed!"

Step 3. In the event list, you will be able to see all the events that are on the specified date. In this case, the only event that is on 20/11/2019 is "Talk by DEF Company".
|
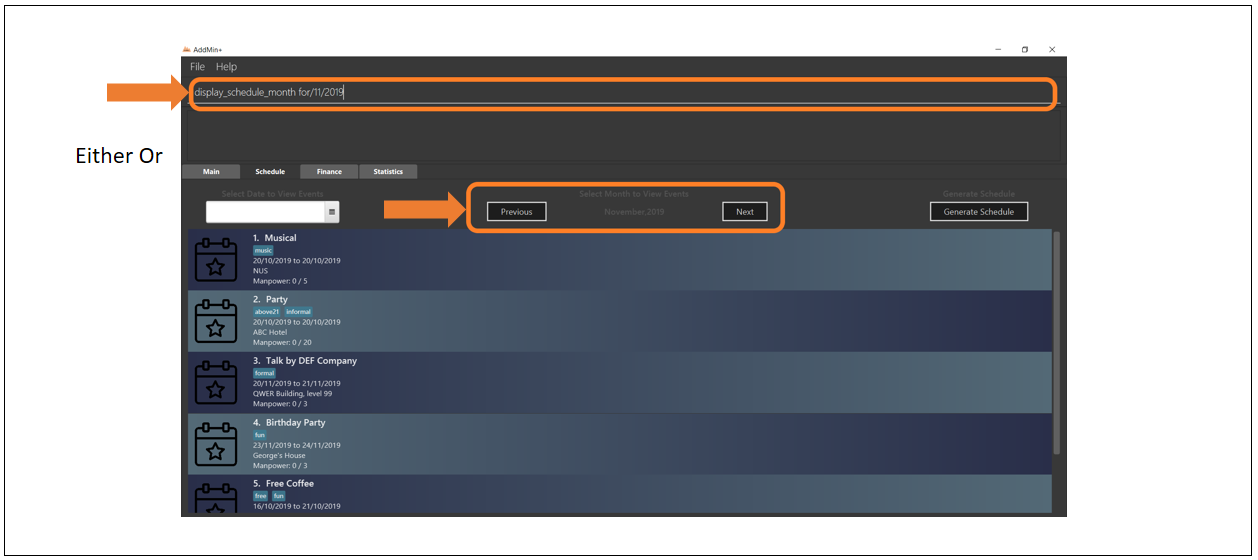
3.6.2. Display Schedule for a specific Month and Year: display_schedule_month
Now you would want to see all the events you have on a specific month and year.
Instead of looking through the list of events you have, you could use the display_schedule_month command to do it!
Format: display_schedule_month for/MM/yyyy
Example: To display schedule for a specific Month and Year (11/2019):
Step 1.
Either type display_schedule_month for/11/2019 into the command box or click on the month year picker buttons to navigate to the specific month and year.
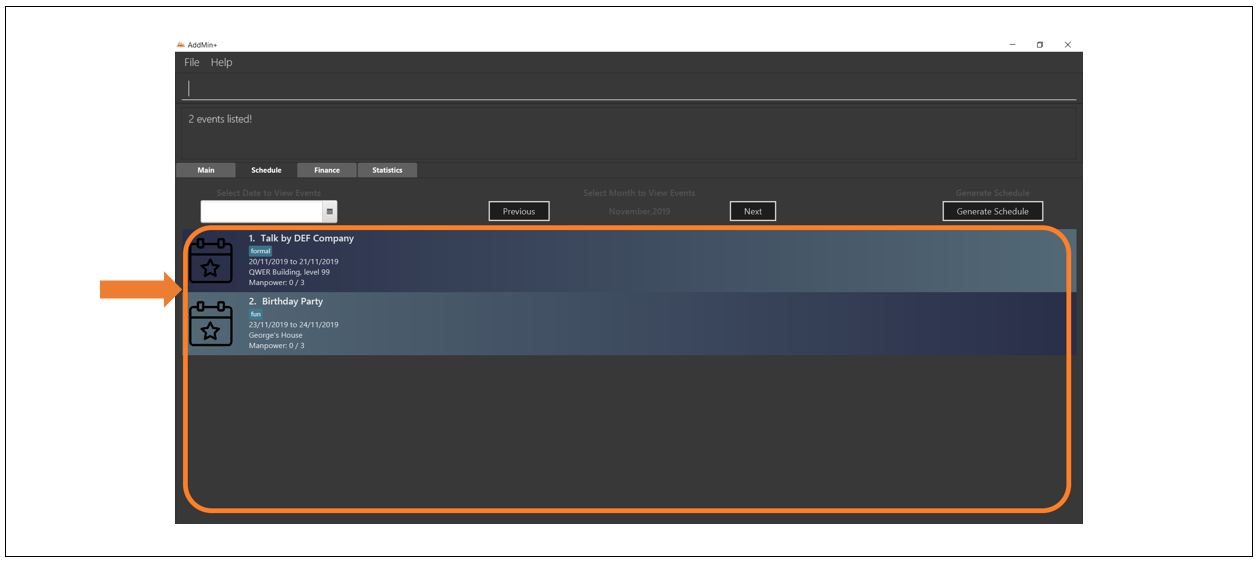
Step 2. The result box will display a message informing you how many events are being listed. In this case, the message displayed is "2 events listed!"

Step 3. In the event list, you will be able to see all the events that are on the specified month, year. In this case, there are 2 events on 11/2019 which are "Talk by DEF Company" and "Birthday Party".
|
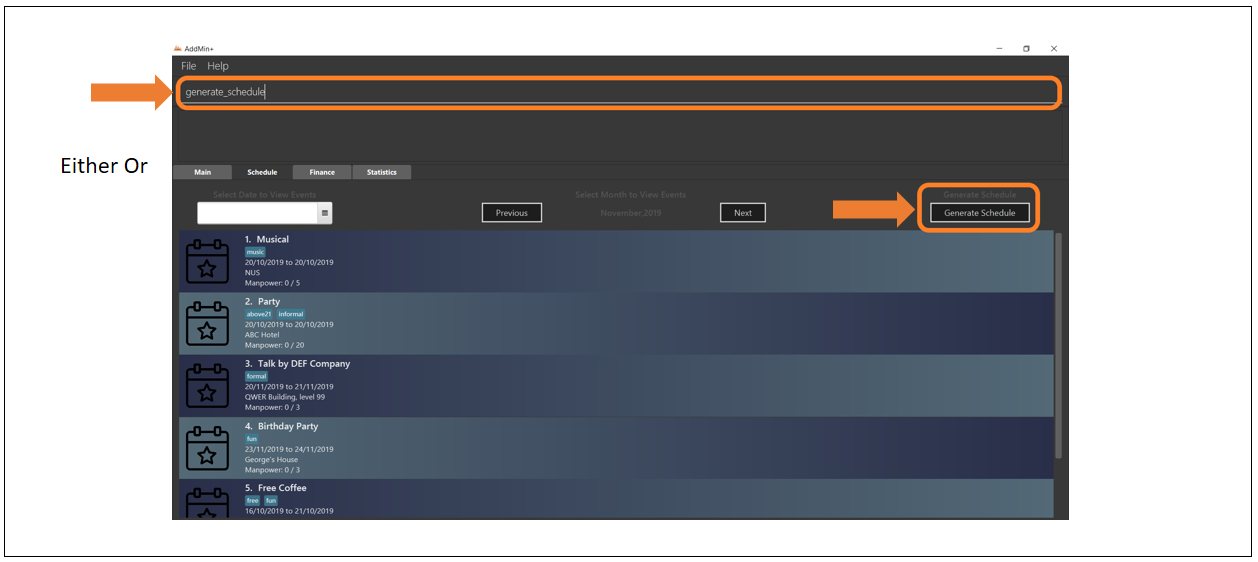
3.6.3. Generate Entire Schedule: generate_schedule
Looking for a way to have an overview of all the dates that has an event?
Use the generate_schedule command to do so.
The generate_schedule command looks through the entire list of events and generates a new window with a list of all the dates which has an event and also displays all the events that happen on that date.
Format: generate_schedule
|
Example: To display the entire schedule:
Step 1.
Either type generate_schedule into the command box or click on the generate schedule button to display the entire schedule.
Step 2. The result box will display the message "Schedule Generated".

Step 3. A new window will open, displaying all the dates and events that are happening on those specific dates.
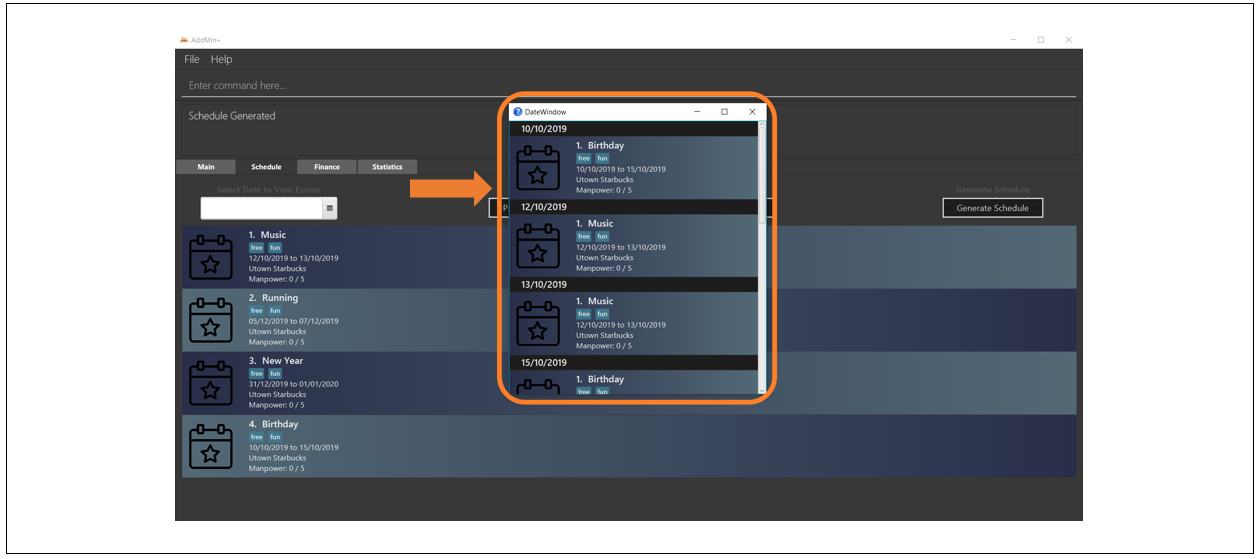
| The generated list will be empty and not display anything if there is no event in the current event list. |
3.6.4. Display Schedule between two specific dates: display_schedule_between
Allows you to see all the events between 2 specific dates!
Format: display_schedule_between start/dd/MM/yyyy end/dd/MM/yyyy
Examples:
display_schedule_between start/02/12/2019 end/31/12/2019
|
3.7. Statistics
3.7.1. Generate Statistics: generate_stats
Displays a set of statistics, Number of events, Number of employee etc
Format: generate_stats
Example: To generate list and pie chart statistics on demand.
Step 1.
Navigate to the statistics tab either using the mouse to click the statistics tab or by typing statistics command.
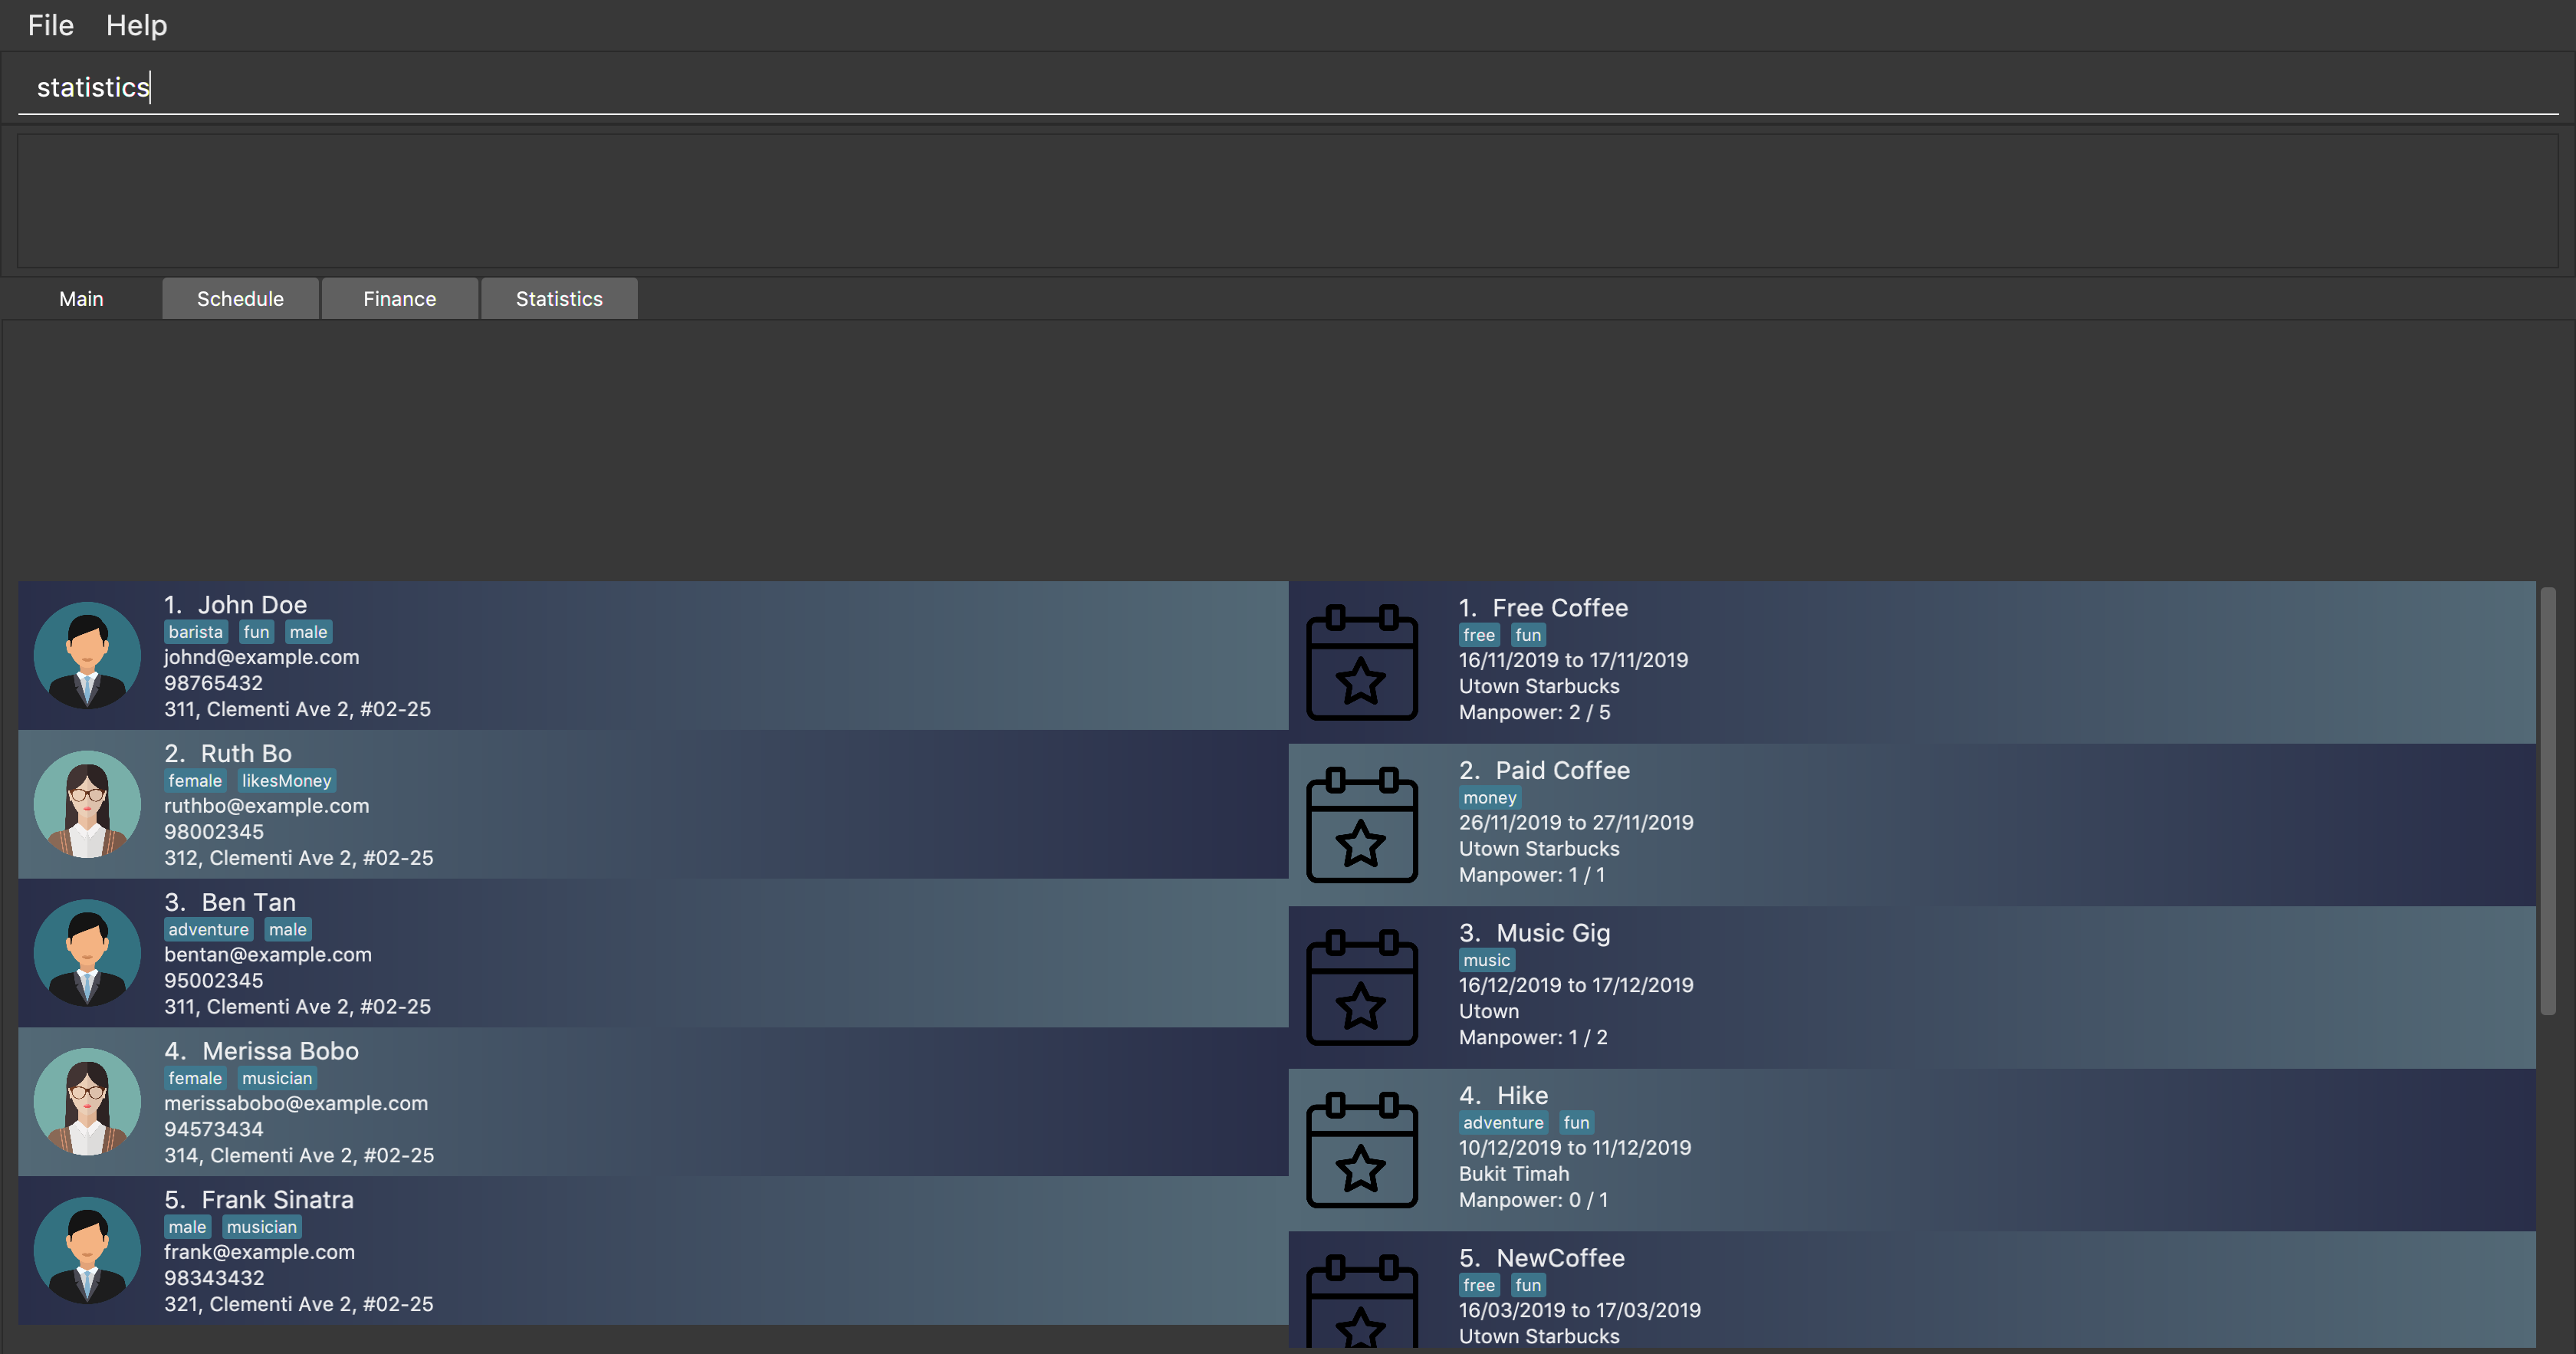
Step 2.
Generate the statistics either by using the mouse to click the generate statistics button or by typing generate_stats command.
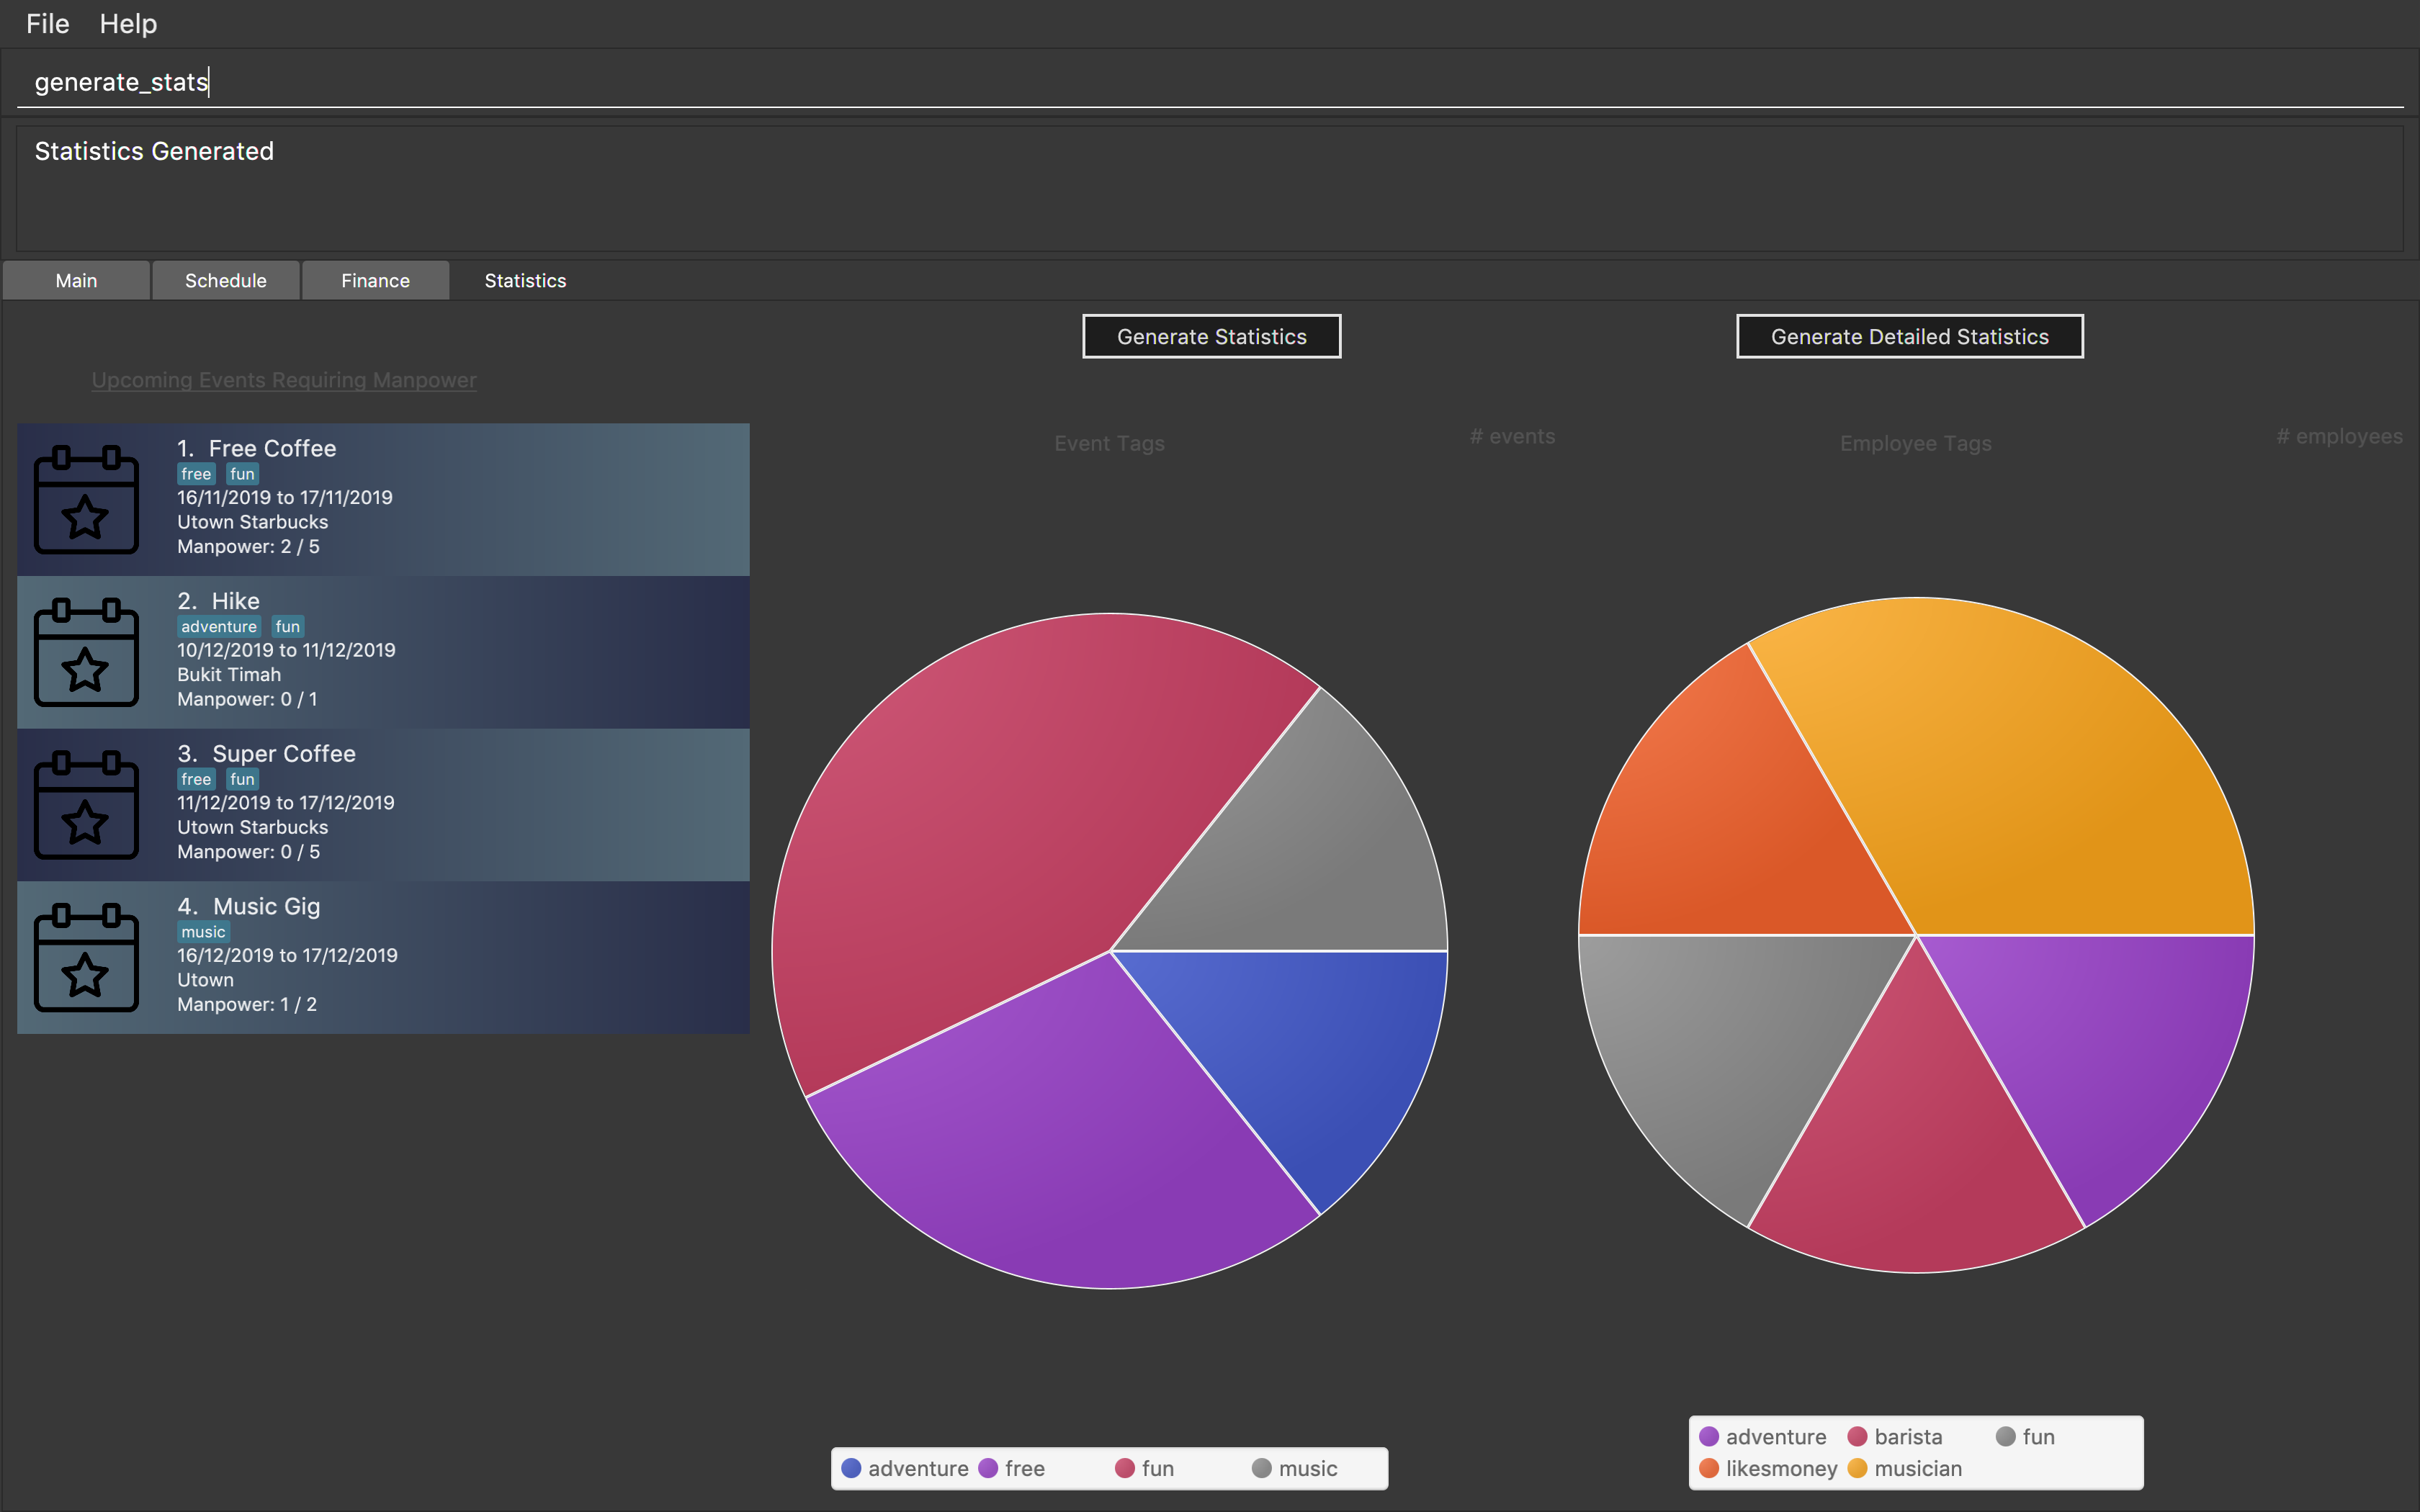
Step 3. Statistics will be displayed in 2 different types of views: list and pie chart. The list will display the upcoming events that require manpower sorted from the nearest upcoming date to the furthest date. The pie charts represent the upcoming events that require manpower and employees tags respectively. This is done this way to help the user identify efficiently if they have sufficient employees with matching tags for the event or if more employees may need to be hired to match the tag of the upcoming event. For example, a music event will have a 'music' tag and an employee who plays the guitar will have a 'musician' tag. The pie charts will reflect that there is one event under the 'music' tag and one employee under the 'musician' tag.

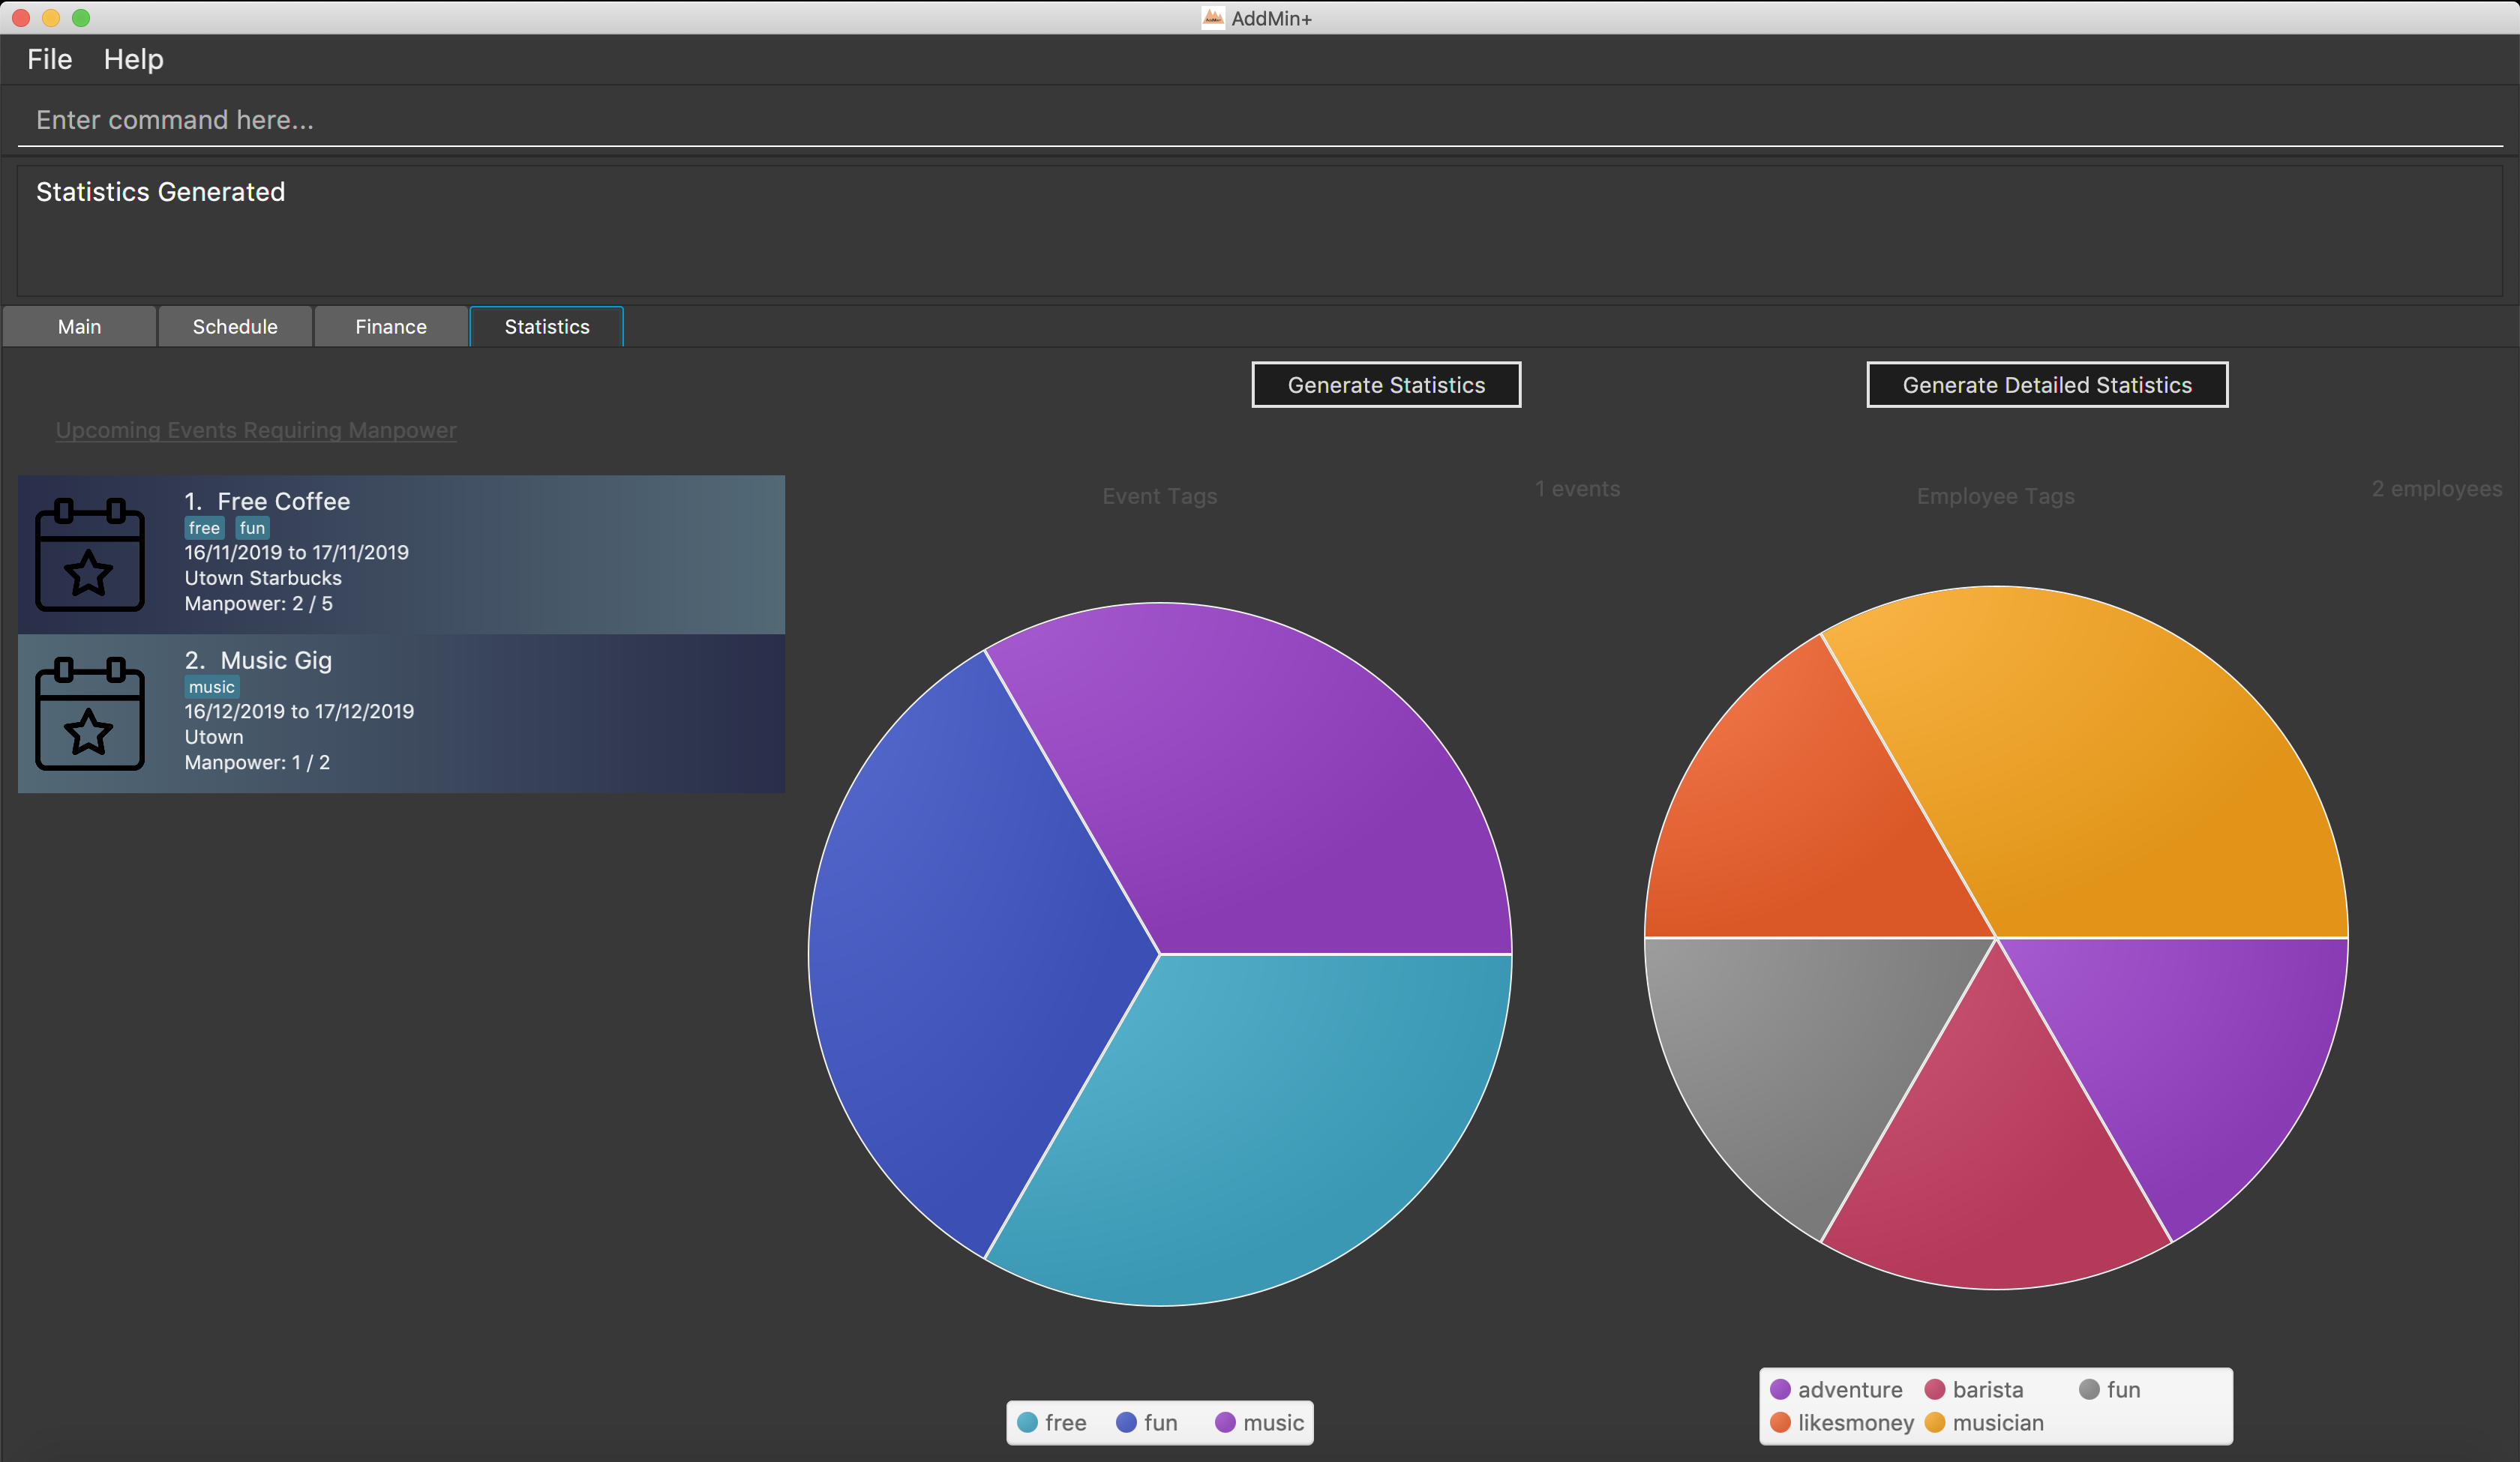
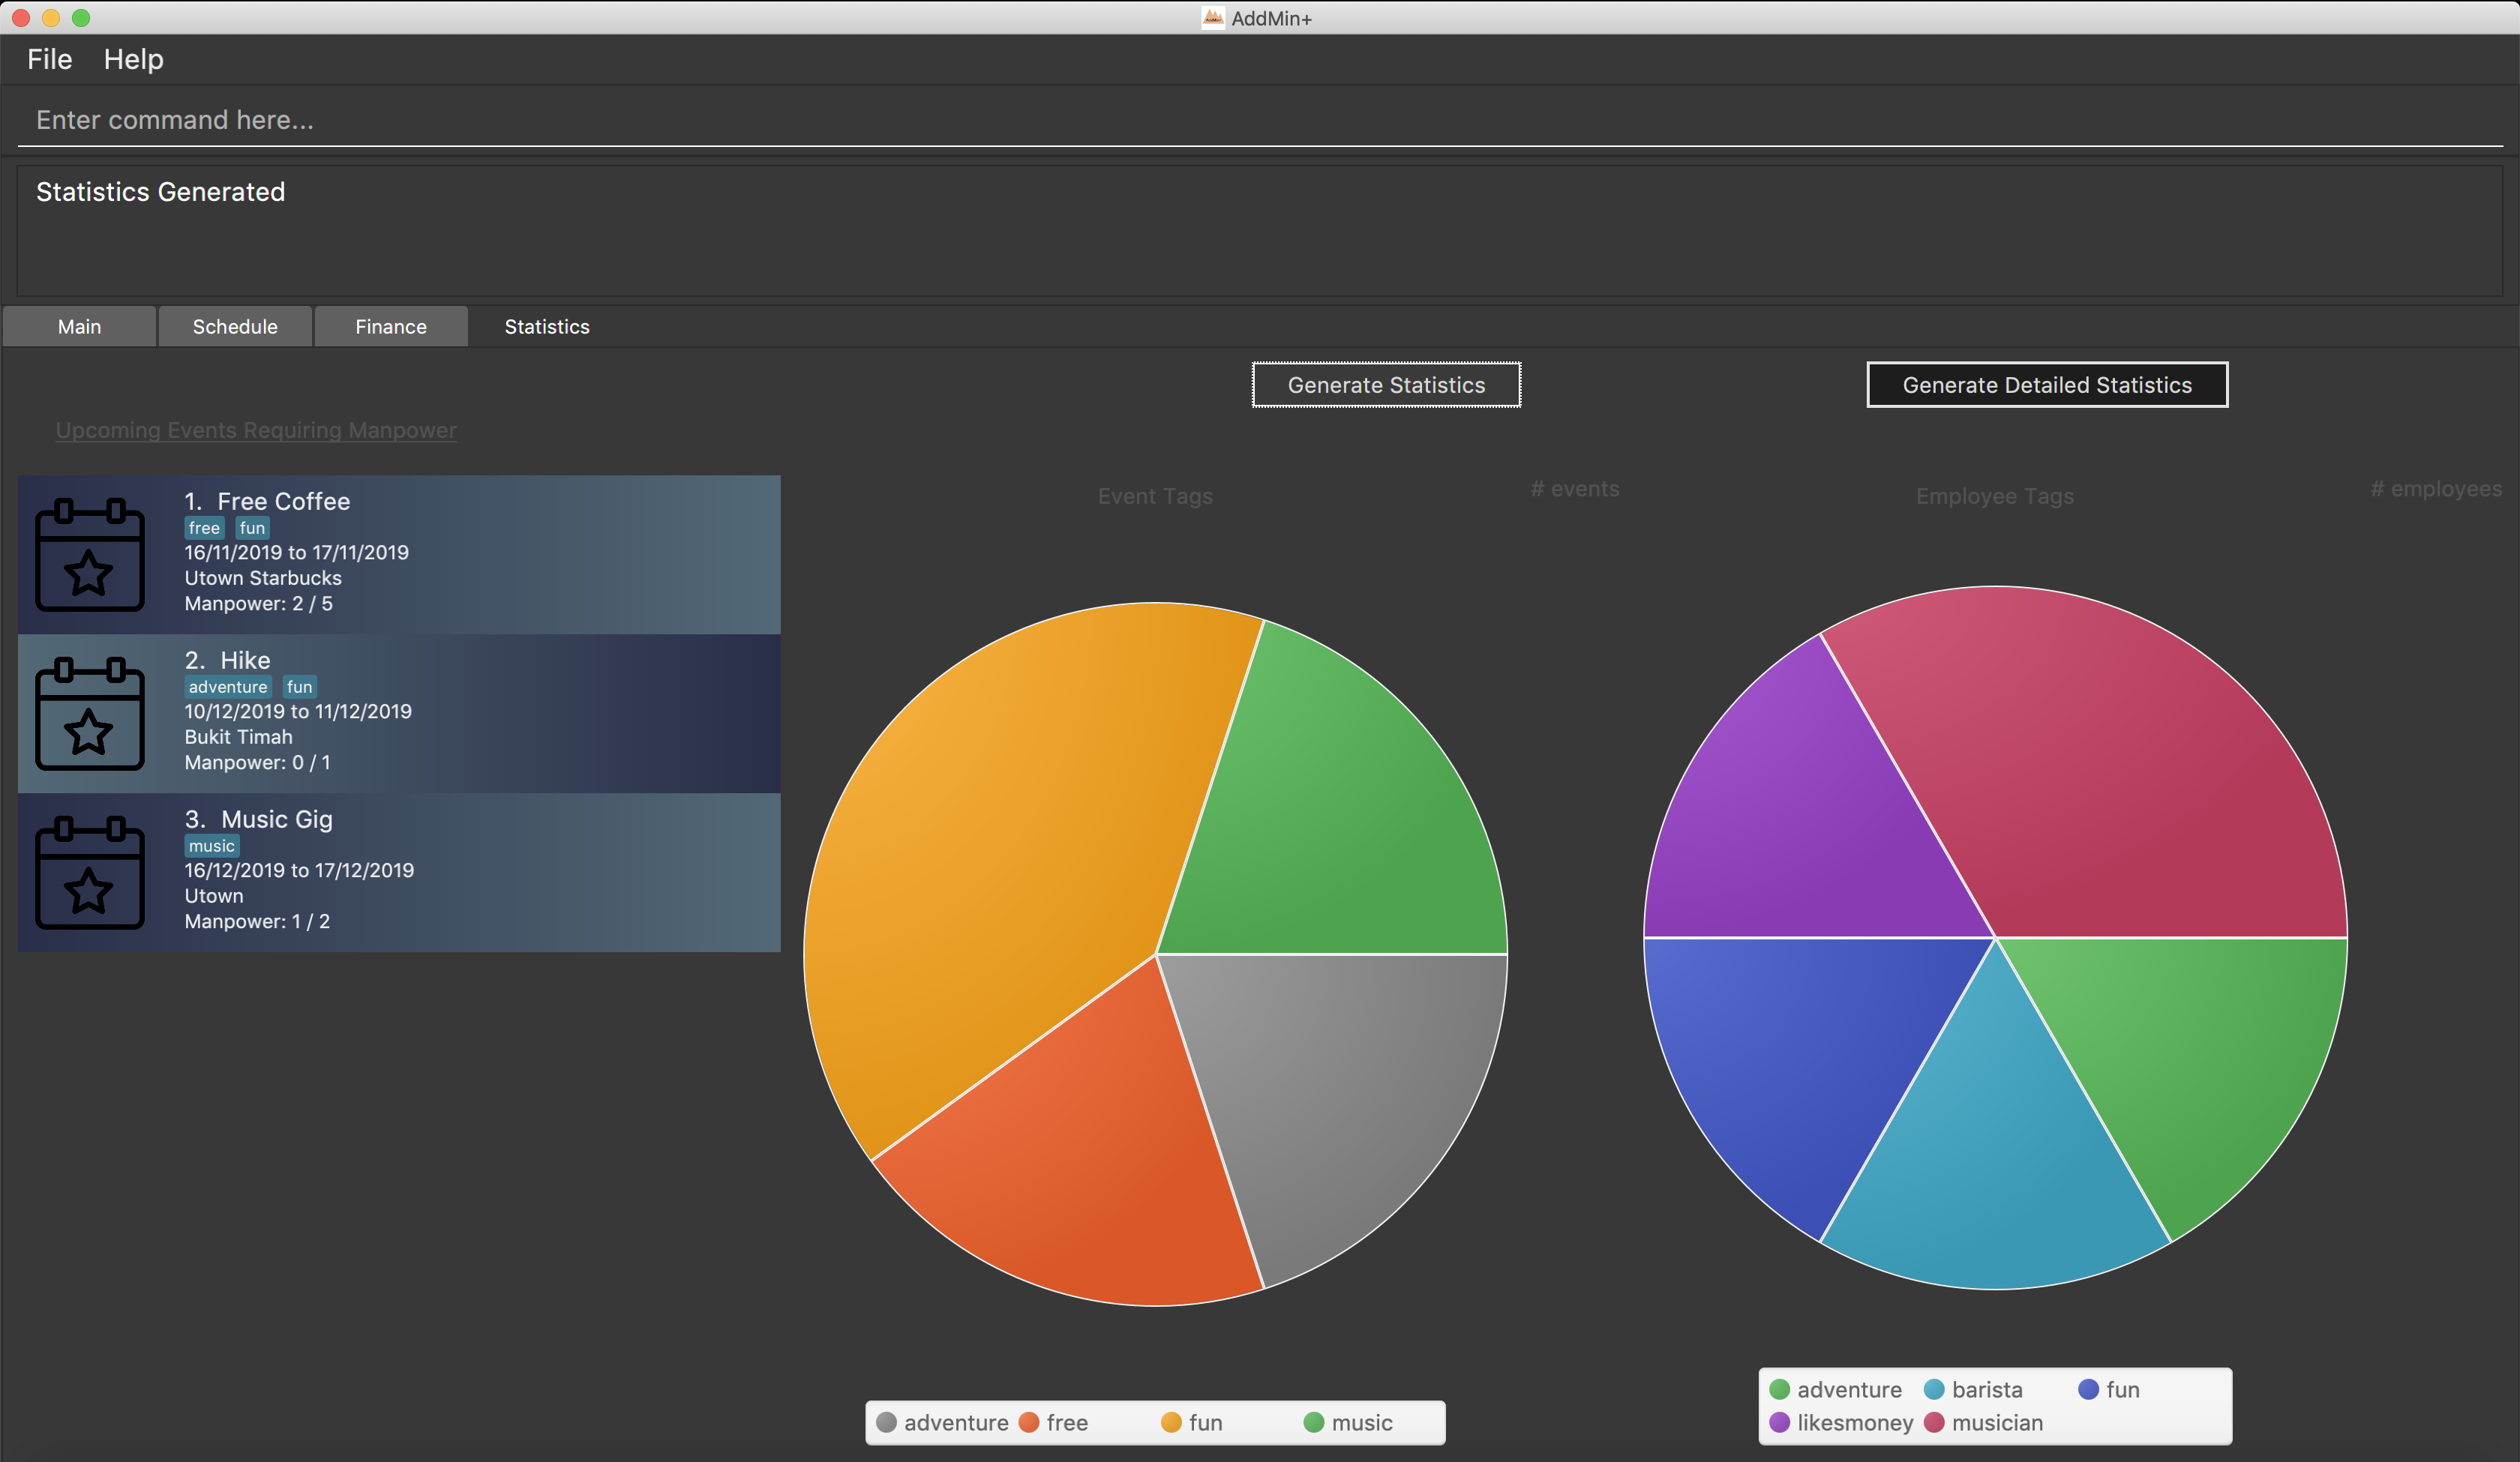
Step 4. To allocate an employee to an upcoming event, double-click the event on the list and it will display the allocate function covered earlier in the User Guide. The segments on the pie charts can also be clicked to display the number of events or employees associated with that specific tag on the top right corner of each of the pie charts.
Step 5. Generate statistics manually when any change in data occurs to keep the statistics up to date and relevant.
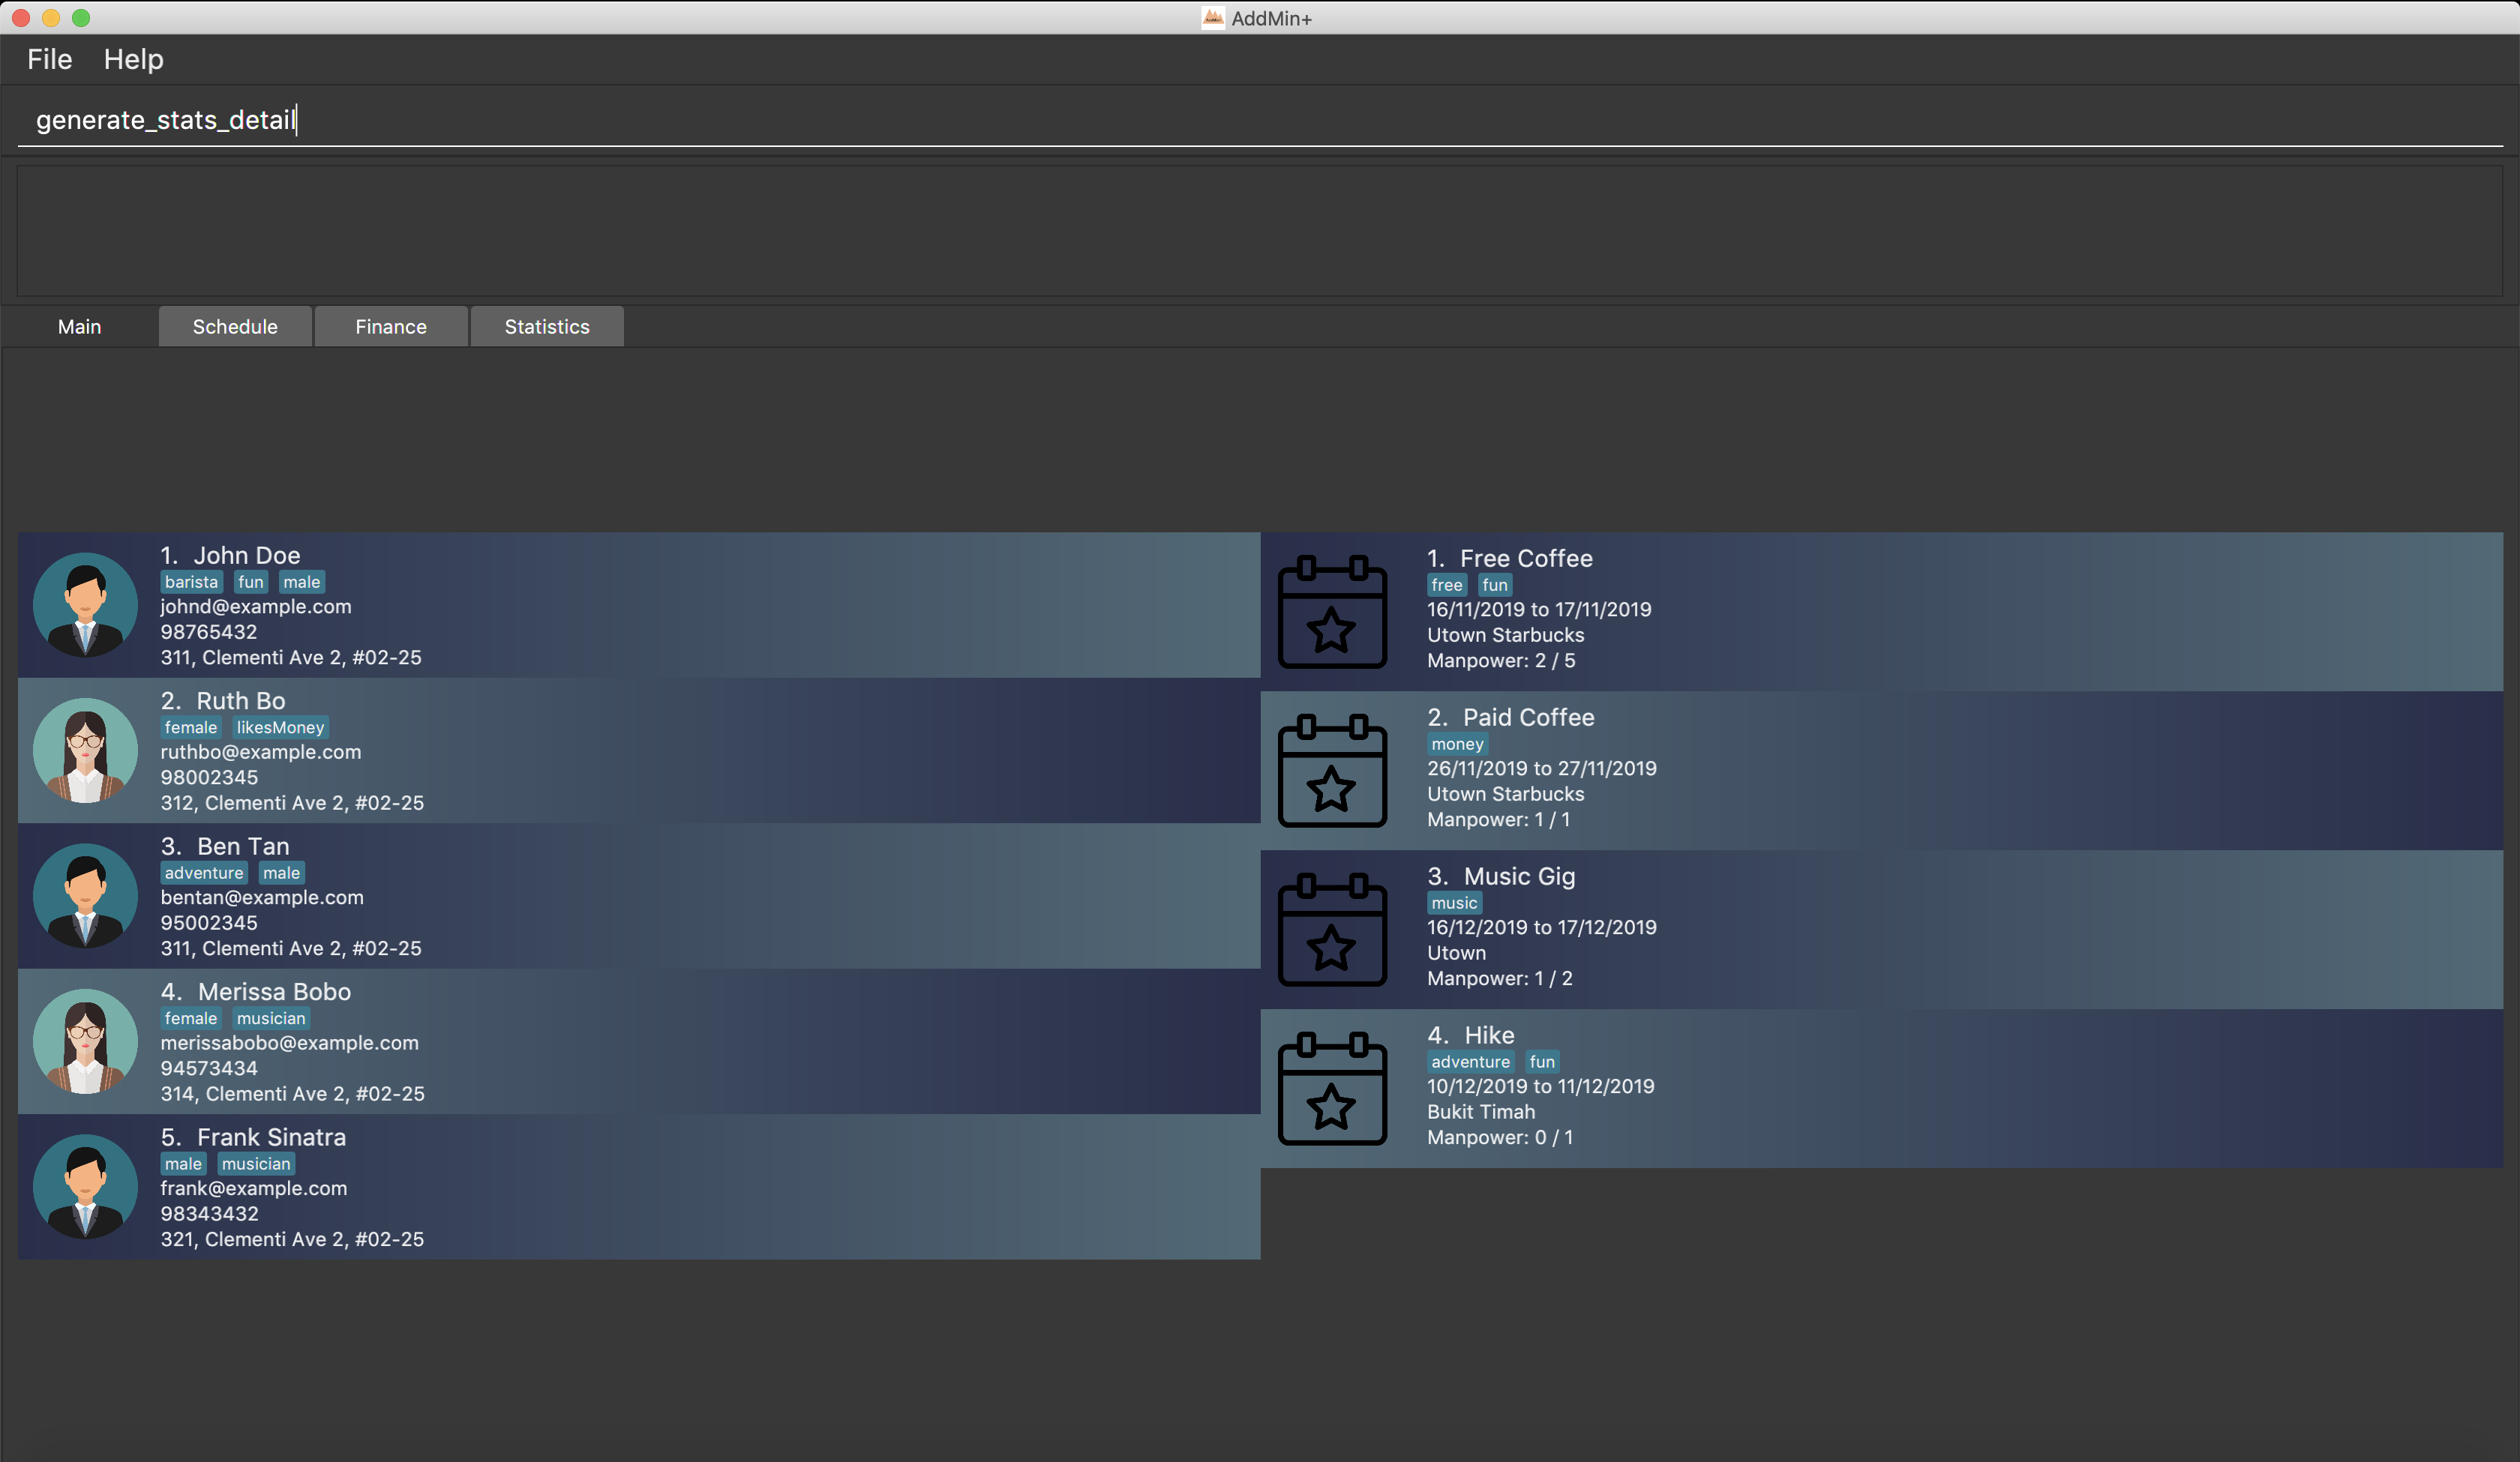
3.7.2. Generate Detailed Statistics: generate_stats_detail
Displays a set of statistics, Number of events, Number of employee etc
Format: generate_stats_detail
Example: To generate detailed statistics in plain text format on demand.
Step 1.
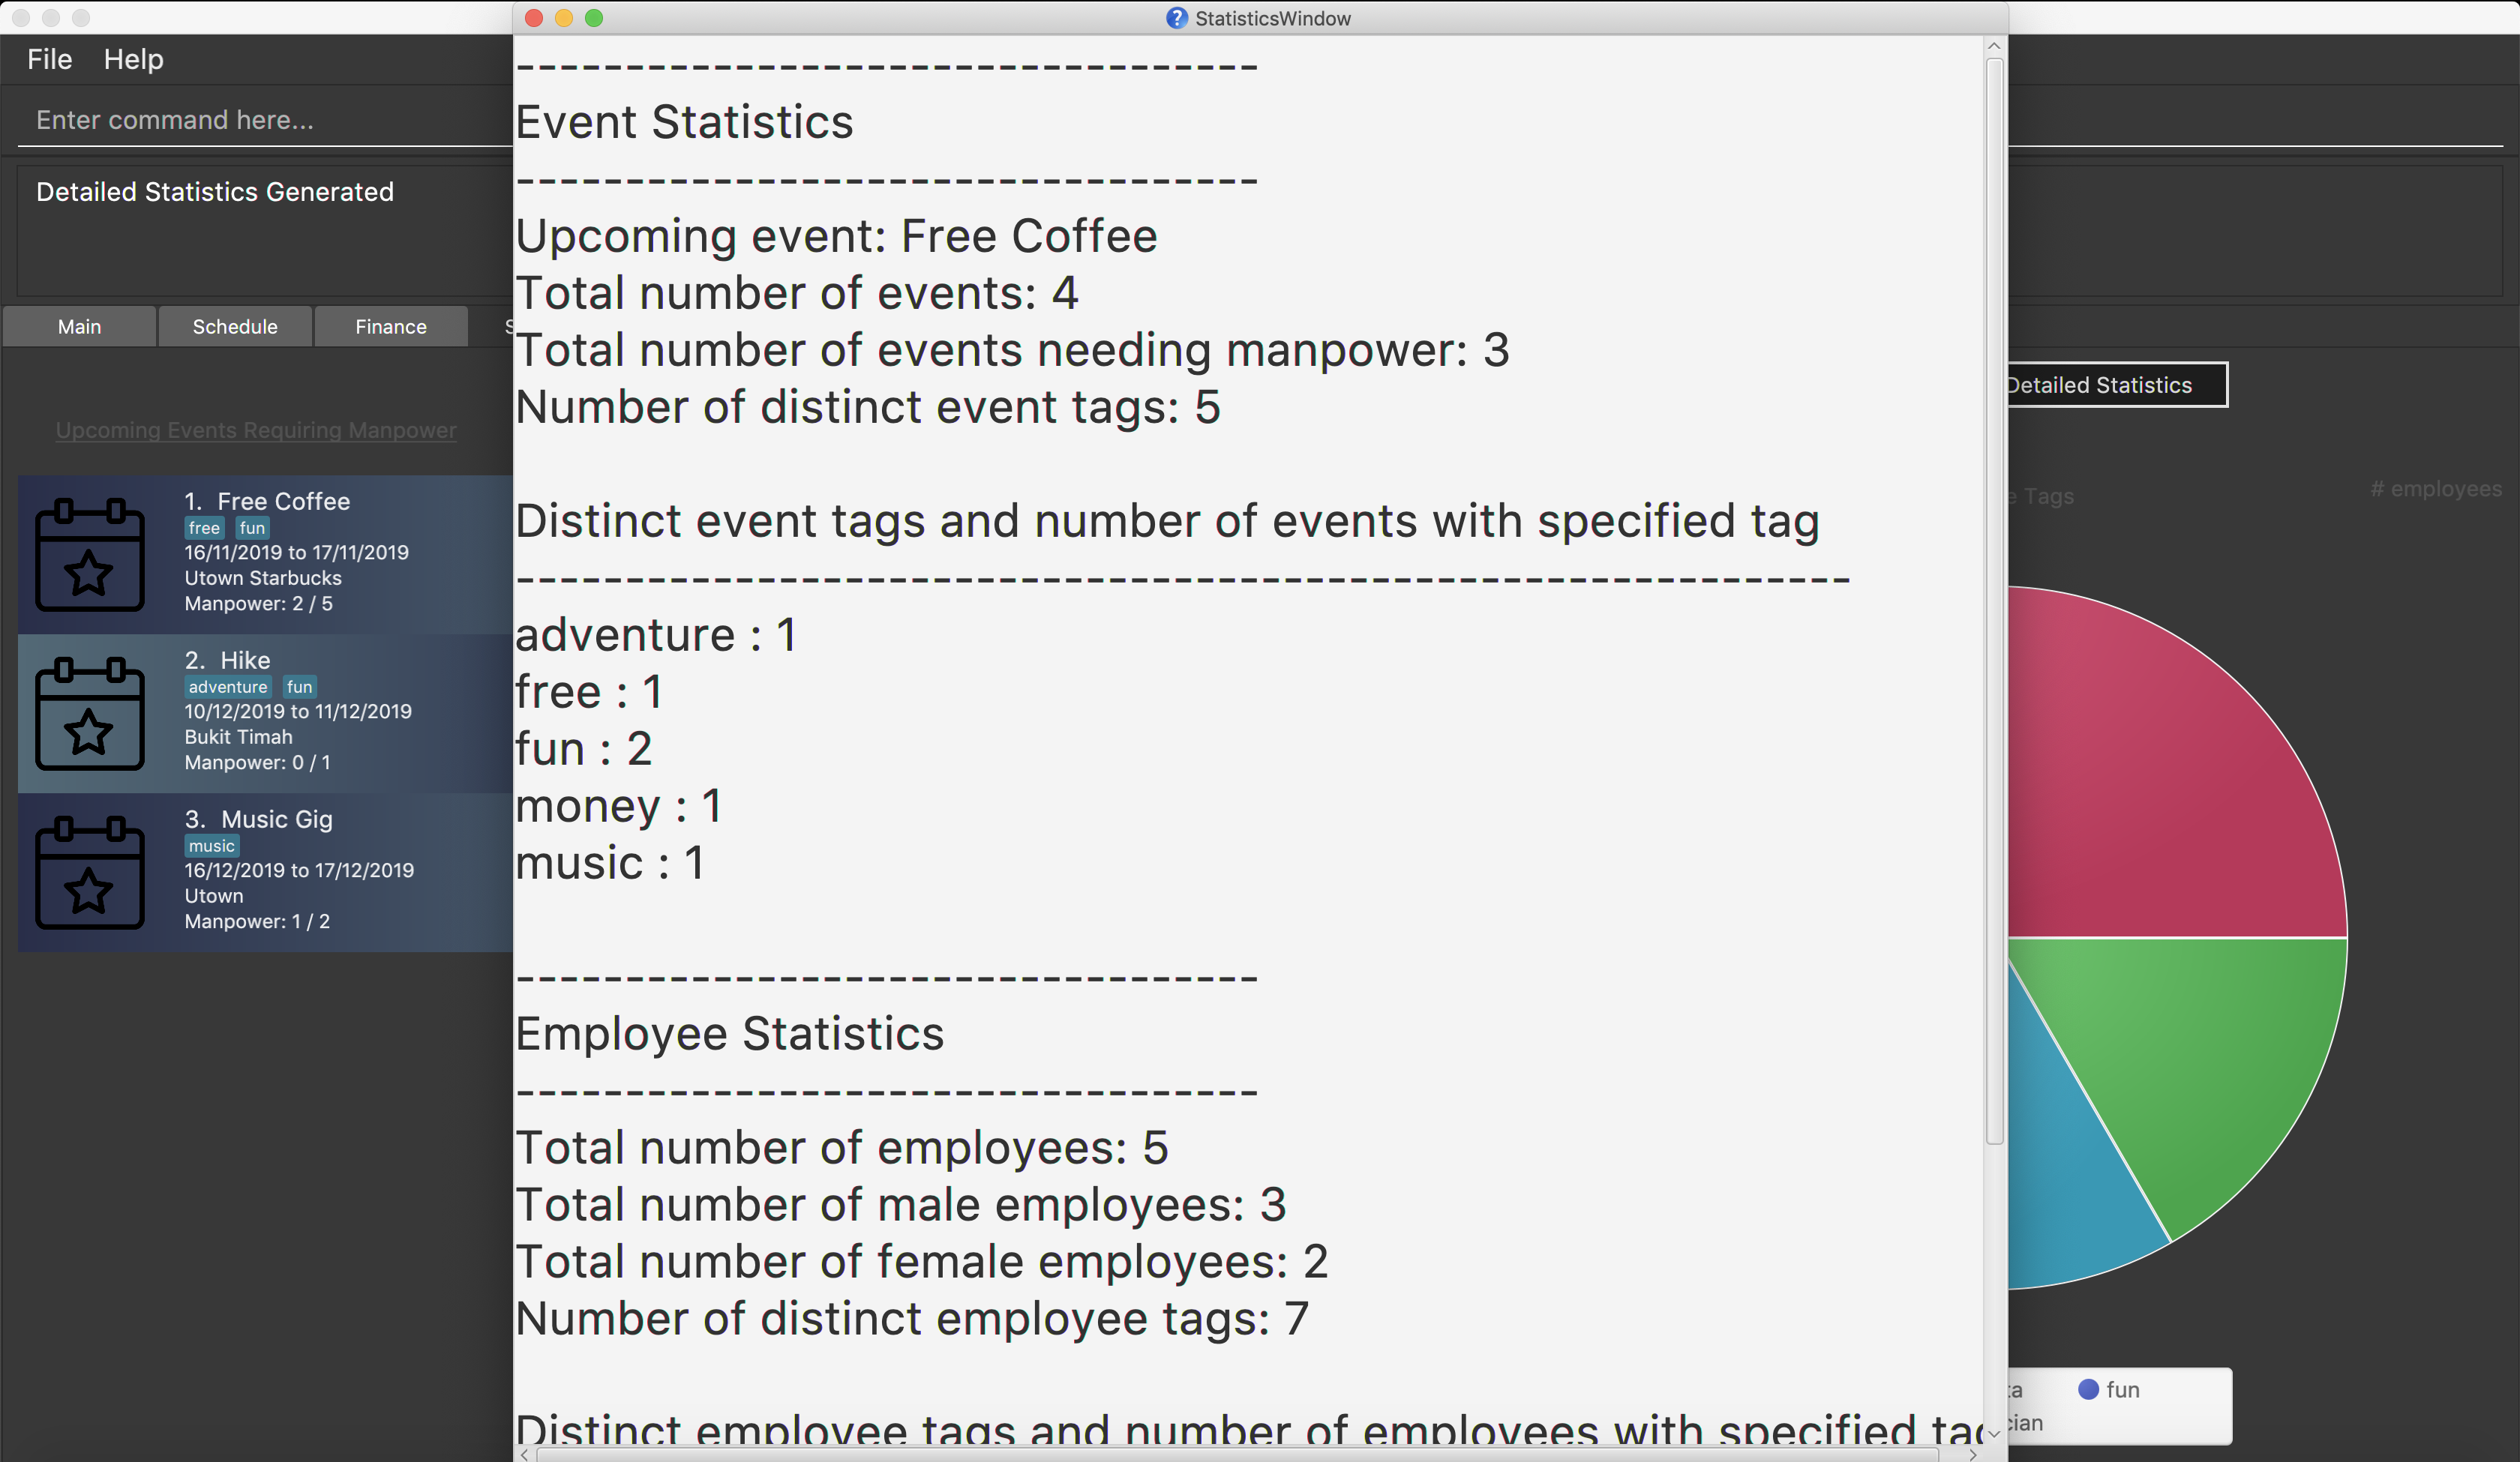
Either type generate_stats_detail into the command box or navigate to the statistics tab and click the 'Generate Detailed Statistics' button.
Step 2. A pop-up window with the header "StatisticsWindow" will appear displaying statistics for both employees and events.
3.8. Miscellaneous
3.8.1. Clearing all entries : clear_em and clear_ev
Clears all entries from the employee book/event book.
Format: clear_em and clear_ev
3.8.2. Saving the data
AddMin+ data are saved in the hard disk automatically after any command that changes the data.
There is no need to save manually.
4. FAQ
Q: How do I transfer my data to another Computer?
A: Install the app in the other computer and overwrite the empty data file it creates with the file that contains the data of your previous Address Book folder.
5. Upcoming Features in v2.0
-
Allows user to set profile picture of employee using online links
-
In v2.0, you can use links to profile pictures on your favourite social media as
Avatarfor your contacts
-
-
Allows user to import personal information of employees from Microsoft Office Apps
-
In v2.0, you can import employee information from other applications, so manual input for first-time users is no longer necessary.
-
-
Generate Employee Payslip
-
Generate Event Contract
-
Generates a contract that can be handed to the company’s client. The contract will contains details of the event such as the location, budget, and date.
-
-
Allow importing and exporting of Event Schedule
-
Allows users to import and export all the users event schedule from AddMin+ to their google calendar.
-
6. Command Summary
COMMAND |
FORMAT |
EXAMPLE |
Add Employee |
|
|
Add Event |
|
|
Edit Employee |
|
|
Edit Event |
|
|
Find Employee/Event |
|
|
Delete Employee/Event |
|
|
Fetch Employee/Event |
|
|
List Employee/Event/Both |
|
|
Allocate a specified number of Employees with Filter requirements to an Event |
|
|
Allocate one specified Employee to an Event |
|
|
De-allocate one/all Employees from an Event |
|
|
Set DateTime to an Event |
|
|
Delete DateTime from an Event |
|
|
Clear DateTime from an Event |
|
|
Display Schedule for specific date |
|
|
Display Schedule for specific month |
|
|
Display Schedule for between 2 dates |
|
|
Generate Entire Schedule |
|
|
Generate Statistics [coming in v2.0] |
|
|
Generate Payment To Employee |
|
|
Undo Payment To Employee |
|
|
Navigate between Tabs |
|
|
Clear EmployeeBook/EventBook |
|
|
Help |
|
|
Exit |
|
|